Each stage of hardware manicure has its own subtleties, knowledge of which, combined with experience, turns a novice master into a professional.
The correct choice of cutter, proper placement of the nozzle, mastery of several techniques that can be selected for the client’s skin type - all this can be mastered step by step.
Let's look at performing a hardware manicure step by step: what the master should pay attention to at each stage in order to get an impeccable result.
What is hardware manicure
Hardware manicure is one of the methods of nail care that is rapidly gaining popularity, and more and more women prefer it. It was invented not so long ago in Germany by beauty salon masters. It is based on a method of caring for nail plates without the use of cutting tools (or with partial use).
Principle of operation
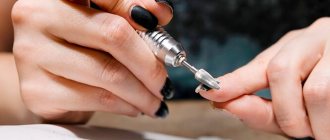
The essence of this method is to remove the cuticle with a milling cutter. Afterwards, using various types of attachments, the nail plate is thoroughly polished, and the skin along the contour of the nail is removed. Hardware manicure is classified as a class of gentle nail procedures, which are recommended to be done no more than once every 2 weeks.
It is strictly forbidden to use the device on wet skin, since the cutter operating at high speed will begin to tear the skin steamed in hot water instead of cleaning it.
A technician with little experience may not be able to control the pressure and, pressing the attachment too hard, will scratch the nail and leave grooves on the surface. The same problem applies to beginners who decide to purchase a similar device for home nail treatment. In both cases, you should be extremely careful and calmly gain experience.
Hardware manicure is a good choice if the cuticle grows too quickly or the nail plate becomes layered with unevenness and ribbing.
It is also recommended to perform it on extended nails for gentle care.
The impact of such a procedure is hardly noticeable on neglected nails and is not at all related to the quality of the attachments. In such cases, manicurists use combined solutions, first treating the nail plates with a machine, and then completing the process with cutting devices.
Requirements for the treated surface
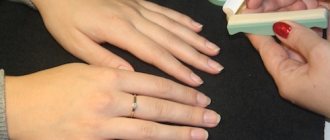
For owners or future owners of the device, you need to know what the surface of the nail should be during treatment.
The hardware procedure should be carried out exclusively on dry nails. Even very well wiped nails should no longer be treated with a tool after washing your hands, as they absorb moisture very quickly. When working due to moisture, such nails will begin to heat up, which will cause, at best, unpleasant sensations or lead to damage to the nail.
If the device has a system for manually adjusting the number of revolutions, a beginner should not set the speed too high or too low. In the first case, you can accidentally damage the nail, in the second, it can lead to heating of the plate, even if it is perfectly dry. An acceptable option would be no more than 10,000 rpm.
Benefits of hardware manicure
Once you pay a large sum and purchase the device, you can forget about expensive hand care products and tools forever. Working with nails becomes safe, eliminates the risk of injury, makes the procedure painless and allows you to simultaneously work with both the cuticle and the nail. Also, with timely sterilization of attachments, the chance of infection after treatment disappears.
Hardware manicure (training for beginners helps to learn the basics of safe nail adjustments) provides the opportunity to process even very fragile and thin nail plates without risk and takes less time than working with hand tools, helping to quickly change the length and shape of the nail.
All these advantages, despite the presence of a list of some contraindications, allow you to treat problem nails with this method.
Disadvantages of hardware manicure
The hardware method has its drawbacks, such as mandatory training, even if a beginner is going to carry out the procedures at home. After all, for efficient and trouble-free work, you need to choose the right nozzle and its speed for processing each individual area.
The lack of professionalism of the master can turn an initially useful procedure into a painful horror, especially when it comes to treating nails for a person with a thin nail plate. It is best for such people to contact professionals with extensive experience in this field.
When to change and how to sterilize manicure cutters
The cutters undergo the same sterilization treatment as other tools in the master’s kit. After use, disposable attachments are disposed of, and reusable ones are treated with a disinfectant solution, washed with a brush under running water and sterilized under temperature or pressure. Recommendations on exposure time to the sterilizing medium are best found in the instructions. Read more about sterilization and disinfection of instruments.
The service life of cutters depends on the intensity of work, the quality of the material used in production, as well as the professionalism of the craftsman. Diamond - 3 years, carbide - 5 years, ceramic - 1-3 months, silicone - more than a year.
When disinfecting, pre-sterilization cleaning (PSC) and sterilizing hardware attachments, you must refer to the “Rotary instruments” mode in the instructions.
The first feature is that for disinfection and PSO you will need a solution with an alkaline reaction and the presence of active detergent components.
In addition to removing viruses, fungi and bacteria, the disinfection solution must soak, loosen, and dissolve the remains of biological material on rotary instruments. Why is this necessary?
Milling cutters have a porous structure, into which dirt and skin become clogged, and they cannot simply be wiped and washed like flat ones. With further processing at high temperatures, the remaining skin and blood may be baked. Complete sterilization does not occur, and the nozzle quickly fails. Therefore, disinfection with a cleaning effect is needed.
The following solutions are suitable for this:
- Aktibor . Expensive, ready to use;
- Mistral . Concentrate, dear. Takes care of the instrument, does not cause corrosion, and does not dull the instrument in comparison with cheap analogues;
- Multidez . Concentrate, affordable price.
After disinfection, a mandatory step is pre-sterilization cleaning. PSO consists of three sub-stages:
- Cleaning occurs immediately in a disinfectant solution or simply in water, using a brush with nylon bristles. Soaked remains of biomaterial are easier to remove.
- Rinsing - can be done under running water, according to the instructions, to remove any remaining solution.
- Drying - Prevents corrosion and extends the life of the attachments. It can be carried out in natural conditions, on a napkin, or under a source of warm air.
Sterilization is performed in an autoclave or dry-heat oven. An autoclave does not damage instruments, but it is expensive. Therefore, it is suitable for large salons. Dry fire can be selected at an affordable price and used by craftsmen and at home.
- Dry heat sterilizes in the “180°C, 60 minutes” mode. A certified dry heater has a vacuum chamber. All rotary tools, even silicone carbide grinders, can withstand temperatures of 180°C. If there is no temperature control in the chamber and poor convection - air distribution - then the nozzles can deteriorate. This can be determined by burning Kraft bags. The dry-heat treatment cycle is 1-1.5 hours.
- Autoclave – processing at a lower temperature, but under pressure. Full cycle time is 30 minutes. The autoclave does not dull the instrument and the occurrence of corrosion is minimal.
Hardware attachments are sterilized on stands so that vibration does not cause friction against each other and abrasion of working surfaces. The second option is sterilization in craft bags, in sets.
In the process of mastering the technique of hardware manicure, try working with different cutters. The basic set should be in two versions - with blue and red notches. Observe the speed limit of the device depending on the diameter of the nozzle. What cutters does your ideal set consist of? - write in the comments, don’t be lazy