The female sex always strives to look great. Well-groomed hands with a beautiful manicure always make them stand out from other people. But you need to spend your personal time on all this monthly, or even several times a month. The idea of gluing stickers on nails made the fate of women and girls easier. This procedure can also be carried out at home; there is no need to go to a salon and wait for hand-painting to be applied.
Benefits of nail stickers
Nail stickers have their advantages over other types of design creation:
- Do not harm the nail surface. Their use is permissible for long-term wearing.
- The plates are not burdened with a large amount of decor.
- Availability.
- You can create a beautiful manicure as often as your mood requires, without spending a lot of time.
- Saving money and time.
- Easy to apply.
- An alternative to hand-painting (ready-made stickers of various shapes with rhinestones and sparkles are available for sale).
- When applied and fixed correctly, the result lasts for 2 weeks.
- Easy to remove with regular nail polish remover (transfer nail stickers).
- A design can be selected for any occasion.
3D slider design
Slider design is not always the simplest sticker; 3D sliders are gaining more and more popularity in the nail industry. They differ from ordinary ones in their structure - the sliders are voluminous and convex, which creates an interesting effect.
The 3D stickers are glued to a clear base so they can be easily tried on before gluing to visualize the final result.
Otherwise, their application is exactly the same as working with a slider that has an adhesive base. You need to cut out the design of interest, remove it from the base, carefully, using tweezers, apply it to the manicure and smooth it out. It is impossible to complete the entire process with a topcoat, because then the desired volumetric effect will be lost.
To remove a 3D slider yourself, you need to know certain nuances. When applied over regular nail polish, nail polish remover is used to remove it, but it will only remove the design.
To get rid of the adhesive base, you need to use an orange stick: it does not scratch the plate, but at the same time effectively removes glue residue.
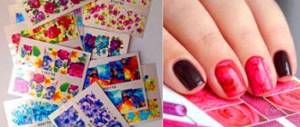
Where to buy nail stickers
You can choose the right ones and buy nail stickers without leaving your home on the Internet. There are many websites that will offer an assortment of products, provide advice, and also use the attached video to clearly demonstrate how to create an image yourself. However, stickers are cheap and therefore the delivery cost may exceed the cost of the product. If there are sites where delivery is free, they are preferred.
The material can also be purchased in special stores or salons. In the store you can clearly see the desired look and choose the shade of varnish.
Step-by-step instruction
Despite the simplicity of the procedure, it is important to follow the step-by-step instructions for its implementation, since poor quality work can lead to premature separation of the stickers from the surface.
Preparatory stage
Any manicure always begins with proper treatment of the nail plate, preparing it for applying a decorative coating. It is especially important to prepare before applying decals, as applying them to an uneven surface can cause premature deterioration of the quality of the decals.
Preparation takes up to half an hour:
- Use a file to adjust the shape of the free edge.
- Apply remover to the cuticle area (at home you can replace it with hydrogen peroxide).
- Using an orange stick or a metal pusher, push away the keratinized epidermis and lift it.
- Cut the cuticle with cuticle cutters.
- Use a buff to polish the surface.
- Remove excess sawdust from the coating.
- Apply a dehydrator to degrease it.
This concludes the main part of the preparation, and after cleaning the workplace, the girl can begin applying gel or other decorative coating.
Main stage
First you need to apply a base layer, dry it in a lamp, and then a main layer of colored gel polish, which will serve as a substrate for the stickers.
If you plan to stick the slider over the entire surface of the plate without leaving noticeable areas of decorative coating, the base layer should be made white or flesh-pink so that it does not interrupt the sticker pattern.
After drying one or two layers of colored pigment, you can attach the decor by first removing the sticky layer from the gel; the method of fixing it depends on its type:
- When using the self-adhesive option, simply remove the paper from the base of the fragment, carefully securing it to the plate;
- Water-based stickers must first be wetted using a dry, damp cloth. After 30 seconds they can be used;
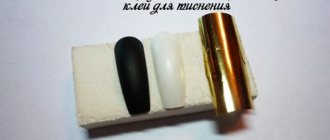
- To fix the thermal decor, you will have to use a hot stream of air from a hairdryer. Be careful not to burn your fingers while heating the piece.
Be careful when securing pieces for decoration, as you will only have one chance to secure them absolutely straight.
To make it easier to work with elements, you can use tweezers to carefully pick up decorative elements and transfer them to the plate. This will reduce the risk of accidentally damaging them with your fingers or nails.
Final stage
After finally attaching the decal to the gel, give it 20-30 seconds for the adhesive to cure and then use a topcoat to seal the work to prevent the design from coming off prematurely.
Keep in mind that when applying the last layer, be sure to seal the end of the nail, preventing damage to the decorative coating and its gradual chipping.
If the thickness of the finished nail is not too large, you can make two final layers - first apply the base, dry it in a lamp for one and a half minutes, and then fix everything with a top coat. This will increase the adhesion of the decor to the gel polish, which will increase the long-term preservation of the work in its original condition to a month or more.
Which fingers to stick stickers on (design)
When choosing a design for a manicure, pay attention to the length of the nail plates. Design selection principles:
- Don't sculpt too much.
- If the nail plane is long, then you can decorate it at the base on all fingers.
- If your nails are short, then you shouldn’t pile them up; it’s enough to apply the design on several fingers, for example, the middle and ring fingers, or on one ring finger.
- If you plan to use rhinestones and sparkles, you shouldn’t overdo it, as it will be cluttered and the feeling of superiority will disappear. It is enough to decorate one ring finger.
General information about sliders
In English, “slider” is translated as “slide.” Before applying the finished design to the nail, the picture should be moved from the base. If you don’t know how to use slider design for nails, consult with specialists and collect all the information you need. To create a nail design using stickers, use one of the slider application types.
You can apply stickers to the surface of your nails as follows:
- for the entire nail. The pictures are fixed thanks to the tight fit of the base to the base coat and with the help of a transparent varnish on top of the slider. For the procedure, you can use nail polish of different colors. At the end of the manicure in this way, the nail will be completely covered with a decorative image;
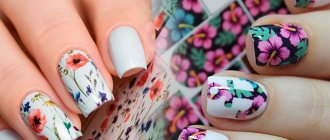
- on a transparent basis. This design can only be used with a light or white shade of varnish. Stickers on a transparent basis make it possible to create an original composition of any theme, thanks to which the beauty of such a manicure will be clearly visible to others;
- with a dense pattern. To create this type of manicure, your nails should be well prepared for the procedure. This design is often used to create a French manicure or do-it-yourself painting. To make the stickers look harmonious on your nails, it is best to apply them over light and bright varnishes. You can additionally decorate your nails with glitter or rhinestones.
The described types of nail plate designs can be done independently or in a beauty salon.
Possible problems and their solutions
When performing any work, unpleasant moments may arise that you immediately want to eliminate, but this is not always possible. Every moment has its own reason and solution.
Reasons for peeling sliders
Failure to comply with the technological process can lead to poor fixation of the material and its subsequent peeling.
Reasons for peeling:
- The varnish layer on which the slider was applied was not dried properly.
- Weak fixation of the slider. This reason will arise if you do not leave space (0.5 mm) near the cuticle and lateral skin ridges for sealing the film.
- Poor smoothing, unevenness and bubbles. When smoothing, do not touch the film with your fingers; this is done with a napkin, an orange stick, a silicone brush, etc.
- After applying the water slider, be sure to dry the surface from excess water. To do this, use napkins or discs to soak the water, and a lamp to dry completely.
- No protective layer applied or poor application. In some cases it is better to apply twice and wait time for drying.
- Low quality of materials used.
- Contact with water occurred a short time after the attachment procedure.
For such reasons, peeling can occur on the third day after completion of work, in some cases earlier.
The drawing turned out to be insufficiently bright or almost invisible
The dullness of the design and its illegible outline are due to incorrect application of the color of the first layer of varnish. Most of the material has a transparent base, and it must be pasted in a tone that matches the image. If the picture has dark outlines, then the varnish layer should be light and vice versa. But in most cases it is better to apply a colorless or light layer.
Same with lace. If it is black or dark in color, then the base should be light. If the lace is white, then the first layer is covered with dark varnish.
Chips in the finishing coat
If the surface constantly clings and turns out to be uneven, then the reasons may be the following:
- The protective layer was not completely dried before use.
- The protective layer has a thickened shape.
- Poorly smoothed film.
- Material tearing and ends coming apart.
- Poor quality cutting of material before use.
- Careless handling while doing household chores.
Pattern peels off with top coat
Peeling of the material together with the protective coating can provoke prolonged contact with water: washing dishes, furniture, laundry, etc. When doing housework, wear gloves. This will protect the manicure from mechanical damage and will not reduce its service life.
The sticker does not completely adhere to the nail plate
Bloating or poor fit of the pattern can occur for the following reasons:
- The material was not applied carefully, proper smoothing was not carried out, and air accumulated.
- Product defect. On an adhesive base, incomplete distribution of the adhesive. This happens on low-quality films. If poor-quality application of the adhesive base is noticeable before gluing, then it is necessary to additionally apply a layer of nail glue and continue to use gluing according to the instructions for it.
- Failure to comply with gluing technology.
We recommend watching the video:
Peculiarities
Despite the fact that from the outside, the method of fixing the decor seems quite simple, before applying the sticker to the gel polish, you should take into account some of the features of this method of decorating a manicure or pedicure.
There are several options for stickers that can be used for manicure:
- Thermal. To secure them, heat treatment is required to warm up the adhesive base of the material. When hardened, it is tightly fixed to the surface.
- Water based. To secure them, the base of the fragment needs contact with moisture; after 20 seconds, use it for a manicure.
- Self-adhesive. The most convenient decor option, which is used most often now. The drawings are placed on thin paper - a backing that you simply need to remove and fix the details.
Despite the fact that the latter option is more convenient to use, it does not always have the highest long-term preservation; craftsmen often recommend using water or thermal decor.
The very method of creating an unusual design has many positive aspects:
- Ease of use. Even a beginner can perform the procedure; no special skills are required;
- Low price. To apply gel on all nails, you will need 3-5 rubles worth of material;
- Uniqueness. A wide range of designs that can be used to create unusual work;
- Versatility. They can be fixed on gel, acrylic or regular varnish;
- Rapidity. To secure one slider to the nail bed, the girl spends about a minute.
One of the common myths is that to create an unusual design on gel polish, you need to have a honed artistic skill, thanks to which you can draw unusual patterns.
Nowadays, any skill of a specialist is being replaced by ready-made patterns on self-adhesive paper, which are independently attached to the nails.
How long do stickers last?
How long the sticker will last depends on the correct execution of all stages of the manicure, the quality of the materials, and also on how correctly the woman handles the applied coating (primarily this applies to household work during which water and chemicals are used).
If the sticker does not last long, this may be because it was applied to a poorly dried layer of gel polish, or the design itself was poorly dried before being applied to the nail. Another reason could be that the sticker was of poor quality or too thick.
If the topcoat chips, this means that it was applied to a poorly dried sticker, when applying the design there was no room left for the top to adhere to the gel polish, or the sealing of the nails was done poorly. The topcoat may come off prematurely if a low-quality topcoat was applied or one that is not suitable for a design with stickers. Therefore, before purchasing, you need to clarify this point in the instructions.
Why do sliders peel off?
There are times when pictures begin to peel off from the nail plates. Most often, this phenomenon occurs due to the use of low-quality materials or violation of manicure technology.
A manicure deteriorates very quickly if the slider is made from low-quality film or the fixing varnish does not completely cover the picture.
If an error was made during the procedure, the slider will also begin to peel off very quickly. Most often, the mistake lies in insufficient drying of the base or the design itself. It is important to always fix your work with a transparent fixative varnish.
To create a beautiful manicure using sliders, before starting to create an image, consult with a manicurist, study the information, watch videos on the Internet.
Having learned what slider pictures for nail plates are, their types of application and application, you can create any manicure according to your imagination and your wishes. No one will have a nail design like yours. Since the work will be done according to your own design.