Gel polish stickers should be applied to an undried base or sticky coating layer. The water ones are pre-conditioned on a damp surface to separate the substrate.
Self-adhesive ones are simply removed from the base with tweezers and placed on a fat-free, buffered plate. For strong fixation, the stickers are coated with a primer on top. You should not do this only with 3D decor, it will lose its relief. The sticker must be smoothed onto the nail. Only after this is it covered with topcoat and dried.
How to glue stickers on gel polish: preparatory process
Before gluing stickers onto gel polish, you need to prepare your nails:
- Shape them with a file.
- Remove the pterygium, trim the keratinized part of the cuticle, otherwise the rags of skin will prevent the material from holding on to the plate.
- Polish the surface of the nails with a buff for better adhesion to the base.
- Wipe them with a degreaser, simultaneously removing the smallest particles of skin and sawdust.
- Apply the base coat in 2 layers and dry it the same number of times.
This process is the same regardless of the type of stickers. You also need to prepare a set of tools to work with them:
- tweezers,
- manicure scissors or nippers,
- orange stick,
- cotton pad,
- water,
- spatula with silicone tip.
We recommend reading the article on how to apply rubbing on gel polish. From it you will learn about the types of rubbing, the advantages of the technique, instructions for application, the technique of applying mirror rubbing, interesting nail designs with gel polish and rubbing. And here is more information about the spectacular nail design with foil on gel polish.
How to transfer self-adhesive stickers with a backing onto your nails
Transferring stickers with a backing and sticky base to nails should follow the required steps:
- Apply a color coating to the base in 2 layers, dry both times.
- The picture is removed from the backing, which should come off easily.
- Then it is applied to the nail, straightened, and fixed.
- All that remains is to cover the nails, not forgetting the end sides, with two layers of top (or first the base and then the finish), polymerize each one in turn. 1. 2. 3. 4.
This is how they work with expensive stickers and material from Aliexpress. But if the decor doesn’t stick well, after fixing it, you should coat it with a thin layer of base, dry it, and only then apply the top coat. For the same purpose, a primer is used as an intermediate. Take very little liquid and barely touch the nail with a brush moistened with it. Otherwise, the decor may get wet.
How to make stickers on gel polish with your own hands
You can make stickers for gel polish yourself from available materials; using them is also quite simple:
- In a glass of water, you need to place one drop at a time of ordinary varnishes of different shades so that multi-colored stains are obtained on the surface of the liquid.
- Using a thin brush, mix them until the desired image appears.
- A film of multi-colored varnishes should be allowed to dry directly in water.
- Then it is removed with tweezers and carefully transferred to polyethylene.
- Here it should also dry out, but not to the point of a crust.
- Sliders are cut out of multi-colored film according to the size of the nails.
- Then they are used as regular store stickers.
The process can be simplified if there is stamping:
- The design that comes with it is coated with regular varnish 2-3 times and each time it is erased with a spatula.
- Then a silicone stamp is pressed onto this area.
- You need to wait some time for the varnish with the imprinted pattern to dry.
- Then a top coat for conventional varnishes is applied to it, and it is also allowed to dry.
- The resulting slider is removed from the stamp with tweezers and then used as finished stickers.
Is it possible to make stickers yourself?
It is not at all necessary to purchase stickers intended for manicure. You can make them yourself. The only drawback is the simplicity of the image.
Using water and varnishes of several colors, you can create an original 3D design.
To do this, you need to drop a few drops of each varnish into water, then immerse the nail in the resulting composition, after removing the excess varnish, remove it with a cotton swab.
Wave stencils deserve special attention. They are cut out of paper with serrated scissors and coated with mother-of-pearl varnish.
The plate is covered with a base layer, then a self-made sticker is fixed on it. It is covered with a fixative on top, otherwise it will last for a short time.
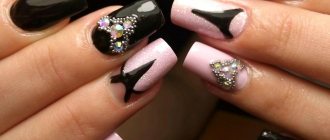
How to stick sliders on your nails using glue
To stick sliders on nails using a special fixing agent, the following procedure is necessary:
- Apply colored gel polish to the base and dry.
- Cover parts of the plate or its entire surface with special glue.
- Leave for a few seconds until the white fixative becomes transparent.
- Apply stickers to the nail and smooth it out.
- Use topcoat and polymerization.
How to stick sliders on your nails using glue
1 of 4
1.
2.
3.
4.
To fix the decor more firmly, after the 1st stage you can treat the surfaces with a polishing buffer and then degrease. But if the sticker is small and does not cover the entire nail, this is not necessary.
Summing up
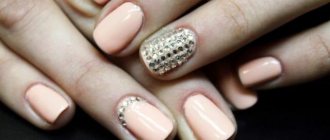
To create a unique manicure design with gel polish, it is recommended to decorate the nail plates with special stickers. In the assortment you can purchase water stickers or photographic film. The first option is suitable for gluing under gel polish, the second - on a gel base.
In both cases, masters do not advise going overboard with the number of drawings. To emphasize the originality of the manicure, the pattern should decorate no more than 2-3 nail plates. Otherwise, your nails will look defiant.
How to use nail transfer stickers
There are two ways to use transfer stickers for nails, the first is as follows:
- The selected shade of gel polish is applied to the base and dried.
- Next, use a special glue, which is applied in a thin layer and evenly.
- Then you need to wait a few seconds for it to become transparent.
- The wrong side of the sticker is pressed against the nail and smoothed.
- Then it is sharply removed from the surface, and the design is imprinted on the gel polish.
- All that remains is to coat the nails with the finish and dry for the required time.
The second method is similar to the first; almost all actions are repeated. But it is not the glue that acts as a fixative, but the sticky layer of the base. It is applied to polymerized gel polish, dried, but the surface is not wiped with a cleaner. Thanks to the sticky layer, the decal is clearly imprinted on the nail. It is secured on top with a finishing agent.
Fashionable design with flash tattoo
Using the same principle of transfer stickers, you can use flash tattoos on nails. They have a beautiful metallic shine and have been at the peak of popularity for several seasons now. The main thing is not to forget to cover the design with a top coat.
© naileditbysim
Do you like to use stickers in manicure? If yes, then share your photos on Instagram and tag our account @makeupru_official.
Gel polish stickers step by step: process and design ideas
The step-by-step procedure for fixing the sticker on gel polish is as follows:
- They prepare the nails, that is, they give them a shape, paint them with varnish, apply a base that is not dried, or leave a sticky layer of gel.
- Prepare the decor: cut it out if necessary, moisten the watery sticker, separate it from the backing or remove the self-adhesive one from the base without using moisture.
- Attach the sticker to the plate and smooth it out from the middle to the edges.
- If you fixed the decor on a wet base, place your hand in the lamp, otherwise skip this step.
- Use a file to remove excess sticker from the end of the nails.
- Apply the finishing layer and dry in a lamp.
There are some nuances when using 3D stickers, stripes and lace.
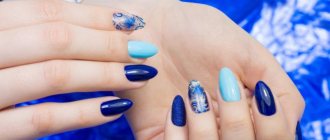
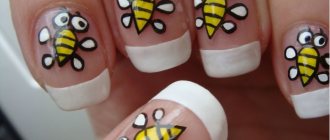
3D stickers
Gluing 3D stickers onto gel polish is a little more difficult than flat ones, due to their volume. After all, this is not just a picture; it turns out that some elements of the sticker rise above the surface of the nail. And you need to attach it securely. Otherwise, with any awkward movement, the decor will shift or fall off.
The 3D fixing process should go like this:
- Nails painted with gel polish are covered with a top coat with a sticky layer, dried and not removed.
- The required fragment of the sticker is cut out almost to the size of the nail plate, but deviating from the design by 1.5-2 mm.
- Place it with the wrong side on a damp cotton pad for a few seconds.
- The sticker backing is moved to the side and removed.
- The three-dimensional image itself is placed on the nail plate, helping yourself with tweezers.
- The decor needs to be leveled, for which a silicone applicator is used.
- Apply a small amount of topcoat on top of the nail.
- From a three-dimensional image, use a thin brush to move it to the edges of the sticker.
- The layer must be dried.
- For greater reliability, you can once again coat the edges of the sticker with topcoat, without touching the bulk part, and polymerize it.
Instead of a top coat with a sticky layer, at stage 1 you can use a base product, but do not dry it. You should place your hand in the lamp when the sticker is already pasted on the nail. Do not use a primer with voluminous stickers, as it will dissolve the film and the 3D effect will disappear. The final coating is not too thick. Otherwise, the relief of the pattern underneath will disappear.
3D stickers are usually made to decorate part of the nail. Therefore, when using them, there is room for imagination: you can glue them in the center, move them closer to the side roller, fix 2 patterns on 1 plate, etc.
Watch the video on how to attach 3D sliders:
Lace stickers
Lace stickers are usually of the water type, but when using them it is important to consider several nuances:
- the base of the decor is transparent, so it looks better not on colored gel polish, but on a base product without a tint or top coat, as well as a white or black coating;
- As a rule, lace is made on the entire plate, which means that it is necessary to carefully check the size of the sticker and the nail;
- for the same reason, it is equally important to properly straighten the film around the sinuses and cuticle.
Otherwise, the process is no different from what needs to be done with other types of decor.
Slider design “broken glass”
The “broken glass” slider design is made using a special film that does not have an adhesive layer or backing. It can be individual fragments or a whole sheet, which will have to be cut into pieces of the desired size.
The design technique is as follows:
- First, the decor is prepared, that is, the film is cut into fragments of different sizes.
- A thin layer of top or base product is applied to nails painted with gel polish and dried.
- While the top covering is wet, pieces of film are placed on it so that there is a distance between them.
- The hand should be placed in a drying lamp.
- Then another layer of topcoat is applied and polymerized.
Use a thin brush to move pieces of film onto the nail. And to correct an unsuccessfully settled fragment, an orange stick will be useful.
The film can be taken in one color or used in several shades. “Broken glass” is performed in the same colors as the manicure itself, or they use decorative shades that contrast with the gel polish. You can apply it completely to the nail, form a pattern or geometric shape, or select one part of the plate of your choice.
For the whole nail
Using decor on the entire nail has its own characteristics:
- The sticker should immediately fit the size of the plate, not counting the free edge. After all, only from the end can you remove the excess. It will not be possible to do this from the cuticle or at the side rollers when the slider is glued, as you can damage the coating.
- Therefore, after it is cut out, any type of sticker should be applied to the nail for fitting. And even if it is slightly narrower than the plate, this is not a problem, since sliders are always made on a transparent basis.
- After applying the sticker to the nail, you need to smooth it out so that there are no wrinkles. To do this, work with a spatula or finger from the middle to the edges. You must act carefully, otherwise the thin film will tear.
- The slider is placed on a sticky layer of top or undried base. When it is straightened on the nail, you need to send your hand into the lamp to fix the decor.
- Only after this can you remove excess film from the free edge. This is done with a file, placing its plane at an angle of 90 degrees to the end.
- All that remains is to coat the nail with the finish and polymerize it. It is also necessary to seal the end of the plate with the product, and not just the surface of the plate. This will ensure even more reliable fixation of the decor.
Types of slider designs
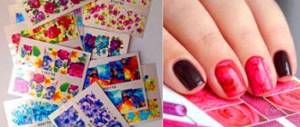
Sliders are divided, firstly, by the type of base. Drawings can be made:
- on a film that is removed from the paper backing with water;
- on an adhesive base that can be removed with tweezers.
Secondly, these nail design elements differ in the types of patterns:
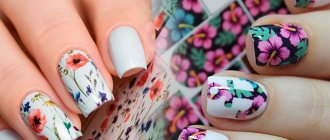
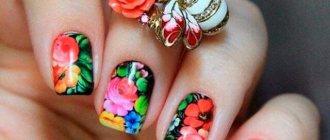
- dense images to cover the entire nail plate. These can be any patterns: animalistic, floral, etc. Due to the complete overlap of the nail, they can be applied to a substrate of any color;
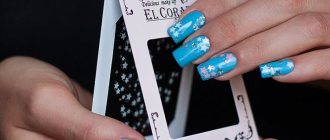
- images on a transparent basis. Various thematic designs (flowers, lace, twigs, inscriptions, etc.) are transferred to a substrate of a certain color and partially decorate the nail plate. Can be used in French manicure;
- 3D sliders: volumetric prints that decorate part of the nail;
- metallic sliders: thin strips are usually cut out of them for nail decoration. Very popular in French manicure.
Variety of options.