What a beast sand nail polish is
A fashionable novelty - textured varnish, immediately after its appearance on the market, attracted close attention and quickly became popular. Thousands of fashionistas are already doing a “sugar manicure”.
Nails coated with sand varnish appear both externally and to the touch to be strewn with grains of sand of different sizes . The abrasive particles that make up the varnish, after it dries, lead to the appearance of an interesting pattern reminiscent of the sands of hot deserts. Sand varnish is quite dense and thick.
At first glance, the varnish in the bottle seems ordinary. To achieve a visible effect, shake the varnish well before applying so that the “sugar” particles mix with the rest of the mass and are evenly distributed on the nails.
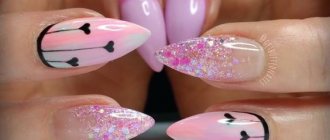
The sand coating looks unusual and original. A shimmering, magical manicure will be achieved by using a textured varnish with reflective particles and sparkles of various sizes. If both components are present, the mesmerizing shine of your nails will delight both you and those around you. Pay attention to the photos that demonstrate the beauty of sand-effect nail polish.
Advice: do not use too coat - a top, finishing coating that smoothes out roughness. It will turn an original manicure into a regular one. If the uneven spots are too large, cover your nails with a very thin layer of clear sealer.
Pros and cons of sand varnish
Advantages:
- Original;
- Beautiful;
- Protects nails from harmful external influences;
- Dries quickly;
- It lasts quite a long time (if the varnish is of high quality and the layer is of the required thickness).
Flaws:
- If you apply too much varnish, the coating becomes brittle ( chips appear );
- The shade that appears on the nails after drying is sometimes different from the color of the polish in the bottle. What to do? Be sure to apply a base coat to even out the tone;
- Removing nail polish is a little more difficult than regular nail polish.
They say that bronzing dark hair is a waste of time, nothing like that! Your hair will look like royalty!
By the way, you can read about booking in this article!
Velvet manicure options
Velvet sand often serves as an element of decoration for the overall design. In this case, you can use different shades, creating a truly original design. In such situations, tweezers, a toothpick or a needle are added to the tools already mentioned.
Professionals use stencils to create patterns. This speeds up the process significantly. Don't think that these patterns won't last or will look awkward. After all, their creation is painstaking work, which indicates the high professionalism of the master.
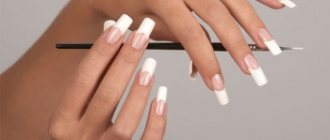
French
French with sand can be done in several ways:
- Complements classic French design. Cover 1 nail completely with transparent decor on one side, and shade the cuticle on the other.
- Choose a nude shade of gel polish as your main one. The “smile” should be made with colored velvety sand. You can take 2 different shades and apply them both to the free edge of each nail: one from the left roller, the other from the right, so that they meet in the center.
- Make a traditional French design. But on 1 nail of each hand, make a manicure completely speckled. It can be white or pink, that is, it can be combined with primary colors. Or they acquire a bright shade that stands out against the background of the classic French tones.
Delicate wedding manicure
A gentle manicure for the bride is:
- A combination of a classic jacket and the moon. But a transparent bandage is applied to 1-2 nails, and flowers are made on them with plasticine gel.
- Multi-colored design, when each nail is painted in its own tone, but only light ones are used - soft pink, peach, beige, milky, blue, lemon, lilac. On 2-3 fingers they are completely decorated with transparent “sugar”, and on the rest you need to rub pearls.
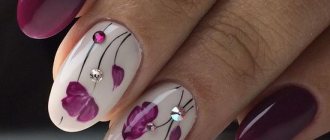
- Use soft lilac gel polish as a base. On the right hand, a branched ornament with white “sugar” is drawn on the middle and ring fingers. You can choose milk as the main color. Draw lace on 2 nails with lilac, pink or blue velvet sand. 2-3 transparent rhinestones are used on decorated plates.
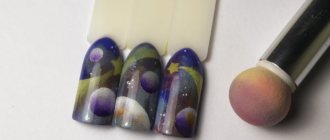
Ombre colored sand in the picture
Semi-permanent nail polish using the gradient technique can be used differently than in previous cases if you make a drawing:
- Hygienic manicure and color coating are performed as usual, but without finishing agent.
- The drawing is made with gel polish so that it consists of separate lines and occupies the entire nail.
- Take the first pigment and sprinkle it over the top third of the plate, tapping off the excess with your finger.
- “Sugar” of a different color is poured onto the central part, but so that it reaches the border of the previous shade.
- The excess also needs to be shaken off, as in the previous case.
- For the last third of the nail, use the third tone of Velvety Sand as in step 4.
- Repeat steps 3-6 for more juiciness.
- After a short pause, during which the decor “settles,” the coating will harden.
- Nails are combed.
From this video you will learn what velvety sand is and how to work with it:
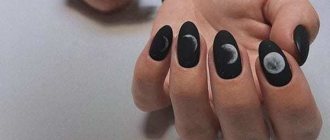
With black powder
The following designs look impressive with black powder:
- Any light shade of gel polish was chosen as the main one. But 1 marigold is completely covered with black “sugar”. And on the neighboring one, with the same decor, they draw an ornament in the form of branches with leaves.
- The nails of the thumb, index and little fingers are covered with black gel polish and a shiny top. For the rest, use a camouflage base. And black “sugar” is applied on top, but there remains a negative space in the form of a hole. The border between the shades is decorated with small transparent rhinestones.
- For the thumb, index and little finger nails, choose a dark blue nail polish with a sandy effect, that is, a slight shimmer, and a glossy finish. In the center, the plate is almost completely covered with black “sugar”, but the hole is highlighted with rhinestones of the main shade. The ring nail is made completely velvety.
For a wedding
Light manicures with sweaters, monograms, roses and other patterns are very popular among brides. Velvety sand will help make this nail art even more appetizing.
"Sweater"
Nail art with sweaters is very popular, especially in winter.
Sand harmonizes perfectly with rich colors and goes well with almost any design and a wide variety of decorative elements. For example, see how unusual and colorful a sand-colored knitted manicure looks in combination with a French manicure and decorated with rhinestones.
Regular Full Coverage
The simplest but most elegant option. Of course, it’s not at all necessary to make every nail sandy.
It is also worth noting that such a coating is not only beautiful, but also practical - it strengthens the nail plate, so breaking such a nail will not be so easy. This velvet design brings out the beauty of any color and the soft pastel colors make it even more subtle.
Sugar Gradient
Velvety sand looks great paired with shade. Of course, such an effect can only be created with the help of universal white sand, which can take on any color.
Red nails with sprinkles
You can smooth out the aggressiveness of a red manicure with the help of inclusions. Velvet coating is applied to all or only some nail plates. The scarlet design looks feminine, gentle and elegant.
Manicure with colored sand
Sand manicure can be done in any color scheme. And some girls cover each nail plate with velvet of different shades. This design looks bright, elegant and playful.
Manicure with sand and rhinestones
A festive manicure with specks on the nails can be decorated with rhinestones. But you shouldn’t cover them in large quantities - just highlight the hole with arched or triangular pebbles. This option will be very harmonious.
Spectacular gold
Gold decor can be used in the following ways:
- Choose yellow as the main color, but cover 2 nails with white gel polish or milk base. On one of the last ones, place diamonds with velvety sand. On the second, draw a square and print a gold transfer sheet next to it so that the color of the gel polish is not hidden under the decor.
- Cover all your nails with a beige flower bed. On the ring and little fingers, draw wide, curvy lines using golden “sugar.” Cover the rest of these nails with a matte topcoat. Cover all other fingers with a glossy coating.
- Create a baby boom. But on the little finger of one hand and the ring finger of the other, completely cover the nails with gold jewelry.
Black on red
The subtle contrast of black and red velvet sand with glitter will make it even more elegant.
Combination with red
There are also many design options with red gel polish:
- Cover all nails with the base color, but on 1-2 nails use a lighter shade for a gradient. And apply transparent velvet sand on them.
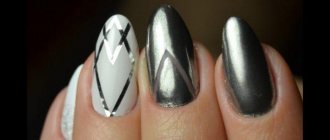
- Use purple or scarlet gel polish and the same decor. Finally, on 1 nail, place a wide strip in the center, from the base to the free edge. And on the next plate, draw two triangles - a thin and a thick line.
- Paint all your nails red except your middle or ring finger. Use white or pink gel polish for this. And on the same nail, draw tongues of fire or other patterns with red sand.
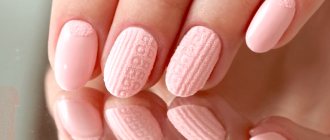
Knitted
Quite an original idea. Experts recommend using this model in the winter, but it will be very relevant both in spring and autumn. With it, the image becomes truly friendly and familiar.
Plain
This option will create a bright and attractive image. You can choose pastel colors for subtle, eye-catching looks to add accents to your look. You can create a special manicure for every season.
How to Apply Sand Nail Polish
To make the “sand” layer look neat and stay on your nails for a long time, apply it correctly:
- Cover the nail plate with a special base;
- Shake the bottle well so that the glitter and abrasive particles are mixed with the total mass;
- Place a little varnish on the brush. A layer that is too thick looks uneven and sloppy. It may split and crack;
- If you bought a thinner nail polish with a sandy effect, Golden Rose, for example, you will need two coats (thin ones!);
- Take your time so as not to “overdo” the amount of varnish;
- Don't touch your nails. Wait for the coating to crystallize. The effect appears within 10 or 15 minutes.
Jelly, mica, shimmer, glitter
The jelly has a jelly-like structure and transparency . It's hard to achieve vibrancy with it (even with multiple coats), although it can have a rich hue in the bottle.
Mica is very similar to jelly, but it contains oblong particles that shimmer in the light.
The shimmer includes shimmering grains. They give your nails volume and a jewel-like glow. Depending on the concentration of such particles, the coating can be almost invisible, and then it can be used in everyday life. Or, conversely, stand out with its brilliance, which makes it indispensable for parties. The varnish is easy to apply without leaving streaks, but due to the presence of sparks it is very difficult to remove.
—>
Glitter is the sister of shimmer, but instead of tiny particles it contains small sparkles. Such an addition can be plain or colored, in the shape of a circle, rectangle, triangle, hearts, stars. Removing it from nails is also problematic.
How to remove nail polish
Remember two rules:
- Do not hurry!
- Don't rub your nail when trying to remove sand polish! You will damage the nail plate.
So:
- Soak swabs or cotton pads in nail polish remover;
- Wrap each nail with them;
- Wait at least 3 minutes;
- Gently wipe your nails without pressing. If the coating is not completely removed, wet the new discs and leave for a couple more minutes;
- Apply a nourishing cream or product to protect the nail plate.
Metallic, duo/multichrome, holographic, magnetic
The so-called metallic gives the nail the effect of a foil coating. Most often it has silver and golden shades. Copper and bronze colors are less common.
Jaay - Mobile - Content - 250*360 - 6
Duo- and multichrome change their colors when the angle of light or viewing changes, creating an interesting combination of several shades on the nail. There are many types of this effect; there are contrasting ones, for example, black and white, and monochrome ones. If there are two such shades, the varnish is called duochrome; if there are more, then multi.
The holographic is very reminiscent of a gasoline film on a puddle. It also sparkles and shimmers with all the colors of the rainbow.
Magnetic varnish contains particles of iron filings, which, when applied to a magnet, form a beautiful pattern. Applying it will require some experience.
—>
Selecting your varnish
The acquaintance with sand varnish has not yet been so long, but the girls have already made the first conclusions. Each brand has both advantages and disadvantages. Let's compare to find out which sand effect nail polish is worth buying.
Varnish from OPI “Liquid Sand”
The American company OPI produces varnish for “sugar” manicure using its own revolutionary development – technology that leads to the appearance of a texture called “liquid sand”.
The same rough structure, the same grains of sand on the surface. But the coating is of better quality and is easy to apply. Lasts great for a week. Many OPI varnish collections have an original composition that other manufacturers do not have.
Glitter can be very interesting: stars, holographic figures, sparkles, etc. The presence of shimmer gives the effect of glow and deep volume.
Mariah Carey's Liquid Sand™ collection made waves in 2013. She introduced Russian fashionistas to innovative coatings. Cost – 455 rubles.
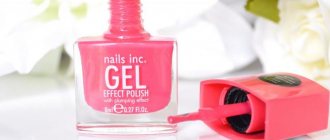
Golden Rose
The Turkish manufacturer has been familiar to Russian beauties for a long time. Budget varnish Golden Rose with a sandy texture has proven itself well. The 31 shades of the “Holiday” collection have tones with and without glitter and the entire palette of colors. On the company's official website you can order varnish for 149 rubles.
Dance Legend
There is also a company in Russia that produces a trendy new product.
OLBO is the manufacturer of the popular sand varnish Danse Legend. The collection with fine glitter “Sahara Cristal” has a light texture and is easy to apply. Two coats of varnish are recommended. The effect is excellent, but the coating is quite unstable. Cost - 180 rubles per bottle. You can easily make hand baths for dry skin yourself; there is nothing complicated, just follow our advice.
An excellent remedy in the fight against cellulite is a coffee scrub, try it!
You can read how to properly make a foot bath at the link
China Glaze
The difference between the “Texture” collection and similar products from other companies is its seasonal palette with rich, bright colors.
There are six of them. Shimmer and glitter – in moderation. Silicone particles give the varnish thickness. The varnish from China Glaze goes on evenly and is easy to remove. When mixing colors, a 3D effect is achieved.
New items from China Glaze – sand varnishes in white and black colors. Thick enamel varnishes allow you to create a flawless manicure. Snow white or deep black look great and highlight your style. Price – 289 rub.
How to do a manicure with sand at home
Sand manicure is a type of nail design using finely dispersed acrylic powder, which is used to sprinkle a wet layer of gel polish or gel paint.
This is one of the most beautiful and simple options for decorating nails both at home and in the salon. Only in salons lately are gel manicures sprinkled with acrylic more and more common. Craftsmen often call acrylic sand “velvet”, since it can be used to create a matte finish with the same effect. In addition to decoration, sand was previously used to strengthen weakened, soft and bending nails. Now it has been replaced with a finer ground material called powder. You can also find colored acrylic dust on sale. But no matter what material you choose, the essence of the technology for working with it will be the same. Let's look at it in more detail in a step-by-step lesson on how to perform a manicure with shimmering velvet sand.
Step-by-step lesson on creating a design with sand
There are two main options for nail designs using sand. The first is to completely cover the nail. The powder is applied to the wet gel polish over the entire surface of the nail. This design is beautiful, but in winter it is not very convenient, since the surface is rough and clings to gloves. The second design option is partial sanding only in the places where the design is applied. In this master class we will do the second option, because it is more interesting. It shows the technique itself, how to do a manicure with sand and contains artistic elements.
Step 1 – Velvet shimmering sand on matte gel polish looks very beautiful. Let's take a fashionable beige shade as a basis and make a nude manicure.
Step 2 – Sprinkling with velvet sand can be done on shellac, gel polish, gel paint, gel. When creating drawings, it is more convenient to work with thick gel paint. For our design, let's take gold gel paint with fine shimmer and a brush with thin, medium-length hair.
Step 3 – The design must be applied “in one go,” since the powder is applied to a wet layer. Intermediate drying is inappropriate here.
Step 4 – First, draw the outline of the first element.
Step 5 – Then fill the element with gel paint.
Step 6 – Next, look at the step-by-step photos of how to make a nail design with sand. Place the nail over a container of sand, take a pusher or a convenient spatula, pick up a small amount of sand and sprinkle it on the design. We tap on the finger a little, without touching the nail, so that the excess sand falls back into the jar. Place your hand in the lamp.
Step 7 – After the gel paint has dried well, you can take a brush and brush off the excess velvet sand. The material should remain only in the drawing area.
Step 8 – Next we carry out the design according to the same scheme: apply the next element of the design, sprinkle with sand, dry, remove excess sand with a brush.
When the drawing is ready, there is no need to additionally cover it with anything. Do not be afraid. The sand is securely fixed in the gel paint and will not go anywhere.
Even in the photo you can see how beautifully the manicure shimmers with velvet sand in the rays of light. It looks really chic, and it doesn’t take much time to create. Try to make a similar design at home yourself and you will appreciate all the advantages of this type of design.
The author of the master class is Tatyana Gladkikh.
Set of tools and materials
In addition to the usual tools for filing the nail and applying the base and color coating, it is necessary to purchase specialized materials to create a unique effect, the photo of which will captivate the imagination. Velvet sand nail design is made with the following set:
Reviews
Decorating your nails with velvet sand is a popular manicure option that many girls and women love. It is chosen for its original appearance and ease of creation. You can make such beautiful nails even at home. However, it is not necessary to have extensive experience in this matter. It is enough just to carefully re-read these instructions and follow them, doing everything very carefully.
To create such beauty you don’t need a lot of time and additional materials.
It is quite possible to do even without an ultraviolet lamp. So you can definitely handle the creation process. It is removed in the same way as regular gel polish, using cotton pads, a special liquid and foil. It is important not to forget to moisturize the skin with cream after removal so that the epidermis around the nails does not dry out.
Another important feature is that this manicure lasts quite a long time. Although at first glance it seems very short-lived, in practice the nails will last as long as a simple gel manicure. At the same time, they can be completely wet, so housework will not particularly spoil the beauty of your nails. If necessary, it can be adjusted quite easily.
Well, the last advantage that pleases everyone is that such nails are suitable for everyone, regardless of age.
They look fashionable and stylish. You can “stylize” your manicure yourself, tailoring it to the event or image you want. So, for example, many brides, when doing their wedding manicure, highlight their ring finger with a different texture. For everyday looks, you can choose a neutral manicure that will match everything you wear during the week, both to work and to meetings with friends.
Velvet sand is one of the many ways to make a manicure unusual, but at the same time trendy. Choose the colors and decor options you like, experiment with combinations of shades and textures, and you will not be dissatisfied with the result, and your manicure will go unnoticed.
Original design
Using high-quality colored “sand” for manicure, you can create several interesting design options at once. Let's look at the most popular of them.
Plain
The simplest option is simple plain nails covered with velvet sand. For this purpose, you can use “liquid sand” of different shades. If you want to cheer yourself up and create a bright look, then you can combine several different tones. For example, turquoise glossy tones are complemented with inserts of a catchy and rich color called “orange cupcake”.
Features of velvet sand on nails
Velvet sand on the nails makes their surfaces rough, matte, and a little “fluffy.” The material is a granular substance consisting of small particles and similar to coarse powder or fine sugar, semolina. It comes in three types:
- Translucent. Gives a velvety effect, but retains the visible shade of the gel polish.
- Color. It is used directly on the base coat, as it has a pronounced tint, sometimes melange.
- With sparkles. It also has color, and it is not only pigment, but also shining particles.
Velvet sand manicure can be done on the entire nail or used for part of the plate to highlight the pattern and create a voluminous texture.
Benefits of rough manicure
Rough manicure is in demand because it has many advantages:
- beauty and originality;
- variety of colors and textures (there are smaller, medium and large particles);
- possibility of strengthening nails;
- ease of use;
- the ability to wear the design for a long time and preserve its appearance (does not fade, does not crumble);
- their variety (french, ombre, geometry, full coverage, ornament, pattern, etc.);
- ease of removal;
- availability of material at a price and prevalence in stores;
- no need to apply a topcoat on top.
Velvet sand can be used on short or long nails of any shape. If you follow the application technique, it will not fall off when washing your hands or doing any work while wearing gloves.
Powder top, cashmere-effect finish for gel polish
You can get velvet nails not only with the help of “sugar”, but also using a special type of finishing coat - with a matte effect. They do not look as “fluffy” as with decorative sand, the surface simply loses its glossy shine and becomes like satin with a slight shine, velvet or velor. All manufacturers have similar tops. The most famous, inexpensive and high-quality products are produced by the following companies:
- LiaNail,
- ONIQ,
- Haruyama,
- Solomeya.
Mistakes in using velvet sand
The effect of applying decor may not be as expected if:
- Use liquid top coat and finely ground powder at the same time. The finishing agent will form a thin layer, and it will not be enough to fix a sufficient amount of decor. It is always better to use a medium consistency topcoat, as using a thick liquid can result in a thick coating.
- Save sugar. In this case, after shaking off the excess, there will be too little left on the nails. The manicure will turn out to have bald spots.
- Immediately after applying the velvet sand and getting rid of its excess, place your hand under the lamp. This may result in the decor not being fixed firmly enough. You need to wait a minute for it to “drown” a little in the top, then polymerize.
- Dry your nails exactly the same amount as base, gel polish or top coat. “Sugar” needs longer polymerization, otherwise it will quickly begin to fall off. After all, it is not secured with a top on top.
- Pour sand onto the dispersion layer of the dried finish. Some people think that residual stickiness will hold the decor, but this is the most unreliable way to fix it.
- Apply finishing agent to velvet sand. This will nullify the external effect of the decor; the nails will simply become thick. When highlighting designs with “sugar”, only areas where there is no sugar are coated with topcoat.
Velvet sand is one of the most popular types of decor, original and easy to use. It is suitable for a festive manicure and for those who are forced to comply with a dress code. It can be combined with rhinestones, foil ribbons, “broken glass” and other types of decorations.
Sugar candies
Nowadays, many products have appeared on the nail design market, thanks to which you can achieve the effect of sugar on your nails. You can choose any colors: plain, neon or melange.
You can create a sweet surface using acrylic powder with small glitter.
- Each nail needs to be covered with a base, two layers of colored varnish and polymerized in a lamp.
- Apply a thin layer of top.
- Immediately, gently sprinkle acrylic dust using a pusher over the entire surface of the nail.
- Dry in a lamp and remove all excess with a brush.
To prevent excess powder from spilling, it is recommended to hold the nail over the jar and sprinkle glitter on top.