Recently, the nail industry has been developing quite rapidly. Until recently, these were nails with incredible designs, in some cases almost claiming to be works of art.
However, women's tastes (like fashion) are characterized by fickleness. And now gel extensions and complex designs are being replaced by more practical, but no less attractive gel polish.
Gel polish found its use only a couple of years ago, but has become very popular among both nail industry professionals and fashionistas.
In fact, this is a mixture of varnish and gel, which greatly simplifies its use (unlike gel) and, on the other hand, increases the life of the manicure (unlike varnish).
Gel polish can be applied in a single color, fortunately, manufacturers offer a large palette of colors and shades. An interesting coating design is also possible.
Which is correct: ombre or gradient?
Before we begin, let's figure out what a gradient is and what ombre has to do with it.
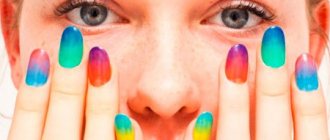
- A gradient is a painting technique in which one color smoothly transitions into another. The effect of smoothness is achieved by using closely spaced shades or mixing them. The technique allows you to use any colors and tones - dark, light, bright, or their non-standard mixtures.
- Ombre is a gradient coloring with a smooth transition from dark to light or vice versa.
It turns out that ombre is a type of gradient, but the gradient itself is not always ombre.
Gradient manicure: preparation, ideas, materials, 6 methods of execution
And also:
- To create a gradient coating, you can use tones of the same color, or contrasting ones with an intermediate shade for transition.
- The varnish does not have to be glossy. Mother of pearl, glitter, gloss - use whatever you like.
When choosing varnishes, pay attention to:
- Essie products. The company offers a wide color palette. You can choose adjacent shades or polar opposites;
- Opi brand palette;
- Glitter coating Cupcake Polish. The official website has a convenient color library where you can choose suitable tones;
- Pearlescent and glossy varnishes Color Club.
Basic ombre techniques
The general technique of performing ombre has only two options - the horizontal and vertical method. The same options are available for lip makeup.
Horizontal ombre
Provides for changing the color of makeup from top to bottom or from the contour of the mouth to the center. Has several varieties.
- Using dark shades on the upper lip and a darker and lighter stripe on the lower lip. Allows you to highlight your upper lip.
2. Apply a dark color on top, a light line below. And the lower lip is painted in the same light tone, which allows you to focus on it.
3. A light outline is placed between two dark ones. Allows you to make lips visually larger and fuller.
4. The lip contour is made in light colors, and the junction is dark. Will reduce lips if necessary.
Vertical ombre
Apply in such a way that the color changes from left to right. There are also several variations of color coverage.
- The vertical edges of the lips are dark, the inner stripe is light. The volume of the lips increases.
2. The inside of the lips is dark, the vertical edges are light. This technique will make your mouth visually smaller.
3. A light shade of lipstick is applied vertically to half of the lips, while the second part of the lips is dark. Most often, this option is found at photo shoots, because its appearance is quite unusual and striking.
For short nails
On short nails, a gradient manicure will be laconic in any color scheme. There is no fear of overloading the design, making it too pretentious and catchy. When creating a gradient on short nails, do not give up drawings - they will make the design individual.
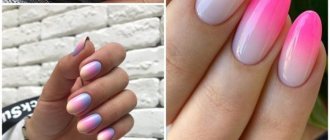
One of the best design options for short nails is a gradient with a milky base. Manicure “Milk Gradient” is a rich, stylish design, but without excessive brightness. It attracts attention, but in moderation, so it goes well even with a business look.
It is not necessary to complement this fashionable nail design with rhinestones, sparkles or stickers, but if you want, try not to overload it so as not to distract attention from the stylish manicure.
Any color can be used as an accent color - bright neon, delicate pastel, muted blue, red and black. In any case, the milky gradient on the nails will turn out surprisingly delicate and original.
The gradient on nails with a milky base, if you apply bright shades, looks like it’s illuminated.
A gentle manicure on short nails is achieved using a pleasant pink, almost coral, turning into white, or vice versa. A similar tone “Coral reef” is presented by the Picture Polish brand.
Manicure on short nails: fashionable shades, ideas, trends
It is not necessary to experiment with bright colors - a calm gradient manicure will be a universal solution for any look, occasion and mood.
As for stickers, they can be very different and reflect the inner world of their owner. You can purchase pictures in offline or online stores. An impressive assortment is presented on Chinese online platforms such as Aliexpress or Pandao.
A newspaper or special water-based or adhesive-based stickers will help you create a design with text.
The stamping technique is good in combination with a gradient. The pattern can be anything, just like a colored background, for example, a nail polish from Color club in the shade “Pucci-licious Gel”.
If you have artistic skills, create bright designs, for example, sunny sunflowers with Kiko “Canary Yellow” varnish.
Gradient with clear boundaries but a smooth color transition using LVX varnishes, shades:
- "Celeste"
- "Serene"
- "Laguna"
- "La mer";
- "Cerulean".
And a few more ideas for short nails
For long nails
With a gradient for long nails you need to be careful - oversaturation with color will make the design too bright. An exception is a manicure done for a celebration - a corporate party, wedding or birthday.
A delicate manicure on long nails is achieved using delicate tones, for example, from the Essie palette - “Minimalistik”, “Lilacism”, “Getting intricate” and “First timer”.
A good option is the previously mentioned milk gradient. On long nails it looks no less stylish and attractive than on short nails and perfectly combines individuality and tranquility.
For those who love a bright gradient, you can complement your manicure with stickers, drawings, rhinestones, and sparkles.
Try focusing on the ends. This can be done with one or several colors, or the complete absence of pigment.
Use bright colors with caution, thinking through their combination. For example, red with black or rich blue, reduced to pale blue.
Use the length to create creative designs - with drawings, inscriptions and sparkles.
How to do it at home: dyeing sequence
Do coloring at home using a toothbrush or a special coloring brush.
When performing staining, you must follow the following recommendations:
- cut off all split ends, make a neat haircut;
- before applying each subsequent layer, you need to wait for a while, according to the instructions on the paint packaging (usually at least 10-15 minutes);
- A couple of days before coloring, it is not recommended to wash your hair, as sebum will help protect the skin from the effects of paint. This is a natural “balm”.
The result of coloring using the ombre technique.
The sequence of the procedure is as follows:
- First, divide the strands into parts. You need to move from bottom to top. After applying the dye, you need to comb your hair so that it is evenly distributed.
- Then the next portion of the coloring material is applied, while going beyond the boundaries of the first.
- The number of layers depends on your imagination, the length of the strands, and the desired effect.
- After completion, you need to wash off the remaining paint, and apply a mask and balm to your head to soften the curls. It is important to properly care for colored hair in the future.
If you are not confident in your capabilities, use the services of professionals so that you don’t regret the result later.
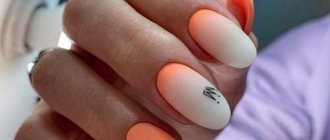
Matte
Eliminating glossy shine is what you need for a gradient. Thanks to this technique, you can use bright colors while leaving the manicure calm.
Summer juicy manicure using bright shades No. 96 and No. 66 of Essence varnishes in combination with a matte top to create a coating that imitates the skin of a ripe peach.
Subdued manicure ideas
A bright hit of this year - a gradient with a milky base, a matte top coat and a trendy manicure are guaranteed.
This technique can be used on both long and short nails - for any length and shape, a milky gradient will be appropriate - the main thing is to correctly distribute the colors and transitions.
You can complement the milky gradient on your nails with stickers, sliders, inscriptions, sparkles and rhinestones, but in the case of a matte top, it is better not to add artificial shine - the cozy, delicate design looks self-sufficient.
Make your matte manicure bright with stickers and designs. An impressive selection of stickers is available on Aliexpress and online nail art stores.
The drawings can be brilliant. Cupcake Polish varnishes are suitable for these purposes. This brand produces dozens of glitter products in various shades.
Manicure ideas with glitter for all occasions - 47 designs with descriptions
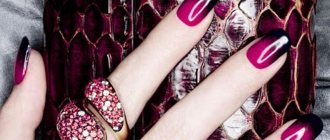
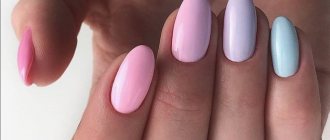
Classic manicure with a gradient
Initially, the gradient was performed in the horizontal direction. First, the coating is applied to the edge of the nail, then slowly moved to the back of the nail plate.
It was made with contrasting colors, close to each other in a circle of colors, and with the same color of different shades.
In one case, the manicurist achieves a bright, contrasting design, in another, a romantic, delicate design.
The combination of white with any other color, as in other things, and black also refers to the classic or horizontal version.
In classics, it is allowed to use two or several different colors. The greater their number involved in coating, the sharper the transition between them.
By using two colors of similar shades, the transitions are smooth and the manicure looks calmer.
Stickers and drawings
Graphic elements allow you to add personality, use it on nails of any length. Size, quantity and color - choose as you wish.
Natural motifs are the trend for 2022. The trend is reflected in clothing, accessories and, of course, manicure.
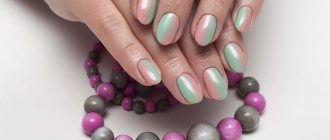
The already mentioned Essie brand with their impressive palette is used not only for coating, but also for design. The photo shows a manicure made exclusively with products from this manufacturer. Gradient of shades “Off topic”, “Beauty nap” and “Mojito madness”. Drawing – “Daring damsel”.
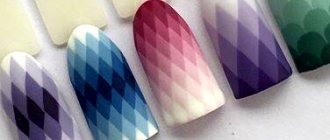
A beautiful manicure is obtained with a graphic gradient. This design is created using stencils or drawing each row of diamonds. For this design you will need only two varnishes - color and white. Pictured is Opi shade “Scores a Goal”.
In general, the drawing can be anything - colored or monochromatic, bright or barely noticeable, clear or abstract.
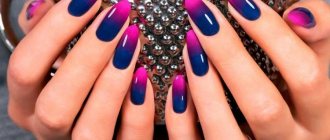
Gradient is a bright and stylish nail design option.
Combine any shades and different design elements. Get inspired by these photos and create a trendy design on your nails. Do you like gradient manicure? Comment
Manicure methods
Technique for performing a gradient using a sponge
You will need two colored varnishes and one base varnish, usually white varnish. If you have chosen varnishes where one color is much lighter than the other, then you can use a lighter shade as the base. Also, in order to make a smoother transition of shades, you can add a third color of varnish, which will be intermediate between the lighter and darker shades.
In addition, you will need a sponge, if it is very wide, it can be cut in half so that it is close to the width of your nail plate, thus the technique will be less “messy”. If during storage of the sponge small lint, hairs and other dust have stuck to it, clean it with the sticky side of regular stationery tape.
To stain the skin around the nail with varnish as little as possible, use regular tape to seal the area around the nail plate, or use a special protective agent that, when dried, forms a film; after work, it is easily removed, you just need to pull the edge.
- Apply clear base to nail;
- Apply the base color (white or the lightest of the colored varnishes you have chosen);
- Take a sponge and apply colored varnishes on it in strips, slightly overlapping each other, so the varnish will begin to mix on the sponge, forming a smooth transition;
- Renew the polish on the sponge, do not let it dry out, otherwise the sponge will begin to stick to the nail;
- Repeat the procedure several times to make the shades more saturated;
- At the end of the work, remove the protective film, remove the remaining varnish from the cuticle with a thin brush and cover the nail with top coat; it will mix the colors even better, ensuring an even smoother transition of shades and adding shine to the manicure.
Ombre technique using a flat brush
To perform a gradient using a brush, you will need everything the same as when performing ombre with a sponge or sponge, only in this case we replace the sponge/sponge with a flat brush, it is desirable that the brush has thinner bristles towards the ends. If it is dense from the base to the tips, then you will need to lightly thin the bristles of the brush at the end so that the transition of shades is smooth without clear boundaries.
- Apply the base, dry under the lamp;
- Apply the base color (white) in two layers, dry with a UV lamp;
- Take the color polish you like and apply it to the top of the nail to the free edge;
- Apply white varnish again to the lower part of the cuticle, leaving a small gap between the colored and white varnish;
- We take a flat brush and with light movements, avoiding strong pressure, stretch the colored varnish from top to bottom, connecting it with white;
- We wipe the brush on a lint-free napkin and again stretch the colored varnish, connecting it with the white from top to bottom;
- Once again, wipe the brush and remove excess white polish from the nail cuticle.
- We repeat the procedure, applying a new layer of colored and white varnish;
- We cover the result with a finishing coat. Manicure is ready!
Gradient technique using a fan brush
For this method of performing ombre you will need: a base, a top coat, two colored varnishes you like, preferably matching each other, as well as a fan-shaped brush.
- Cover the nail with base and dry it under a lamp;
- Take one of the colored varnishes and apply it to one half of the nail from the cuticle just above the middle;
- Take the second color of varnish and apply it to the rest of the nail;
- Let the shellac dry slightly naturally;
- Then we take a fan brush, and with light sweeping movements perpendicular to the growth of the nail, shade the joint of the applied colored varnish;
- We repeat the procedure several times so that the shades are saturated;
- We fix the result with a finishing coat and dry it in a UV lamp.
This method of creating ombre is quite easy, it is only important to avoid strong pressure on the surface of the nail.
Gradient technique using glitter
This ombre option is perfect for a festive event; it will look bright and solemn.
You will need: base, glossy top, glitter polish, or dry glitter mixed with top, thin brush.
- First, we process the nails and cover them with a base, dry them under a UV lamp;
- Then apply the color varnish you like in two layers, dry it in a lamp;
- Afterwards we take nail polish with glitter; if you don’t have it, you can use dry glitter mixed with top coat.
- Apply shiny varnish or glitter to the base of the nail from the cuticle (slightly not reaching the middle of the nail);
- On the remaining part of the nail, at the junction with the shiny varnish, apply a regular glossy topcoat;
- Take a thin brush, hold it almost parallel to the surface of the nail and, with gentle movements, stretch the glitter in the direction from the cuticle to the free edge;
- We fix the result with another layer of top. Manicure is ready.
The design is very quick and easy but looks amazing. With such a manicure, any girl, in the literal sense of the word, will shine at any holiday.
Gradient technique with acrylic powder
This gradient option is easy to implement. For this you will need: a base, a basic colored varnish (usually white), colored acrylic powder (two different shades), a top coat, a brush for applying powder.
- Apply the base and dry it in a lamp;
- Apply the base color (for example, white) in two layers and dry under a lamp;
- We take jars with acrylic powder of two different shades, with a brush we apply acrylic powder first of one color to the top of the nail,
- Then, slightly overlapping, apply powder of a different color closer to the center;
- Shade the border of shades with a brush, slightly stretching the color towards the bottom;
- Shake off excess powder with a brush;
- Cover the nail with topcoat and dry it in a UV lamp.
A manicure using acrylic powder turns out very airy and delicate. Perfect for a casual and romantic look.
Gradient technique using an airbrush
A very interesting option for creating an ombre effect using a special device - an airbrush. The airbrush is a pen-shaped sprayer with different attachments (nozzles). Nozzles come in different sizes, depending on how large the spray will be (0.2 or 0.4 nozzles are suitable for the job); special brushes are also sold for cleaning the airbrush.
To perform a manicure using an airbrush you will need: paints that are poured into the airbrush, a base, a base colored varnish, a buffer, a primer and a top coat.
- We treat the nails, cover them with a base product, dry them under a UV lamp;
- Apply a base color (for example, white), dry under a lamp;
- Cover with topcoat and dry as well, remove the sticky layer;
- Lightly clean the surface of the top coat with a buff before starting airbrushing;
- We fill the airbrush with paint, check the spray pattern on a napkin;
- Next, spray paint from the airbrush from the free edge to the center of the nail;
- Dry the surface with air from an airbrush;
- When the surface is dry, carefully apply a buff along the end of the nail, removing excess paint;
- Then we go over the ends and sides of the free edge of the nail with a primer;
- After treating the ends of the nails with a buff, they become unpainted. You can paint the end with white gel polish and dry it in a lamp;
- At the end, we cover the nails with two layers of top coat and dry them in a UV lamp, remove the sticky layer, while simultaneously removing the paint from the skin around the nails. Ready!
If desired, this manicure can be decorated with rhinestones. This way the design will look more beautiful and impressive.