Not long ago, a new gradient technique on nails appeared in the world of manicure, which allows you to create a very stylish design with a color transition. She immediately gained great popularity among clients of beauty salons, and nail service professionals were happy to offer their visitors trendy nail art. The more popular the design became, the more girls wanted to do manicures with a sponge at home.
What nail art styles are popular today?
First of all, I would like to tell you about the styles that are the most popular in the world of nail art today, so that you can more freely navigate fashion and modern trends. Today, there are a variety of manicure ideas, the number of which has long exceeded a hundred. But we bring to your attention the top most popular ideas.
- Monotonous minimalism is the simplest, applying one color of varnish.
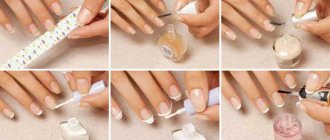
- Classic French manicure (or French). The free part of the nail is painted with white regular varnish, and the remaining surface is painted with nude.
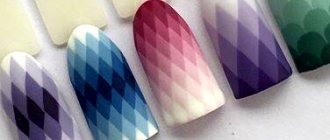
- Graphic geometry – applying a graphic pattern using a stencil. In this case, bright varnish of several colors is used.
- Design with an abstract pattern - to draw, as a rule, they use stencils or nail stamping, although this is not necessary.
- Matte - using matte varnish as an alternative to bright gloss.
- Lunar - when the area at the base of the nail is painted with a different color.
- Gradient - applying several colors of varnish so that they smoothly transition into each other.
In this article we will take a closer look at the latest nail art and find out what a gradient style manicure is. Girls very often come across gradient nails in photos in glossy magazines or on fashion websites, but they don’t always have an idea of what makes gradient nail design unique.
Gradient nail art is the gradual flow of several colors into each other. The gradient technique looks quite impressive on nails. The primary colors, flowing over each other, create a beautiful blurred border at the joints. This design is often called an ombre manicure, but this is not entirely correct, since ombre is a smooth transition from a dark color to a lighter shade within a single color scheme.
Gradient for nails of different lengths
Regardless of the length of the nails, every woman can choose a more suitable type of gradient manicure at home.
- Horizontal gradient is the most popular design. This nail art is universal, but it can be used most successfully by those with medium-length nails.
- A beautiful manicure for short nails is obtained using a color transition within five fingers, rather than each nail individually.
- The vertical gradient is more suitable for medium and long nails, and also looks especially impressive on almond-shaped and pointed nails.
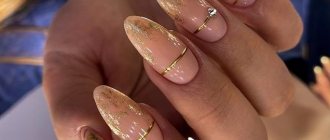
- A gradient French manicure is more suitable for long nails, but looks bad on short tips.
Manicure technique
Currently, the beauty industry is developing extremely actively, and nail service professionals can offer you several varieties of gradient manicure. Many women would like to know how to create a gradient on their nails. The beauty is that girls can do this nail art on their own at home.
To learn how to do a gradient manicure at home, you need to study tips for beginners. For a gradient manicure, it is not important to use shades of the same color palette. Any colors are allowed in the most daring and unexpected variations: from orange-green to emerald-purple design.
There are simple ways to do a sponge manicure that are suitable for beginners. Not everyone knows how to do it correctly. First you need to choose the desired color and shades of varnish. Let's figure out how to make a manicure using a sponge by mixing several shades of polish step by step. Manicure with a sponge at home is quite simple.
- Take a makeup sponge or a regular dishwashing sponge. The sponge is washed, dried, and cut correctly so that the nail plate fits both in length and width.
- Gently paint your nails with a thin layer of base color (white or the lightest shade) and let the polish dry.
- The skin around the nail plate should be protected, since the gradient technique on nails with varnish is quite easily soiled. For example, you can apply a rich cream or cover the skin with tape.
- Next, you need to apply layers of varnish of different shades on your nails so that the edges slightly overlap each other to create a smooth border. You can apply a large amount of varnish, because... The sponge, due to its porous structure, absorbs some part. Using a sponge or sponge, gently pressing it against the nail plate several times, apply colored varnish. You should try to paint the entire nail.
- Remove excess polish by removing the film (if you previously protected your nails), or using a cotton swab dipped in nail polish remover.
- Be sure to apply a sealing layer on top.
When choosing varnishes for a gradient manicure, it is recommended to pay attention to the texture of the coating. It should be tight. In order to get by with fewer layers, varnishes must have rich pigmentation, which is very important for high-quality design.
Next, we will offer you useful video tutorials that will help you get a visual idea of how to paint your nails with a sponge. Be sure to watch a few videos, and everything will definitely become clear to you.
Gradient manicure using a sponge
A beautiful nail design always attracts the attention of people around you, and your spectacular hands are the center of attention of all your friends. If you don't yet know how to do a sponge manicure, then it's time to practice. As you know, practice is the best way to learn anything.
First, of course, you need to prepare your nails for work. We remove the cuticle, file and sand the plates. It is very important to remove the old coating from your nails, otherwise your time will be wasted. You should not do a manicure on nails that are peeling or require treatment. First you need to put them in order, make them healthy, and only after that you need to create a bright design.
So, let's start coating your nails with varnish. You must have colored polishes, a sponge, nail polish remover, finish and cotton swabs.
- Apply the base. You can apply two layers. This way you can get a more saturated color.
- After the base has dried, we begin to work with a sponge. You don’t have to buy a special sponge, but use a new kitchen one. If you choose the second option, the sponge must be cut into finger-thick strips. For each procedure we use a new piece.
- Take the second varnish. Apply the polish to the sponge with a brush and carefully press it to the tip of the nail. You need to press in such a way that the intensity decreases closer to the center. For a short manicure, this amount of polish should be enough for 2-3 nails.
- The final step is to coat your nails with a topcoat or clear varnish.
- We remove dirt from fingers.
Photos of the best gradient design ideas
The most obvious assistant in choosing colors is the rainbow. It presents a bright combination of colors and a soft interweaving of their shades. For a more harmonious result in selecting the number of colors, it is necessary, of course, to take into account the length of the nail plate. On long nails, three or more gradient stripes are allowed. On short nails, it is recommended to perform a gradient manicure using a combination of 2 colors. Various options are possible: transitions can be made in horizontal, vertical and even diagonal directions.
Not everyone knows how to quickly create a gradient on nails with a transition. The 5 finger gradient transition is easy to do and looks good on short nails. The colors can be completely different. Understanding how to paint your nails this way is quite easy. You need to decide on the color scheme and choose 5 similar shades. Each nail from the little finger to the thumb is covered from dark to light shade, or vice versa. As a result, a beautiful harmonious color transition is obtained on the hands from the thumb to the little finger.
Vertical and horizontal gradients look equally beautiful. In a vertical gradient, as the name suggests, colors change vertically from one side roller to another. There are a large number of options. For example, when the colors of gradient transitions change from finger to finger, and the color of the right half of the next nail duplicates the color of the left half of the previous one.
When performing a horizontal gradient, a smooth transition of color occurs from the base of the nail to the free edge. The choice of gradient shades on your nails can only be limited by your imagination. These can be either similar shades to create a delicate, smoothly transitioning manicure, or completely different colors to create bright and extravagant nail art. It is possible to combine two, three or more colors. The more contrasting colors, the sharper the gradient transitions will be, and vice versa.
After enjoying many beautiful photos of gradient nails, you've probably found a few design ideas that you want to bring to life. But how can you make your nail art look neat and stylish? It's no secret that the gradient manicure technique is quite difficult to perform, especially for beginners. A super useful and interesting video will help you with this, the author of which will share with you 10 secrets of the perfect gradient.
Types of gradient manicure
In nail art, three methods of applying a gradient are used: horizontal, vertical, and with a transition. These methods are considered classic, although new variations of transitions are appearing, for example, geometric.
Fashionable manicure with OMBRE effect
Gradient with transition
The transition of shades from dark to light is carried out from one finger to another, i.e. If the thumbnail is painted in a dark shade, then gradually towards the little finger the shades of the same color become lighter. The photo shows a gradual transition from light to dark shade.
Pink Ombre manicure
For these purposes, either five shades of the same color are used, or one color for each nail is whitened or another color is added.
Horizontal Gradient
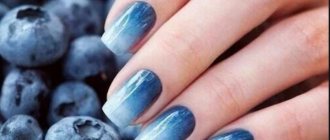
The transition from shade to shade begins from the cuticle area and gradually changes towards the tip of the nail. As for the color scheme, it can be a transition of shades of the same color or a combination of several contrasting colors.
Horizontal Gradient
The gradient consists of at least two shades of gel polish. Stylists advise limiting the number of shades to four on one nail.
Applying gel polish to nails
Vertical gradient
This coloring technique is carried out by changing shades from one nail fold to another. This approach allows for interesting variations. So, you can alternate gradient coloring with monochromatic coloring. For example, cover the nail of the little finger with one shade, the ring finger using a gradient technique, apply the shade that ends the transition on the ring finger to the nail of the middle finger, etc.
Vertical gradient
Another option: the nails of the little and ring fingers are painted in one shade, the index and thumb in another, and on the middle nail a smooth transition is made from one shade to another.
Smooth transitions visually lengthen the nails, so a gradient manicure looks advantageous on short nails.