What are tips?
This is the name given to plastic overlays that imitate nail plates. They are used as a substrate or stencil to obtain an artificial nail plate of the desired shape and length. Such templates are made from thin and elastic plastic. They come in transparent and colored: ivory, white, beige, ready-painted and in other options.
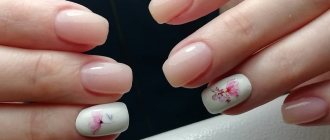
White overlays are ideal for creating a French manicure. They already have a ready-made smile line. After gluing such tips, it is enough to give them the desired shape, apply a thin layer of gel or acrylic to the nails and use a top coat to add shine.
What are tips and who are they suitable for?
A tip is an elongated plate that is placed on the nail bed with the help of strengthening agents. It is usually used if the client has short nails and wants to make them long. In this case, coating with gel will not help achieve the goal, because the material can only be placed around the perimeter of the natural nail. But the tips will not only give you long-awaited long nails, but will also strengthen the nail plate.
Tips help reduce the time spent with a nail specialist. This also affects the price, since the formation of the price directly depends on the time spent by the specialist. It is also worth mentioning that thanks to the tips you can choose the shape of the nail: almond, arched square, classic square or extravagant stiletto. Sometimes craftsmen use tips of one shape, and then cut them into another. This is done if the plate fits perfectly under the nail bed, but does not have the desired shape.
Typically, tips can be worn for 4-6 weeks, just like a regular gel correction. However, even this has a positive point: a free edge will grow under the overlay itself. This way you can grow some length for those who experience brittle nails.
The principle of nail extension with tips
The tip is attached to the nail plate using special glue and becomes its extension. For a reliable connection with the nail along the smile line, the tips have a convenient transition zone. The contact area of the plastic blank is glued to the nail plate, and the rest of it lengthens the nail.
After gluing, the tips are trimmed and filed depending on the desired size and shape of the nails, and then covered with acrylic or gel. The camouflage material creates a nail plate that is visually similar to the natural one.
These overlays are quite easy to use, so even beginners can handle the procedure of nail extension with tips. The main thing is to choose the right pads according to the width of each nail and strictly follow the instructions. Experienced craftsmen do not neglect such materials, especially if they need to simplify and speed up the extension procedure.
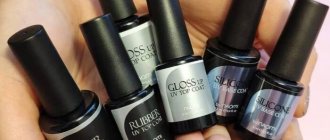
What to glue gel tips on?
No glue is used for this. Fastening is carried out using a base or gel, which are sold in the kit.
How and on what to glue gel tips:
- At a distance of 5 mm from the edge of the tip, a small amount of a special base or gel is applied. Most often it is sold complete with gel tips. You can use absolutely any base that wears well. The main task is to choose the right consistency. After all, too liquid or thick compositions can provoke the appearance of bubbles, which leads to detachments.
- After this, you need to apply the prepared tip, smeared with base, to the nail plate, not reaching 1 mm from the cuticle, at an angle of 45°. The tip is gradually lowered onto the natural plate in such a way that no bubbles or air spaces are formed between the natural and artificial material.
- After this, the tips are not released, but held and dried with an ultraviolet lamp for 30 seconds. Please note that for these purposes you can use special clamps for lamps to lift them. Some craftsmen use ultraviolet flashlights to grab the base. This is not complete drying, but it allows you to fix the tips in the required position to continue working.
After installation, several problems remain:
- Distance from tip to cuticle
- Uneven surface of the hyponychium
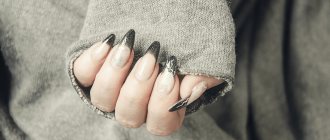
Stiletto shape
Recommendations for selection
To obtain a neat manicure, it is important that the tips accurately follow the shape of the nail rims. Therefore, they are selected individually - strictly according to the width of the nail plate in the central zone, so that the template completely follows the anatomical shape and outline of the nail. In addition to the classically shaped tips, you can choose the following models:
- with a wide, narrow or short contact area;
- tapered;
- dihedral;
- with a pronounced transverse curve;
- made in other versions.
Tips of non-standard shape are used to lengthen convex and flat nails. If the plate has an uneven wavy surface, adhesive gel is perfect for attaching tips to it. It will easily fill uneven areas and create an intermediate layer for securely fastening the overlay.
Differences from extensions to forms
By looking at the table, you can understand which type of extension is best to use.
| Tips | Forms |
| If there is no free edge of the natural nail | Wide nail plate |
| A natural nail has a flat shape | Flat nail shape |
| Springboard nail shape | The free edge of the natural nail is strongly bent downwards |
| Deformed nails | |
| Nibbled nail plates |
What is needed for nail extensions with tips?
To complete this procedure you will need:
- chlorhexidine or other antiseptic;
- cuticle remover;
- an orange stick or pusher to push away the leathery roller;
- nail scissors to trim nails to 0.5–3 mm;
- file 100/180 grit;
- polishing block (buff) or file up to 240 grit - to remove the glossy layer from the nail plates;
- brushes for removing dust after filing;
- brushes for applying the products used;
- degreaser;
- tips of different sizes - choose thin and elastic plates of a shape that suits you;
- glue for fixing plastic linings;
- lint-free wipes;
- type cutter - to give plastic plates the required dimensions;
- primer – acid-free for gel extensions and acidic for acrylic;
- for gel extensions – modeling gel and UV lamp;
- sticky layer remover;
- for acrylic technology – acrylic powder and monomer (liquid);
- cuticle oil.
Preparation for the procedure
Before you extend your nails with tips at home, you need to prepare for this procedure. If you prefer a cut manicure, remove the cuticles at least 4 days before extensions. For 12 hours before the scheduled procedure, do not use hand cream, and in the last 3 hours, avoid prolonged contact with water. These measures contribute to strong fixation of the material.
Before the procedure itself you need:
- Prepare a workplace, materials and tools. Disinfect them, and also treat your hands and work surfaces with an antiseptic.
- Prepare the tips and arrange them in the order of gluing to simplify further work. The length of the overlays should not exceed 2/3 of the length of your own nail. The width of the tips must exactly match the nail plates in the central part and completely coincide with them, from corner to corner. Narrower pads are not suitable for use, but wider ones can be carefully trimmed and filed to the desired size.
- Treat the cuticle - soften it using a remover and carefully push it away with an orange stick or pusher.
- Cut off the overgrown part of the nails to 0.5–3 mm and give them a neat shape with a file.
- Remove the fat layer from the plates (visually a shiny surface). This layer is restored in 40 minutes, so it must be removed immediately before the extension procedure. To do this, use a polishing block (buff) or a file up to 240 grit. The glossy layer is removed by movements from the cuticle to the edge of the plate. The resulting dust is removed with a brush.
After preparatory operations, a primer-degreaser is applied to the nails. Its effect lasts half an hour, so after degreasing, you need to immediately start building up. Otherwise, the fat layer will be restored, and the fixation of the tips will not be strong enough.
Sequence of build-up
Knowing how to properly extend nails with tips, you don’t have to worry about the quality of the work. The forms significantly reduce the procedure time and require virtually no sawdust. The result will please you the first time, but you need to know the technique in detail and look at photos of the process.
Preparatory stage
First of all, you need to prepare the bed. This step cannot be skipped, otherwise there will be detachments. It is necessary to remove the cuticle with the pterygium, file it, and sand it for better adhesion.
This is done carefully, removing only the shine with a buff or a soft file. After that, all that remains is to degrease the surface, apply a base, and then dry it in a lamp. Many masters advise not to remove the sticky layer.
Using Top Forms
Nail extensions begin with the selection of overlays. Enough material is applied, but so that it does not squeeze out when pressed. How to properly increase tips:
- on the reverse side, evenly distribute the substance and apply tightly to the nail (this must be done carefully, otherwise the material will be squeezed out near the cuticle and side ridges);
- remove excess gel with a clean brush, put your nails under a lamp (acrylic dries on its own);
- carefully remove the products by pressing lightly;
- apply camouflage and dry again;
- file to achieve the desired length or shape.
All that remains is to apply the color to your taste. Nude shades are often left without colored varnish, covered with a finish.
Ready-made molds with glue
You need to start by choosing the right size. Perform a manicure, sand and degrease the surface. Sequence of nail extensions:
- Apply a little glue into the hole and spread evenly. You can replace it with a special gel, which needs to be dried in a lamp.
- Place the form on your nail, press lightly with your finger, wait a few minutes. The exact time must be indicated in the instructions.
- Cut off the excess length with a tip cutter; this cannot be done with scissors. Then you need to file down the edge so that there are no sharp corners.
- Lay out camouflage, as well as colored gel, make a design as desired. Be sure to cover your nails with top coat.
The sticky layer should be removed between coats of varnish. Transparent tips for nail extensions are suitable for varnish, and white tips are suitable for French. The work does not take much time, it is better to do it one finger at a time so that the glue does not harden ahead of time. For a better understanding, it is recommended to watch the video, which shows the step-by-step process.
Use of liquid forms
The technology is almost no different from the first method, but you still need to remember, step by step, how to extend nails with tips. You should start with a manicure and selecting products according to shape. Then apply a base layer to the inner side, apply it to the nail, and press gently. Wipe off excess cuticles with a brush and then dry everything in a lamp. After removal, the procedure does not end; you still need to apply a camouflage agent. The extended nail is also dried in a lamp, then top coat, varnish, and decor are applied.
Even beginners can grow nails using tips if they have a set for this in their arsenal and know the sequence of actions. A proper manicure will last 2-3 weeks; wearing it longer is not advisable. As it grows, a transition from a natural plate to an artificial one will be visible. In addition, it can break at the root, causing severe pain.
How to glue tips on nails?
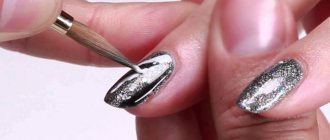
The glue is applied to that part of the artificial plate that is in direct contact with the nail. It must be applied in a continuous layer over the entire surface of the hole, but only at the point where the tip will join the nail - up to the step line, which will coincide with the edge of the nail.
Apply the tip coated with glue to the middle of the nail at an angle of 45° and press the remaining part of the workpiece so that the smile line coincides with the edge of the nail. Press the plate gently to avoid the formation of bubbles. Otherwise, the tips will have to be re-glued to get a flawlessly beautiful manicure. To ensure the pad adheres well, press it for 10–15 seconds. Remove excess glue with a lint-free cloth.
Length correction and shape creation
At the next stage, the glued tips need to be given the desired shape. To do this, use a tip cutter and an abrasive file, no more than 100 grit. The tip cutter makes it easy to remove excess length and give the overlays any shape, and the file removes small irregularities and smoothes the transition from nail to tip. The joint must be thoroughly cleaned so that the transition is not noticeable and the surface of the workpiece becomes smooth and stepless.
It is also necessary to clean the surfaces of the plates with a buff or file to ensure effective adhesion to the gel or other coating. Before applying it, all that remains is to remove the accumulated dust from the nails and skin, treat the nail plates with a degreaser and apply a primer.
Preparing the nail plate
This stage is the same for all types of extensions using tips and consists of the following mandatory steps:
- Manicure . Before extensions, you need to do a trimmed, hardware or combined manicure to remove the cuticle and remove the pterygium. They are most often the cause of detachments of artificial material.
- Filing the top layer of the nail . To improve adhesion to the artificial material, it is important to remove the top layer of the natural nail. Don't get carried away, it will be enough just to remove the natural shine. Experienced masters use either a buff or a file for natural nails for this.
- Degreasing and dehydration . First, apply the cleaner to a cotton pad and remove the dust after filing. Then apply a special degreaser to your nails with a brush.
- Application of primer . This product lifts the scales of the nail plate and ensures adhesion of the artificial material. After applying the primer, wait until it is completely dry, otherwise peeling may occur in the future. When working with gel, an acid-free primer is used, and when working with acrylic, an acidic one is used.
- Applying the base . The base is applied in a thin layer under the cuticle, especially if the extension occurs not on the old layer of material, but on your own nail plate. Dries in a lamp. The sticky layer does not need to be removed.
Now let's move on directly to the extension procedure with various tips.
Nail extension with tips and gel
Working with the gel includes the following steps:
- Apply 1 layer thinly, retreating about 1 mm from the cuticle.
- Drying in a UV lamp for 2–3 minutes.
- Apply 2 layers - in the middle of the nail, in a denser layer with a gradual decrease in its thickness towards the sides.
- Dry in a UV lamp for at least 3 minutes. In case of discomfort due to heating of the nail, it is permissible to take a short break. In this case, it is important to turn the nail down so that the not yet hardened gel layer does not spread. After drying, you need to remove the sticky layer with a product designed for this purpose.
- Filing – performed after applying the main gel coating to all nails. All irregularities in the arch are removed with a file or buff, and the final shape is given to the nails. The edges are filed until they are thin so that they look natural. The sides and area near the cuticle are thoroughly cleaned. At the same time, it is important to minimize the coating to the maximum, give it a natural look and bring it to perfection. The resulting dust is removed with a brush.
- Applying 3 layers – gel finishing coat. It is applied as thinly and evenly as possible to the entire plate, including the previously untouched area near the leathery ridges.
- Drying in a UV lamp and removing the sticky layer (if any). When using a topcoat without a sticky layer, there is no need to remove it.
- Grinding of extended nails.
- Cuticle care - applying nourishing oil.
- Applying a topcoat or finishing decoration - varnish, modeling, artistic design or other method.
Using acrylic
Extensions with upper forms can be carried out not only with gel, but also with acrylic used as a filler for blanks.
- The first stage is completely repeated.
- Second phase.
- The required size tips are selected.
- Two or three acrylic balls are placed in the blank. Then carefully distribute the material over the surface of the tips.
- The tip is pressed tightly to the nail, they look at how the material lays down and, if necessary, adjust it.
- Nails with blanks filled with material are polymerized in a UV lamp for about 2 minutes. After which the tip is carefully removed. The resulting coating does not need to be sanded.
- We repeat points 11-13.
Important! Acrylic is a much cheaper, durable and economical material. The advantage of the gel is that you can use different colors when modeling the nail plate.
Nail extension with tips and acrylic
If acrylic is used instead of gel, there is no need for a UV lamp. But this extension method is not suitable for allergy sufferers, people with diabetes, herpes, fungal diseases or weak immunity. Acrylic extension technology involves the use of monomer and acrylic powder.
Gluing tips, correcting their length and shape, sanding and degreasing are carried out in the same way regardless of the chosen material. But the further steps for acrylic extensions are different:
- An acrylic brush is dipped into monomer and then into translucent or pink acrylic powder.
- The resulting ball is placed in the center of the nail plate and distributed over the surface. This needs to be done quickly, because... acrylic hardens in a few seconds.
- The resulting coating is filed down. The arch is given a beautiful bend. The polishing block removes all irregularities and achieves a glossy surface.
The procedure is completed in the same way as with gel extensions - by applying oil to the cuticle and finishing decoration.
Required tools and materials
Everything for nail extensions is available for free sale; you can do without visiting a nail salon and extend your nails yourself.
Basic starting set of materials for extensions on tips
To work you will need:
- Glue. The material differs in consistency. Liquid dries faster and sets. All brands of glue contain an antimicrobial component.
- Tip cutter . The length of the substrate is adjusted with this tool. When removing excess length with ordinary scissors, there is a likely risk of damage to the tips.
- A milling cutter is a power tool that corrects extended nails. Can be used to remove cuticles, remove gel or polish. The device is equipped with several attachments. The soft parts are used to work with the cuticle, the hard parts are used for filing the nail.
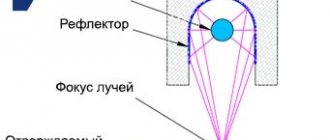
- Lamp (LED or UV). The apparatus is used for polymerization. The cost of LED lamps is more expensive; this technology is newer than UV lamps.
- Napkins (lint-free). Unlike cotton pads, lint-free wipes do not leave small lint behind after use.
- Buff and files. The buff has the shape of a parallelepiped, each side of which is covered with a file with a low abrasiveness (hardness) coefficient.
- Brush . A tool with natural hair will last longer.
- Choose from : acrylic, gel, acrylic or biogel.
- Primer or degreaser . The product is intended for cleaning the nail, degreasing and drying, preventing the appearance of yellowness and delamination.
- Top. Color and shine fixing agent.
- Nail polish
Each stage of work requires a file with a certain abrasiveness (hardness), which is measured in grits. Stiffer files have less abrasiveness.
Tool abrasiveness table:
| Grit | Application area |
| 80 | Working with the length and shape of an artificial nail |
| 150 | Working with ready-made artificial nails |
| 240 | Formation of the length and shape of the biological nail |
| 400 | Removing gloss from natural nails, polishing |
| 900 | Polishing, gloss formation |
What is needed for nail extensions on forms?
List of tools:
- Dust removal brush.
- Tweezers.
- Files for adjusting the shape.
- Dehydrator.
- Cuticle spatula.
- Lamp.
- Grinding tool.
- Brushes.
- Forms.
You can purchase disposable or reusable forms. Disposable ones are made of paper and are cheaper.
Reusable molds are more expensive and are made of Teflon on a wire frame.
Don't miss the most popular article in the section: How to draw monograms on nails step by step for beginners. Instructions with photos.
What is needed for gel nail extensions?
The tools required for extension are discussed above. The list of materials required to secure the manicure and distribute it evenly includes the following products.
For example:
- Gel. The material from which the artificial nail is formed. When it hardens, it forms a durable coating. The economy option is represented by a single-phase substance. Suitable for use at home. The two-phase composition includes agents that protect the nail from fungus and layering. Three-phase, in addition to the functions inherent in the previous raw material, is used as a base, fixer and modeler.
- Primer. Translation of the word from English is primer. As in the case of extensions using tips, when working with gel, it is necessary to prepare the base and protect the nail plate from the effects of the gel components. There are 2 options: acidic, acid-free. The first type includes methacrylic acid. The substance opens the nail scales. The rough surface ensures reliable adhesion of the nail to the applied materials. Acid-free has a gentle effect on the nail plate, helps improve and strengthen the base.
- Degreaser. You can use regular alcohol at home.
- The oil will help get rid of cuticle dryness after the procedure. You can buy: sesame, grape seed, sea buckthorn or castor.
- Paints (acrylic) . This type of dye is used to create designs on nails.
- Decorations (pebbles, sparkles, rhinestones).
Everything for nail extensions (tools and materials) can be purchased as a set. Buying as a set is 25% cheaper than buying everything separately.
Common mistakes when using tips
The first mistake common among beginners is the wrong choice of tips. The sets come with overlays of different sizes, and you need to choose them individually for each nail. If there is no tip of the ideal width, you can take a slightly wider tip and first file it to the desired size.
The second mistake beginners make when preparing the nail plate is when they file it down heavily when removing the glossy layer. The surface of the nail must be sanded delicately without damaging it. You need to carefully remove the shiny layer with a buff or file, using light movements from the cuticle to the open edge.
Another common mistake is choosing the wrong glue. The quality of fastening the tips and the durability of the manicure depend on it. But this does not mean that you need to choose glue with maximum fixation. To avoid damaging your nails, it is better to use glue with moderate fixation. This rule is especially true for thin nails.
You need to glue the tips slowly to avoid the formation of air bubbles in the joint area. They not only look unsightly, but also contribute to the development of infection and cause tips to quickly fall off. Therefore, the presence of bubbles is considered a gross defect and a signal that the nail needs to be redone.
How to use gel tips?
- Unlike the old prototype, they are not made of plastic, but of soft and flexible gel. With proper preparation, they adhere perfectly to the surface of the nail. The main task is to ensure good adhesion. Therefore, all stages of preparation of the nail plate are preserved, as before standard extensions. To do this, you need to remove the pterygium and cuticle using a cutter or a classic manicure.
- After this, the nails are given a matte finish. To do this, you can use a soft cutter or a regular file. It is best to take a file with a grain size of 180-240 grit, so as not to damage the deep layers of the natural nail. After this, sweep away the dust and remove the nail particles. To do this, use alcohol or an alcohol-containing antiseptic.
- You can go through the sinuses and under the cuticle with a microbrush. As soon as the surface of the nail is dry from the degreaser, a dehydrator is applied, which dries the nail plate. Sometimes a primer is used. It can be either acidic or acid-free, depending on the characteristics of the nail. The acidic product is recommended for use on wet hands that constantly sweat and the material does not hold well.
There are several methods for this:
- Acetone-containing substances
- Acid primer
- Using a buff or cutter
How to use gel tips:
- Tips are prepared mechanically or chemically. First you need to choose a size that will cover the growth points and ideally fit the width of the nail plate. It is worth paying attention to the cuticle area, which can have different shapes for girls. If the tip does not fit well at the cuticle, you need to give it the necessary shape using a regular nail file. It is necessary to ensure that the artificial nail fits the shape of the natural nail plate.
- After this, a thin layer of acetone-containing substance or primer is applied. Mechanical processing is carried out using a cutter or buff. It is necessary that the surface that comes into contact with the nail, that is, the inside, be rough and scratched. After this, the remaining dust is removed using a brush, and the surface is wiped with a degreaser.
Nude manicure
Nail care using tips
After extension with tips, nails retain their acquired length and attractive appearance for a long time. The main thing is to follow simple rules:
- Make corrections monthly.
- Avoid impacts and mechanical damage, including when using pins, buttons, fasteners and other everyday accessories.
- When cleaning, washing dishes and performing similar work, protect your hands with rubber gloves.
- Avoid contact with hot water and hot air.
- Use delicate files with fine abrasive.
- Before a manicure, always apply a base coat.
- Use varnishes and other products without acetone.
- Remove growing cuticles with oil or special emollients.
After wearing tips, nail plates require intensive nutrition and hydration. To do this, you need to apply cuticle oil to them 2-3 times a week and polish them once every 10 days.
Instructions: extensions using liquid tips
Sequencing:
- Liquid tip is applied to the surface of the nail prepared for extension. The material is pre-selected according to the width of the nail, and the base layer is distributed along its inner part.
- Use a brush to remove excess material that appears on the surface.
- If you use gel in your work, the next step is drying it in a lamp. When using acrylic, drying is carried out in air.
- After polymerization, the liquid types are removed and the second layer is distributed with a brush, while simultaneously shaping the nail.
- The resulting result is again dried in a lamp (if using gel) or dried in air (if using acrylic) for 2 minutes.
- The artificial nail is ready. It is covered with a finish or top and the design begins.
Why not try it?
Nail extension with tips is a fairly simple technology that is great for beginners to practice and allows you to lengthen any nails. If you have the necessary materials and tools, almost anyone can grow their nails using this technology. The main thing is to strictly follow the recommendations and carefully, without haste, complete each stage.
The tips have the correct shape, so they technically simplify the creation of the correct nail architecture and the extension procedure as a whole. They are durable and hypoallergenic, available in different sizes and designs, flexible and easy to use. White tips are very convenient for French extensions, because... allow you to get the perfect smile line without any extra effort. When done correctly, tipsey nails look beautiful and natural, and careful treatment helps maintain this effect.
Types of tips
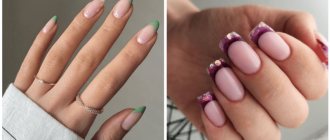
Tips differ not only in the material from which they are made. They have different shapes and colors. To make nail extensions with tips easy, you should choose the right shape that suits a specific type of nail plate.
Tips forms
Tips are available in various shapes to create a specific nail design.
Varieties:
- Classic – have a smooth natural curve, suitable for almost all types of nails. Most often used by professionals. Often sold in packs of 50 copies, the cost is from 250 rubles.
- Straight - in this form of tips there is no contact zone, which is why they are also called non-contact tips. Due to the lack of a contact zone, they are often used for French design. For 150 rubles you can buy a set of 100 copies.
- Tapered tips - used to create nail shapes such as stiletto, bridget, and cat nails. The set includes 50 tips, you can buy a set for 150 rubles.
- Curved frames are indispensable for nail extensions using American style tips.
- Almond-shaped tips - used to quickly give the nail an almond shape. They come in different lengths, most often they do not have a contact zone, which makes it easier to create a French design. The price for 50 pieces varies from 100 rubles.
Each of the described types has a different length, which is written on the packaging. Manicurists use the maximum length of the tips; special clippers are used to change the length.
Color spectrum
In addition to the shape, the tips differ in color. Manufacturers produce a variety of colors to create the perfect manicure.
Kinds:
- transparent - ideal for almost any design;
- flesh or natural shade - to give nails a natural look;
- colored - it’s easy to draw a picture without using the main color of varnish;
- with a pattern - tips are used to quickly create a beautiful manicure;
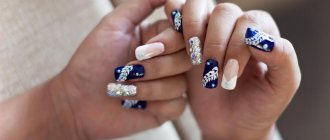
- French tips for nail extensions - quickly create the perfect French manicure.
How to choose tips
Every girl wants her nail extensions to be as similar to natural nails as possible. In order to achieve this result, you should buy thin, but at the same time durable tips. The thicker the frame, the worse it will look on the nails. You shouldn’t skimp on the material; it’s better to buy tips from well-known companies so as not to end up with a fake.
When purchasing tips, you need to consider not only their length, but also their shape. The better the frame fits on the nail, the easier the extension process will be. If it is difficult to choose the appropriate size, then you can take slightly larger tips, apply them to the nail and use a file to remove excess edges.
When choosing tips, you should pay attention to the stop line, the length of the free edge and the contact zone. The free edge is thicker and longer than the contact zone. The stop line is a conditional separator between the contact zone and the free edge. The tip of the nail plate should rest against the stop line.
Tips should be cut with a tip cutter; do not use scissors or other cutting tools.
If the natural nail is slightly raised up, for convenience and a beautiful manicure, the free edge should be of medium length. For defects in the nail plate, it is best to use adhesive gel; it can fill cracks and grooves, smoothing out the natural nail.
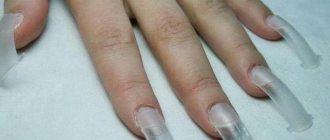
Features of the contact zone
The contact zone is a thin part of the plastic frame, similar to a dimple. The recess should fit snugly against the nail and be in contact with it. Glue is applied to the contact area, only then the tip is glued to the nail plate.
The contact zone comes in different lengths. It varies from three to six millimeters. The shorter the nail bed, the smaller the contact area should be.
The contact zone can be:
- with several slots;
- round;
- deep;
- V – shaped;
- small;
- big.
During the extension process, the contact area is cut down. It is best to start nail extensions using tips at home with non-contact frames. In such types there is no possibility of design violation.