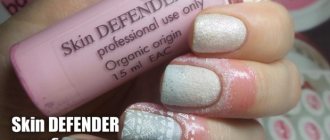
Since its introduction, Skin Defender has become one of the most favorite auxiliary products for creating complex types of nail art. Girls who adore water-marble, gradient, stamping, airbrush design and other techniques that involve involuntary contact of the coating with the skin immediately breathed a sigh of relief. It has become possible not to use a mountain of cotton swabs to correct soiled periungual ridges, adjacent skin and cuticles. By modernizing, this convenient manicure assistant acquired different shades, reduced the intensity of the aroma, acquired a stylish design and convenient volumes. Now creating an artistic nail look has become even more pleasant and comfortable with it. Today in our article we will reveal to you all the secrets of liquid manicure tape and teach you how to use it correctly.
Skindefender: what is it? Main characteristics, pros and cons
Liquid tape is a special composition created on the basis of high-quality natural rubber. It does not contain harmful synthetic rubbers, so the drug can be absolutely safely used on any skin type. It comes in a convenient package (with a brush or sponge applicator), which allows you to carefully apply the substance to the side rollers, touch the cuticle, and even “paint over” part of your finger while performing a water manicure. For practicing manicurists, as well as ordinary girls who love to decorate their nails with intricate, complex nail designs, Skin Defender has become an excellent saver of time, nerves and consumables. What can this nondescript-looking assistant do? Let's look at its main pros and cons.
The undoubted advantages of liquid tape include the following characteristics:
- With the help of this product, you can safely practice various manicure techniques, without fear that you will have to spend a long time and tediously cleaning your skin from colored varnishes, as well as correcting flaws in designs with stencils. Liquid tape will help you master the most complex types of nail art without hassle, without using too much nail polish remover or special corrector pencils. The ease of use of this product undoubtedly captivates beginners in manicure matters;
- The execution of even complex, creative and designer images will finally become a real pleasure. A variety of color pigments, decorating products to protect the cuticle and skin, as well as aromatic additives (including natural oils) bring their own share of positivity and aromarelax when creating a particular image;
- Skin Defender will be especially invaluable when working with liquid gel polishes when the artist is sealing the end. It reliably protects the skin from accidental contact with the coating, which can be extremely undesirable, especially for allergy sufferers;
- This product allows you to improve your skills by practicing careful manicure, mastering the techniques of stamping, French and moon manicure. Despite various cheap analogues, it is branded products that cope with their tasks best;
- Skindefender is convenient to take with you on a trip or vacation, when you don’t want to burden your luggage with excess weight, but want to experiment with new varnishes or shellacs;
- This product will be appreciated by those with sensitive and allergic skin, since applying a protective tape will avoid unwanted contact with aggressive components of nail polish and nail polishes;
- Skin Defender dries very quickly, its application and removal will take much less time than correction with improvised means. Unlike Vaseline or greasy cream (replacement options), Skindefender does not negatively affect the already applied coating. And you will not need to additionally degrease your nails and skin if you plan to further decorate your nails after using the drug;
- If you don’t have special stencils on hand, liquid tape can successfully replace them. Create the contours of the stencil design with a brush from a bottle of the product, and use thin nail tweezers to remove the dried “rubber” film after creating the finished image.
As for the existing disadvantages, they include the following points:
- It is worth stocking up on this drug in advance. If you prefer to order from online stores, then it’s worth replenishing your supplies of the “pink thing” before the cold weather sets in. Since the product formula does not imply delivery and transportation of bottles at temperatures below -0°C;
- Each manufacturer has its own skindefender consistency. Individual specimens harden in a uniform thin layer and are removed in one layer, without any “bits.” With others you will have to tinker, or apply a protective product in several layers, which will increase its consumption;
- Although manufacturers are trying to make this product as pleasant as possible, or at least not with a pronounced odor, it still cannot be called absolutely neutral. If you are sensitive to the aromas of waiting lists and correctors, be prepared for the fact that you will have to create your design in a ventilated area.
What is the purpose of the “pink thing” and why is it pink?
The so-called “pink thing” is necessary and necessary both in home manicures and also when there is a large flow of clients. It is very economical, the product may well be enough for at least 50 manicures. And this more than pays for the cost of good, branded drugs, with an increased content of useful components in the composition and the most muted aroma.
As for color pigments (defenders are available in literally all colors of the rainbow and even black!), the additional ingredient plays an auxiliary role in the product. With its help, manufacturers help us visualize the already treated skin from the area where there is no protection. The pigment itself does not affect in any way (either for the better or for the worse) the strength of the liquid tape or its additional caring properties. You can be sure that a white, pink, or green bottle will please you just as much as a purple or blue one.
For disinfection
Antiseptic
An antiseptic or disinfectant is a liquid or gel alcohol product to combat pathogenic bacteria on the surface of the skin of the hands and manicure instruments.
It is used at the first stage of manicure and is a must in salons and manicure rooms.
Depending on the consistency, the antiseptic can be:
- gel. Products in the form of a loose gel contain a small but sufficient amount of alcohol, as well as glycerin and oils for softening.
- liquid. It is sprayed using a built-in spray bottle, which greatly simplifies the process. Aerosol antiseptics contain more alcohol, which dehydrates the skin.
Depending on the purpose, there are 2 types:
- universal. Removes excess moisture from the nail plate and improves adhesion to the coating, disinfects the skin, tools and surfaces;
- for tools . The percentage of alcohol in such products is higher, which ensures the destruction of bacteria and microorganisms.
Some manufacturers offer a universal product that is suitable for treating both nails and tools.
Cuticle Defender: dangerous or safe for the skin? Alternative and analogues
As with any other product applied to the skin, girls who are getting acquainted with it for the first time have many questions about liquid tape. One of the main ones is whether the product is as safe as the manufacturers say about it? As the experience of professionals in the manicure industry shows, high-quality professional skindefenders will not cause any negative reaction in your skin. They do not contain any components harmful to the health of the skin and nails.
An allergy test should be carried out only for those girls who have previously encountered manifestations of allergies to various manicure products, including gel polish itself (read about the manifestations of allergies to shellac in our article “Allergy to gel polish: causes, types, symptoms, treatment and prevention"). Other nail fashionistas can safely use products from any professional brand, without paying attention to the color pigments in one or another version of the liquid tape.
Surprisingly, this manicure assistant not only performs protective functions, but also manages to take care of the skin. This becomes possible thanks to the natural composition of the cuticle protector, in particular neroli oil. Thus, the defender not only prevents the penetration of color pigments of varnishes into the nails and skin, but also performs disinfecting functions and also restores the skin in areas of microdamage. In a short time on the skin, the cuticle protector manages to slightly moisturize, nourish and protect it from drying out.
The second most popular question that worries girls in the process of creating their next manicure masterpiece is how to replace the skin and cuticle defender if the existing one has run out, is missing altogether, or the order from your favorite online store has not yet arrived. Let's look at the existing replacement options and their advantages and disadvantages in comparison with a professional drug.
Among the products for protecting the skin around the nail during manicure, the following “substitutes” are the most popular:
- scotch;
- PVA glue;
- fat cream;
- petrolatum;
- cuticle softener and remover;
- correction marker;
- cotton swab + cotton swab (or a thin synthetic brush, cotton swab and dry cloth);
- cuticle oil or regular vegetable oil;
- orange stick + nail polish remover;
- After a manicure, take a hot shower (an hour later) or wash your hands with soap and apply moisturizer.
Why shouldn't you use tape instead of a defender?
Although tape is, of course, cheaper than a specialized liquid for protecting the cuticle, however, it is extremely ineffective for water manicure. In water, the tape gets wet, stops adhering tightly to the skin and allows the varnish to flow through. In addition, it is difficult to cut the tape to the shape of the nail, especially if it has a high adhesive layer.
What's wrong with the PVA method?
This product is another more than budget alternative to Skindefender. PVA is applied to the skin with a brush and removed with water and a cotton swab. With the right level of dexterity, it can, of course, give an effect similar in effectiveness to the “pink thing”. However, the product is not as safe for the skin, contains harmful ingredients and can cause severe irritation. In addition, PVA is more liquid than skindefender, which means the risk of “staining” the design with it is higher. Also, due to the lower density of the film, it often breaks when removed.
What is the disadvantage of using a rich cream (Vaseline, cuticle oil)?
When choosing a cream, you may be mistaken with the level of its fat content (you need one that is suitable for dry skin or recommended for the winter). In addition, cream (vaseline and oil) are not very effective when performing an ombre design, since a lot of varnish gets on the skin and it will be difficult to remove. For the same reason, a product for softening and removing cuticles will not work. It will simply be washed off with water when performing a water-marble manicure.
It should also be remembered that if you want to further apply other decor to the skin after stamping, gradient or water design, you will have to spend time not only removing oily cuticle protectors, but also use preparations for degreasing the skin, cuticles and the surface of the hardened varnish (gel -varnish). Another important point: if you awkwardly apply Vaseline or oil to the skin and cuticle area, you risk ruining the design and having to redo it.
The use of various correctors (a cotton swab or an orange swab with a liquid, a brush with a liquid, a special felt-tip pen-corrector) also has its disadvantages. A cotton swab and a marker-corrector, even ultra-thin ones, will not allow you to trace the contour of the nail as delicately as a brush. When working with a cotton swab, there is a risk of over-saturating the ZhDSL cotton and getting stains on the coating under the cuticle. By using the orange assistant, you risk damaging the skin with an awkward movement or pressing too hard on the nail (and this will lead to the formation of a dent). As for the brush, frequent contact with nail polish remover or gel polish is detrimental to the hair, and breathing product vapors during the correction process is a dubious pleasure.
Options with correction through water procedures after creating the design are also not always an adequate alternative to skindefender. When getting a manicure with gel polish, your nails should not be wet for at least 2 hours. You may not have time to wait if you are going to an event right after your manicure. In addition, there are capricious varnishes, when working with which it is better not to wet your nails for as long as possible, unless of course you want to redo the design.
Advantages of the product
At home, when performing a manicure, women, after the polish has dried, remove its remnants using a cotton swab and nail polish remover. However, this method is inconvenient and harmful to the skin. Because of this, a completely new product - liquid tape for manicure is actively gaining popularity. The advantages of the product are:
- ease of use;
- guaranteed skin protection from varnish;
- quick drying;
- cost-effectiveness;
- complete safety for the skin;
- easy removal.
You should only buy high-quality tape from a reputable manufacturer. If you purchase questionable material, you may encounter the following problems;
- lack of an even layer during application;
- passing the varnish through the protective layer;
- skin irritation after use;
- Difficulty in removing - the tape will break and come away from the skin very poorly.
It is most convenient to use a product of a contrasting color so that when removing the edge of the film is clearly visible, then it can be easily pryed off with tweezers or a fingernail.
How to properly apply manicure around the nail?
Liquid tape is perhaps the simplest, most pleasant and effective way to protect the design being created, regardless of the type of coating and the chosen nail decoration technique. To ensure that the process of using it gives you only positive emotions, follow the following technology and recommendations for working with Skin Defender:
- Before starting work, be sure to perform a trimmed or untrimmed manicure, work well on the cuticle (tweezers or cuticle remover and an orange stick). Do not file or polish your nails after applying liquid concealer, as the film may tear during its removal. And you will have to spend more time removing it from the skin;
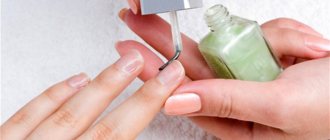
- Gently brush over the periungual skin with a brush generously dipped in the “pink stuff.” Try not to let liquid get on your nail, otherwise your design (be it a water design, gradient or stamping) will turn out unclear or blurry, and the polish or gel polish will not lie evenly. If you plan to create a water-marble design, then you should treat not only the skin around the nail, but also the two phalanges of the finger with a protective preparation. Apply the product generously so that the film becomes thick and strong enough to make it easier to remove;
- Make sure Skin Defender is completely dry before creating your design. Due to its component composition, the liquid turns into a film in about 30-60 seconds (depending on the manufacturer brand) and becomes colored (the color that you see in the bottle);
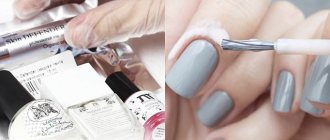
- Having finished creating the nail art you have chosen, use tweezers to pick up the edge of the elastic film and gently pull it to the side and up. All traces of coatings on the film will be removed along with it, leaving clean skin and a smooth, beautiful edge along the line of the nail.
The perfect cuticle design: three simple ways to create the look.
So we moved on to the most important thing - creating a finished look in gel polish using the tricks of subcuticle design. The general technique for creating a manicure in this style is as follows:
- Having prepared your nails, apply base to them as close to the cuticle as possible, but without going beyond it. And don’t forget to seal the free edge;
- Gel polish must be applied in very, very thin layers, without making any indentations, using a natural brush or a painting brush. Try to additionally slightly pull back the back of the nail with the thumb and forefinger of your free hand;
- dry the first layer for 2 minutes in a UV lamp and 30 seconds in an LED device;
- Apply a second (if necessary, then a third layer), polymerizing in a lamp for the same amount of time. Do not forget to seal each applied layer of color coating;
- Without removing the sticky layer, apply top coat. The area where the finish is applied must match the area of the colored gel polish. Drying in a UV lamp should take 3 minutes;
- Decorate the manicure with any desired decoration or painting, repeat the application of the top and, after baking in the lamp, remove the stickiness. The movements should be wiping, and the napkin with liquid to remove stickiness should move from the cuticle to the free edge.
The very effect of the coating, as if by magic growing from under the nail fold, can be created in three ways.
Using a separate brush.
It is more convenient to work in this case by applying a few drops of shellac to the palette (to draw the subcuticle pocket).
And as a tool, choose a thin brush with a beveled angle from a set for Chinese nail painting. Stages of design execution:
- place the brush sideways to the nail plate as close as possible to the cuticle and paint the semicircle and the area of the side ridges with several strokes of equal thickness, pulling the skin with your finger;
- dry the contour in the lamp and re-apply the gel polish to the previously dried strokes;
- Having drawn a kind of frame (translucent hole), use a brush from the gel polish itself to paint the central area of the nail with thin, smooth strokes;
- try not to create overlapping layers. If they accidentally formed, and you noticed it after drying in the lamp, lightly buff the edges of the color coating, smoothing out the transitions. The top will help you completely eliminate visual flaws.
Using the original gel polish brush.
Just like the first method, this option also requires concentration and accuracy.
As a rule, beginners begin to master the rather complex subcuticular technique from here. Image creation steps:
- Having collected a little gel polish on the nail, place the brush at an angle of 45 degrees to the nail (lift the back roller and pull it with your finger);
- Using the pointed corner of the brush, make a stroke in a semicircle, spreading the brush like a fan. Repeat the same application on the other side of the nail;
- usually the central zone of the nail is already relatively evenly painted. However, to be sure, apply a few strokes to even out the color. If you need to remove over-applied coating, increase the angle of movement of the brush on the nail. For a more dense application of color, try to hold the brush almost lying on the nail.
Mechanical (tactile) method.
Creating an image in this way is convenient only if you (or the client) have sufficiently flexible periungual skin (elastic, mobile, moisturized and well-groomed). Otherwise, your hands will quickly get tired of constantly controlling the cuticle and back roller. Due to the labor-intensive and elaborate nature of the work, this method is most often used by experienced craftsmen. And they paint the nail with the original brush, from the gel polish. Involuntary flaws are corrected with a dry hair brush. Essentially, with this subcuticle technique, you are using a second coating method. The only difference is that you push back the cuticle more than once, at the very beginning (before applying strokes), but accompany each brush stroke by constantly pushing back the overhanging skin. Thanks to this, although the manicure takes longer, it is performed more carefully and efficiently. The manicure turns out to be the most expressive and looks fresh and tidy for longer.
Popular manufacturers: TOP 5 liquid tapes for protecting skin during manicure
Which Skin Defender should you choose? This product was released by almost all well-known and top nail brands. Today's list of favorites is:
- Irisk - Cuticle Defender and Skin Defender;
- El Corazon - Cuticle Defender (white and pink);
- Masura - liquid tape (pink thing) and liquid tape (pink thing) LUX;
- Mo You London - Latex Cuticle Guard Watermelon;
- TNL Professional - Skin Defender cuticle protection product.
Brands such as Konad, Dance, Kasako Docai, RIO Profi, Planet Nails, JessNail, In'Garden, RuNail have also released their versions of liquid tape.
Mini video master class on using skindefender.
To make the process of application and removal clearer for you, we invite you to watch small training videos with one of the most popular skindefenders - Mo You London Latex Cuticle Guard Watermelon:
To summarize our review, we note: by purchasing a manicure defender, you can forget about such little things as a crooked brush in your favorite varnish or shellac, as well as an inconvenient consistency (too liquid or with a generous presence of different sizes of glitter). Thanks to the “magic” film of the “pink” thing, even a novice manicurist can indulge in any experiments, ultimately getting an invariably great result!
You can buy Skin Defender using the link.