In the modern world, girls are very careful about the beauty of their nails. To do this, they need to regularly visit beauty salons or take care of their nails on their own.
Very often, when we do our nails at home, we encounter the following problem: the polish extends beyond the boundaries of the nail, which does not look very nice. It was to solve this problem that liquid manicure tape was invented.
In our article today you will learn what it is and how to use liquid tape.
What is liquid manicure tape?
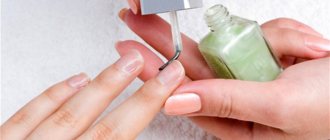
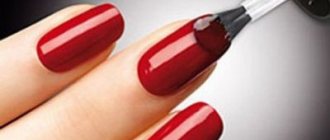
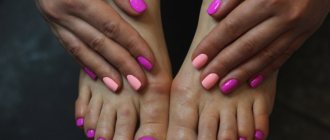
Externally, liquid nail tape looks like a jar of liquid. If you don't look at the inscription on this jar, you might think that this is an ordinary varnish, but this is not the case at all. This is a liquid that has the consistency of nail polish and is designed to be applied around the cuticle.
After this application, it turns into a film. After the liquid has dried and turned into a film, you can begin applying the main nail polish. The tape protects the delicate skin of your hands from nail polish, which in turn allows your manicure to look more aesthetically pleasing.
IMPORTANT TO KNOW: Gel nail polish and everything you need to know about it
The tape contains only beneficial ingredients without harmful dyes, so it does not cause peeling or irritation.
Skindefender: what is it? Main characteristics, pros and cons
Liquid tape is a special composition created on the basis of high-quality natural rubber. It does not contain harmful synthetic rubbers, so the drug can be absolutely safely used on any skin type. It comes in a convenient package (with a brush or sponge applicator), which allows you to carefully apply the substance to the side rollers, touch the cuticle, and even “paint over” part of your finger while performing a water manicure. For practicing manicurists, as well as ordinary girls who love to decorate their nails with intricate, complex nail designs, Skin Defender has become an excellent saver of time, nerves and consumables. What can this nondescript-looking assistant do? Let's look at its main pros and cons.
The undoubted advantages of liquid tape include the following characteristics:
The execution of even complex, creative and designer images will finally become a real pleasure. A variety of color pigments, decorating products to protect the cuticle and skin, as well as aromatic additives (including natural oils) bring their own share of positivity and aromarelax when creating a particular image;
Skin Defender will be especially invaluable when working with liquid gel polishes when the artist is sealing the end. It reliably protects the skin from accidental contact with the coating, which can be extremely undesirable, especially for allergy sufferers;
This product allows you to improve your skills by practicing careful manicure, mastering the techniques of stamping, French and moon manicure. Despite various cheap analogues, it is branded products that cope with their tasks best;
Skindefender is convenient to take with you on a trip or vacation, when you don’t want to burden your luggage with excess weight, but want to experiment with new varnishes or shellacs;
This product will be appreciated by those with sensitive and allergic skin, since applying a protective tape will avoid unwanted contact with aggressive components of nail polish and nail polishes;
Skin Defender dries very quickly, its application and removal will take much less time than correction with improvised means. Unlike Vaseline or greasy cream (replacement options), Skindefender does not negatively affect the already applied coating. And you will not need to additionally degrease your nails and skin if you plan to further decorate your nails after using the drug;
If you don’t have special stencils on hand, liquid tape can successfully replace them. Create the contours of the stencil design with a brush from a bottle of the product, and use thin nail tweezers to remove the dried “rubber” film after creating the finished image.
As for the existing disadvantages, they include the following points:
Each manufacturer has its own skindefender consistency. Individual specimens harden in a uniform thin layer and are removed in one layer, without any “bits.” With others you will have to tinker, or apply a protective product in several layers, which will increase its consumption;
Although manufacturers are trying to make this product as pleasant as possible, or at least not with a pronounced odor, it still cannot be called absolutely neutral. If you are sensitive to the aromas of waiting lists and correctors, be prepared for the fact that you will have to create your design in a ventilated area.
The most popular product is Skin Defender
The most popular nail tape is Skin Defender, which is made from natural rubber. This product has very good reviews, and it has already been appreciated by many women.
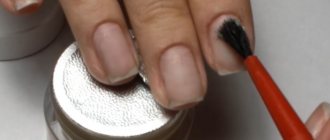
This product is sold with a convenient brush, which makes it easier to apply the tape to the periungual plate. The external product resembles a pinkish liquid that reliably protects the cuticle from staining. In addition, this liquid protects the skin of the hands from bacteria and has an antiseptic effect.
Moreover, the adhesive tape from this brand prevents the growth of dead cuticles. After applying the liquid tape to the skin of the hands, it, like all conventional products, turns into a film, which, upon completion of the manicure, is easily removed with tweezers or any other means.
If you do not have the opportunity to purchase this product in cosmetic stores, then do not despair. You can easily make liquid tape yourself at home using available materials. This way you will spend much less money and will be 100% confident in the components included in the product.
IMPORTANT TO KNOW: Acrylic nail extensions at home for beginners: step by step, with photos and videos
Below you will find information that will help you make liquid concealer with your own hands. Remember that the product must be applied as close to the cuticle as possible, and you should begin applying your base polish only after the film has completely dried.
If you don't follow these rules, the tape may move and your manicure will look ugly.
LIQUID TAPE SKIN DEFENDER: AN ESSENTIAL MANICURE ASSISTANT
Since its introduction, Skin Defender has become one of the most favorite auxiliary products for creating complex types of nail art. Girls who adore water-marble, gradient, stamping, airbrush design and other techniques that involve involuntary contact of the coating with the skin immediately breathed a sigh of relief. It has become possible not to use a mountain of cotton swabs to correct soiled periungual ridges, adjacent skin and cuticles. By modernizing, this convenient manicure assistant acquired different shades, reduced the intensity of the aroma, acquired a stylish design and convenient volumes. Now creating an artistic nail look has become even more pleasant and comfortable with it. Today in our article we will reveal to you all the secrets of liquid manicure tape and teach you how to use it correctly.
How to use the tape: step-by-step instructions from A to Z
- Cover your nail with base polish.
- Apply liquid nail tape to the cuticle area and let it dry.
- Cover the nail with your base polish color and let the nail dry.
- Remove the film with the remaining varnish.
- Secure your manicure with a top coat.
What is the purpose of the “pink thing” and why is it pink?
The so-called “pink thing” is necessary and necessary both in home manicures and also when there is a large flow of clients. It is very economical, the product may well be enough for at least 50 manicures. And this more than pays for the cost of good, branded drugs, with an increased content of useful components in the composition and the most muted aroma.
As for color pigments (defenders are available in literally all colors of the rainbow and even black!), the additional ingredient plays an auxiliary role in the product. With its help, manufacturers help us visualize the already treated skin from the area where there is no protection. The pigment itself does not affect in any way (either for the better or for the worse) the strength of the liquid tape or its additional caring properties. You can be sure that a white, pink, or green bottle will please you just as much as a purple or blue one.
How can I replace liquid tape? Are there any analogues?
Many people wonder how to replace liquid tape. If we don’t have manicure tape in our house, and you critically need it now, then don’t panic, because in your house you will definitely find something that can easily replace it.
PVA glue is a very convenient and also safe product that you will most likely find in your home. Especially if you have small children. Dip the glue bottle and brush into the glue bottle and carefully apply a thin layer of glue around the nail, as you would if it were liquid manicure tape.
IMPORTANT TO KNOW: Transparent manicure with glitter: photo examples of how to do it at home
When the glue is completely dry, you will notice that a kind of film has formed in its place. Only then can you start doing your manicure. When finished, carefully remove the film with the remaining polish and enjoy your beautiful nails.
PVA glue for manicure around the nail as a liquid tape
When performing stamping, water manicure and other nail art options, you can use PVA glue for manicure around the nail.
It would seem that this is a completely irrelevant substance in this case. However, experienced craftsmen will tell you that the properties that such an adhesive composition has are very beneficial to use to protect the skin from the risk of becoming contaminated with residues of varnish, gel polish or gel. We recommend: How to draw patterns on nails: step-by-step instructions for beginners
PVA glue does not need to be prepared or mixed with other components; just open the tube cap and squeeze the product onto the skin. Gently spread it over the skin with a thin brush, not forgetting to check the space close to the nail. Next, the composition should be allowed to dry thoroughly; when this happens, a thin but very reliable protective film will remain on the skin, which will not allow decorative varnish, gel polish or gel to stain the skin around the nail and thereby ruin the appearance of the entire manicure.
After the glue has dried, you can create a nail art design. And when it is completed, you only need to remove the remaining glue from the surface of the skin. This is not difficult at all, just use tweezers; with this tool, the adhesive film is removed from the skin.
How to make ribbon at home
Many girls practice making ribbon with their own hands. This is very convenient, because as mentioned above, you spend much less money on the product.
You will need:
- 10 ml drops of running water;
- 10 ml nail polish remover;
- 30 ml pva glue;
- brush;
- hairdryer
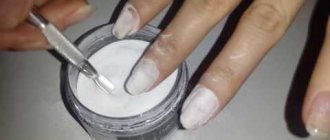
All of the above components must be added to the bottle and mixed thoroughly until a homogeneous mixture is formed. Next, apply the resulting product to the cuticle, and then dry the applied mixture with a hairdryer. After the made tape turns into a film, you can begin to perform a manicure.
What to do if varnish gets on the cuticle?
What to do if there is no product at home to protect cuticles from varnish? You can first perform the procedure and then remove the remaining dye from the skin. The simplest method is to wipe off excess varnish with cotton wool that has been previously soaked in acetone. The cotton wool should be wrapped around a match or a toothpick. In addition, a correction marker will help. You can use nail polish remover, a cloth and a thin brush. The latter should be dipped in liquid and rubbed over the stained areas. After this, you need to wipe the brush on a napkin. You can use cuticle oil or sunflower oil. An hour after drying, you need to take a hot shower. Afterwards, the stained areas should be massaged with a terry towel. If the cuticle is dirty with varnish, you can wash your hands with soap and then moisturize them. This way you can soften the varnish and remove it. Another way is an orange stick. It should be used in the same way as a toothpick.
Nail glue: types, rules for selection and use
A flawless manicure and well-groomed hands are every girl’s dream. It's fashionable, beautiful and simply necessary to look your best. But it takes time to grow nails to the desired length, so more and more often modern fashionistas are resorting to the help of false plates. They are called tips. A tool such as nail glue allows you to attach the plates and decorate them, as well as repair them.
Nail glue is a translucent viscous gel intended exclusively for manicure. It is better to use the adhesive liquid in a salon environment, where professionals will attach the overlay plate and make the perfect design. Or you can try to achieve an impressive effect at home. Convenient packaging and a narrow tube spout make it possible to apply light glue directly to the nail without irritating the skin around it.
The chemical composition is based on cyanoacrylate or another similar polymer. Thus, reliable adhesion of your own nail to the tip is achieved. It is believed that in addition to the main effect, the glue prevents ultraviolet radiation from drying out the plate and protects it from other harmful influences. An exfoliant and panthenol are added to the polymer as an additive, as well as strengthening components and antioxidants, retinol palmitate.
- Coo-Coo-City. This product, consisting of two components, is well suited for gluing decor. Capacity – 25 ml. In order to stick the rhinestone, break off both tips and mix the components in equal parts. Place it on the nail and secure the accessories.
- ORLY. The repair kit contains a glue brush, silk and powder, and a sanding block.
- Nail Glue. It is considered one of the best products according to professionals.
- KODI Professional. Contains 10 g per package, suitable for tips.
- Kiss Brush On Nail Glue. This type provides instant setting. Applied with a brush, holds false nails and foil firmly.
- RuNail. Hypoallergenic and safe, odorless. Meets medical standards.
How to glue artificial plates: instructions for use. As a rule, the glue comes in a kit along with the overlay plates. At home, you will need tools, lint-free wipes, a degreaser, and a deep bowl for hot water.
- Artificial plates are coated from the inside with a degreaser. The excess is filed down to fit the desired size. The tip should be wide enough to completely hide the natural surface of the nail plate.
- After removing the remnants of old nail polish, use scissors to treat the cuticle, then you can begin gluing. To do this, you need to open the glue and quickly apply it, then apply and hold until connected.
- If you make a mistake and the glue has time to set, put your hands in hot water for a while. When the tips peel off, you can remove the softened glue with a solvent. Do not file to avoid damaging the surface. Then repeat the procedure again.
To do this, apply a template of the design or pattern that you like to the nail. The elements are fixed in the holes left on the template. The rhinestones are placed with tweezers, and the glue is applied dropwise using a thin stick. You need to think about the placement of the rhinestones in advance, then secure them one by one in the holes with glue. Afterwards, a final coating is applied to ensure that the decor remains firmly on the surface. It is best to use two-component adhesive gels for rhinestones. They dry more slowly, making it possible to move the elements until they form the desired pattern.
In addition to working with tips, glue is used to repair your own or artificial nails. The product is also used to attach rhinestones, lace, foil and other accessories. And yet the main purpose of this polymer is urgent repairs. Brittle nails cannot always be protected from cracking. The affected nail often breaks off close to the edge and next to the soft tissue. A sharp edge can damage them and cause bleeding. Therefore, for a broken nail and manicure around it, glue will be an indispensable means of restoration. The glue will harden, while maintaining the appearance of the manicure until the original length is restored. If the extension is done with acrylic, there will be no problems. This product is not suitable for gel extensions.
It is especially important to monitor the manicure if the plates are almond-shaped or pointed. This applies to both natural and artificial nails.
To repair a nail, you need to do the following.
- Clean the broken area with a buff so that all roughness disappears. The tool is a bar with a high abrasive surface that polishes the nail to a shine. A variety with a maximum degree of abrasiveness is used - over 500 grit.
- Place a special silk material and drop glue on it. It can be linen or artificial fiberglass.
- Sprinkle a little powder on the break line.
- Wait until everything dries.
- Sand and smooth with a nail file.
- If an accessory falls off, use a manicure stick. Holding the element, it is enough to drop the composition onto the place of attachment.
It is impossible to replace the glue produced by manufacturers specifically for manicure. Neither Moment glue nor Super glue are suitable: they are harmful and are not intended to interact with human skin. It is not then possible to completely remove such a reagent. Moreover, health may be damaged and an allergic reaction is possible. It is advisable to wear gloves even when using glue intended for manicure. If you urgently need to attach the plate, a high-quality transparent varnish is suitable.
If there is a need to urgently remove the overlays, this is a simple procedure, since the tips easily come off the nail plate. The main thing is not to damage your own nails and completely remove from them the remnants of the adhesive gel that holds the tips. Glue can be removed from nails only using special means. It is necessary to have manicure instruments, as well as auxiliary cosmetic compositions:
- discs or cotton wool for removing makeup;
- a liquid composition containing acetone that dissolves varnish;
- special means for peeling off tips;
- cream and foil.
The first thing to use is a tip remover. This liquid is applied, then, after removing the false nails, they begin to clean the natural surfaces of the glue. Most of the frozen gel remains in the places where the pad was attached. These lines require cleaning with an abrasive file. Of course, you need to polish your nails carefully and carefully so as not to damage them. The next stage is warming up your hands in warm water. Water is boiled and poured into a large container, deep enough to immerse both brushes. While the water is cooling, it contains nail polish remover that needs to be warmed up. When warm, the product will work more effectively.
The next stage is warming up your hands in warm water. Water is boiled and poured into a large container, deep enough to immerse both brushes. While the water is cooling, it contains nail polish remover that needs to be warmed up. When warm, the product will work more effectively. Hands are warmed up for at least 10 minutes, and cotton pads soaked in nail polish remover are applied to contaminated areas of the nails. In order for the cotton wool to hold, use securing foil. After 15–20 minutes, the discs can be removed and the nail plates can be wiped with acetone again. The most difficult part of the procedure is over. All that remains is to hold your hands in warm soapy water, finally removing any small residues. Soap and water are used again, placing your hands under the flowing stream. Now comes the turn of a softening cream or nourishing mask for the skin of the palms.
It will not be possible to completely remove the glue without damaging your nails. Especially if you often resort to applying tips. But with comprehensive care using special baths and regular use of moisturizing and nourishing, your hands will remain in excellent condition.
To learn how to stick your nails on, watch the following video.
vplate.ru
How to use liquid tape. Skin Defender for cuticle
When performing a beautiful decorative manicure at home, we inevitably face the problem of corrosive pigment and other active substances (gel polish, acrylic paint, airbrush paints) getting on the cuticle and side ridges. Removing these stains around the nails can take a lot of time, and if they have time to dry out, then you have to clean the delicate skin with special products. Regular procedures can cause irritation and peeling of the thin periungual skin, and the roughened cuticle grows more.
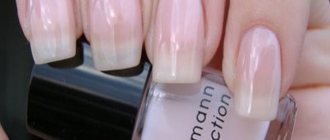
Liquid manicure tape is easily applied to the skin around the nails and turns into a thin film that protects the cuticle and side ridges from pigmented liquid. This product does not contain harmful components and the thin film will reliably protect delicate skin from allergic reactions, irritation and peeling. Liquid tape for cuticle protection Skin Defender is made on the basis of high-quality natural rubber, has good reviews and is appreciated by many women. This manicure corrector is sold with a sponge applicator or a convenient brush for applying a quick-drying product to the cuticle. Skin Defender correction fluid, pinkish in color, reliably protects the periungual skin from staining, has a bactericidal and antiseptic effect, and slows down the growth of keratinized cuticle. After applying the liquid tape around the nails, a dense film is formed on the delicate skin, which can be easily removed with tweezers upon completion of the home manicure.
— in the photo: Skin Defender cuticle protection corrector But if you do not have the opportunity to buy or order the innovative Skin Defender product in an online store, then you can use the means at hand to protect the cuticle or make a liquid nail tape with your own hands. In this material you will find tips on making liquid concealer with your own hands, and also learn what materials can replace liquid tape. Try to apply the corrective agent as close to the base of the nail plate as possible and begin manicure only after the thick film has completely dried, so that it does not move during the procedure. ♦ APPLICATION OF LIQUID TAPE
• Water manicure. During this procedure, it is imperative to isolate the periungual skin from excessive staining with varnishes of different colors. Layers with coloring pigment are formed on the surface of the water, into which the nail is immersed. The abstraction remains on the base coat of the nail, and the corrector film is removed along with the remaining varnish; • Gradient manicure. To create a gradient on nails with a smooth transition from one color to another, a piece of sponge or sponge is often used. Varnish or paint is applied to the surface of the sponge and the imprint is transferred to the nail using pressing movements. The wide surface of the sponge almost always extends beyond the nail plate, and the dried liquid tape will not allow the paint to get on the cuticle and nail folds; • Stamping design. The stamping kit includes a stamp with which the print is transferred to the surface of the nail. Before the procedure, be sure to apply liquid corrector to the skin around each nail; • Airbrush. During the procedure, highly pigmented paint is sprayed using an airbrush and a design is formed on the base coat of the nail along the contours of the through holes of the stencil. Use skin defender or homemade liquid manicure tape to protect thin skin from corrosive paint. ♦ WHAT TO REPLACE LIQUID NAIL CORRECTOR ❶ PVA glue. A very convenient and safe product that you probably have at hand at home. Dip a thin brush into the jar and carefully apply a thin layer of glue around each nail, being careful not to go beyond the cuticle line. When the glue dries, start doing the manicure. The film with remaining varnish or paint can be easily removed with thin tweezers; ❷ Scotch tape (adhesive tape). First, you can cut out a template from paper according to the shape of the area around the nail and cut a blank from adhesive tape using the template. It is advisable to take the thinnest adhesive tape and glue the workpiece cut out of it onto completely dry periungual skin treated with a degreasing liquid; ❸ Vaseline. Apply a very thin layer of Vaseline to the skin around each nail and wait until it dries. Be sure to remove any remaining Vaseline that gets on the nail plate before performing a manicure; ❹ Nail polish remover. Dip the tip of a cotton swab in HDSL and very carefully apply the liquid to the cuticle and nail folds, being careful not to touch the nail plate; ❺ Corrective pencil (felt-tip pen) for nails. If you have this product on hand, apply a thick layer to the entire area around each nail and lightly smooth it out with an orange stick. ♦ HOW TO MAKE LIQUID TAPE WITH YOUR OWN HANDS • Tools, materials: -30 ml PVA glue; -10 ml of clean water; -10 ml cuticle remover (can be replaced with nail polish remover); — Brush; - Hair dryer. • Step-by-step instruction:
√ Add all components to the bottle, close the lid and mix thoroughly until a homogeneous consistency is formed. √ Apply a thin layer of liquid tape to the cuticle and side ridges with a brush. √ Use a hair dryer (at medium power) to dry the applied layer. √ When the product has completely dried and turned into a thick film, we begin to perform the manicure. ♦ VIDEO LESSONS
Your recommendations and opinions will be very useful to all site visitors! Please leave comments on the article and share with each other the secrets of home care for cuticles and nails. If you want to post your photos and video materials on the topic on the site, please write a message to us by email: This e-mail address is being protected from spambots. You need JavaScript enabled to view it. To the main page
ALSO FIND OUT...
| Comments | Add new | Search |
Children's Portal: Home Page
3.26 Copyright (C) 2008 Compojoom.com / Copyright (C) 2007 Alain Georgette / Copyright (C) 2006 Frantisek Hliva. All rights reserved."
Related materials:
- Before birth, the baby is constantly in the mother's placenta and his movements are very constrained by the tight space. When a child is born, there is hyper...
“>How to sew a cocoon diaper with your own hands (pattern, master class)
- When choosing any tool for hot styling of strands, first of all pay attention to the characteristics that affect the structure and healthy appearance…
">Hair straightening tongs. Rating, characteristics
- Cosmetics with thermal protective properties ideally preserve the keratin structure of hair after aggressive exposure to high temperatures…
">Thermal protectants for thin, brittle hair
- My little daughters are 5 years old and I love experimenting with different options for styling braids, twists and curls on their long hair...
">Easy hairstyles for kindergarten for girls 3-5 years old
- A properly executed hairstyle for competitive ballroom dancing is an important element of the aesthetic appearance and unconditionally adds charm to the stage…
">Ballroom and ballroom-sports hairstyles for girls 10-14 years old
The following materials:
- Most women have very thin skin around their nails, prone to inflammation. In order not to once again injure the nail folds with sharp tools for...
“>How to use a pencil to remove dead cuticles
- We always pay special attention to the care of the periungual skin, since without a smooth, neat cuticle line it will be difficult to make a beautiful ma...
“>Choosing cuticle removal gel: Sally Hansen, Aravia, Severina
Previous materials:
- The cuticle protects the nail growth area (matrix) from infection and consists of a leathery cushion with a keratinized layer of pterygium, which grows together...
“>How to properly remove cuticles at home
- The cuticle is a leathery formation in the form of an elastic roller at the base of the nail plate, which protects the matrix (nail growth zone) from penetration...
“>How to use cuticle oil. Pencil and home remedies