A shiny manicure using a liquid foil texture can be the best finishing touch to your look. In addition, this design remains on the list of 2022 fashion trends and top manicure ideas.
Do you want to be inspired by new beautiful nail design ideas with “liquid” foil? We have collected bright options for such nails in different styles, shades and techniques. Among them there are spectacular solutions for a business style, new photos for everyday wear, and top ideas for a festive look. Choose the design you need! You can recreate any of the shiny designs you like on short and extended nails.
What is the advantage of “liquid foil” gel polishes?
- Fashionable manicure with “liquid foil” does not belong to seasonal manicure designs.
- Today, such decor can be worn all year round, decorating the nails separately.
- Gel polishes “liquid foil (mica)” have good density (1-2 layers), self-leveling, which allows you to quickly and easily get a sparkling outfit for your nails. Lasts up to 4 weeks!
- Beginners like it for its ease of use and the ability to create designs on nails.
How to do a manicure with transfer foil: instructions
A more complex decorative element in manicure is transfer foil for nails. Let's look at the question of how to use nail foil correctly so as not to have to do the work again.
Design using this material is considered quite labor-intensive. Not every novice master can really handle it.
Therefore, for a successful nail design, follow the step-by-step instructions:
- remove the remnants of old varnish from the nail;
- We do a manicure, using a nail file to give the nail plate the desired shape;
- polish the nails and then degrease their surfaces;
- apply the base and dry under a lamp;
- using a napkin, carefully remove the remaining sticky ball on the nails;
- Next, you need to cover the nail with shellac in a color similar to the foil (instead, you can use a special transparent base);
- dry under an ultraviolet lamp and remove the sticky layer again;
- coat the nail with glue, wait until it dries until transparent;
- We place a piece of material on the glue, carefully and evenly distributing it over the desired area with a cotton swab or pointed tweezers;
- After two or three minutes, we tear off the product quite sharply with a side tug to make an imprint with varnish.
Only after two hours do we apply the finishing polish, preferably gel, to the nail. You cannot coat it in advance, otherwise the product may shrink.
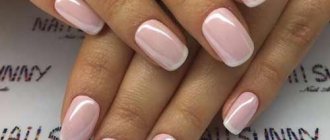
Lunar and regular French using foil
Let's look at how to use nail foil to create the most popular moon design. In this manicure, the main focus is on the lunula - a small distance from the root of the nail to its central part. In this case, the hole can be of different shapes: convex, round, triangular, etc.
Before you do a lunar manicure, you will need to think about not only the shape of the hole itself, but also the color design of both the varnish and the foil. In this case, it is recommended to play with contrasts: a great solution would be a bright hole on a dark background, or a dark one on a bright one.
You need to cut holes of the required size from the foil. To do this, it is recommended to use special stencils or make a preliminary sketch on paper, carefully transferring it to a piece of foil.
Before using nail foil, degrease the treated nail and cover it with a starting base. Dry the plate and apply the main shade of the varnish coating. After it dries, remove the sticky layer and apply a hole to the nail. Next, you should carefully level it with pointed tweezers or a cotton swab. Apply the finishing coat on top.
French is created in much the same way. Only instead of a hole at the root of the nail, a neat strip is applied to its beginning. In this case, it is also recommended to use special stencils to make the nail truly flawless.
Beautiful manicure with foil, gel polish and glue
It's no secret that foil designs on gel polish can be very diverse. In this matter, you are limited only by your imagination.
Another good solution is to design one nail, for example, on the ring finger. To apply a more original design, you can cut out various elements from foil and stick them in a specific or chaotic order.
On the Internet you can find many interesting videos or photographs that will become a source of ideas for creating an original manicure. For example, if you want to shine in all its glory, you can simply cover all your nails at once with a continuous strip of foil.
Lunar design or French design with “liquid foil”
Classic designs do not exclude the use of “liquid foil” gels. After all, an elegant manicure always looks amazing.
A hole design or a French jacket in tandem will brilliantly demonstrate an original and non-trivial approach.
Gradient and “liquid foil”
Fashionable gradient, Baby boomer and ombre allow you to combine several shades in a manicure. For a delicate manicure, you can choose pastel colors, for an intriguing one, dark ones. When decorating your nails in this way, you can highlight one or two nails using foil to match or choose an accent option.
Photo ideas for applying patterns
Using transfer foil in manicure is not only about cute wavy lines and flowers. There are enough ideas to decorate the surface of the nail with this material to choose the appropriate option for your luxurious design.
Gold casting
To apply gold casting on nails you will need high-quality foil. To achieve the effect of the presence of gold on nails, the foil should have a bright golden hue without darkening, and you should not use material with a holographic coating. It will not make your manicure “expensive”.
To make your manicure as realistic as possible and to feel the presence of natural gold on your nails, you should not ignore these tips:
- It is better to use black gel polish for the casting base; it is against this background that gold foil looks especially advantageous. You can use a black background not only on dark coatings, but also on transparent, bright, light ones;
- To enhance the precious effect, the trend is to combine gold casting with the liquid stone technique;
- In order not to lose the relief of the pattern, you should not overfill the design with top, then the casting effect will be more noticeable.
Gold casting is important to use in manicure if a woman wears precious jewelry in golden tones (for example, gold rings, a gold bracelet, etc.). This design looks great on different backgrounds, so there is no fundamental difference in choosing the main shade of the manicure.
Silver casting
Similar to gold casting, silver matches any basic shade of manicure. But it is still worth considering a woman’s preferences in jewelry: you should not cast silver if the jewelry on your hands is gilded or made of gold. If there are no decorations at all, then any shade of foil will do.
For a beautiful and delicate manifestation of a silvery coating on the pattern, it is better to do it in white. Silver foil on a white background appears with a gentle reflection; this effect is best used for dark shades of the manicure background. If you take black as a basis, then silver casting will look bolder and stand out well against a light background.
Liquid stone casting technique
To perform a design when you need to imitate natural stone, you must have a gel polish or gel coating on the nail plate. Application of liquid stones does not take place in one layer. For high-quality design, you need to have stained glass gel. But if it’s not there, then you can make a “hamburger”:
- Apply a flat drop of colored gel polish to the gel coating and dry;
- then do foil stamping (best with an overflow, the base is translucent);
- cover with topcoat and dry.
Option for creating liquid stone on nails
Depending on the real stone chosen, various color combinations and shapes are used. Along the edges of such a stone, you can use casting, as an option - golden broths. Photo examples are attached:
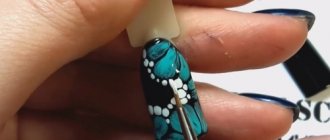
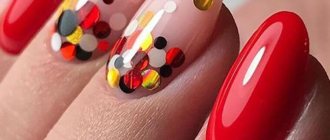
Stained glass patterns and mosaics
To create such a design, it is better to purchase stained glass gel, which differs from its counterparts in its transparent base, but has a shade of the desired color. Other options for design are pieces of multi-colored foil, mica, colored gel polishes with a “cat” effect.
The effect of stained glass using stained glass gel can be created between partitions made using the casting technique. To use pieces of foil, it is better to use the “aquarium” technique and draw the borders with black gel polish or acrylic or gel paint.
Volumetric lines and monograms
This design is suitable for adding uniqueness to traditional types of manicure: French, moonlit, plain glossy or matte finish. You can create volume using the classic method of layering gel polish and a foil print.
To simplify the drawing, it is worth using a thin brush made of artificial material (nylon, for example).
Mirror effect
In order to get a mirror-like shine effect on your nails, you need to choose the appropriate foil with the ability to transfer. Mirror foil sticks in the same way as regular foil - to the sticky layer of gel polish. You can also use pieces of mirror-coated foil and make an applique out of them. Upon completion of the design, the resulting mirror effect is fixed with a top coat.
Hollywood casting
Making a Hollywood nail is quite easy if you have foil and gel polish. This technique involves smoothly applying foil to the nail to create the effect of a gold bar. This design is not used to decorate every nail, but is limited to a few selected ones. The background for other nails can be varied, but for Hollywood casting, classic solutions are preferred: black, red, white. As an option - fashionable shades that are constantly changing: marsala, burgundy, champagne, etc.
French casting
You can get an exquisite foil nail if you use French casting. To do this, you just need to leave the stickiness on the tip of the nail and make an imprint using foil embossing. Any foil color can be chosen, it all depends on imagination and the desire to stand out. French casting is suitable for short and long nails.
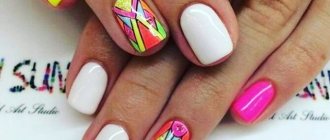
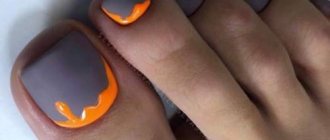
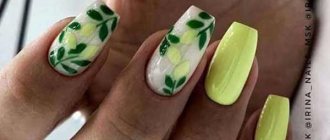
Colorful nail art with “liquid foil”
If you want to get a spectacular manicure, it is advisable to highlight one or two nails in a colorful way. In the spring-summer season, these can be floral motifs and foil, in winter - no less delightful thematic designs made with liquid foil. In this way, you will realize the “precious” design in a stylish way.
Rubbing and “liquid foil”
Rubbing and applying the selected shade of gel polish in 1-2 layers is one of the most spectacular ideas for a manicure. These two sparkling textures can easily coexist in one design. An ideal choice for a holiday manicure when you want to make a bright accent on your nails.
However, by highlighting only one nail at a time with rubbing and foil, you can get a completely laconic design.
INSTRUCTIONS FOR APPLYING TRANSFER FOIL USING GLUE
Do you want to learn how to properly and aesthetically decorate your gel polish design with transfer foil, but you can’t print it correctly? Our detailed master class on the classic method of transferring foil to a full nail will help! We will reveal all the intricacies of this technique and talk about the stages of creating this popular design.
Foil for nail art is a decorative product with which you can quickly and effectively decorate any coating (varnish, gel polish, gel, polygel) with minimal time and maximum aesthetics of the final design. By type, this decor is divided into potal (flakes), “broken glass” (cut), malachite (stylized as semi-precious stones) and transfer. It is with the latter type, which was one of the first to appear in the nail industry, that novice masters have the most difficulties in working.
In our article today we will look at the main methods of applying foil (on gel polish, on top coat and on glue). We'll tell you why foil may not print on gel polish and explain how to avoid this.
The most common mistake when creating a nail art with transfer foil is confusing it with the tear-off look. Many craftsmen believe that there is no difference between these decorative options, so they are disappointed with the results of their attempts to fix the foil on the gel polish coating. In order to achieve a positive result in implementing this technique of decorating natural or extended nails, you need to know the intricacies of each method of imprinting transfer decor. Let's look at their pros and cons and look at step-by-step instructions on how to properly apply foil to gel polish.
Option #1: print foil onto a sticky layer of gel polish.
The advantage of this method is its speed and ease of execution. The downside is that it is least effective for decorating the entire surface of the nail plate with a layer of bright, sparkling, colored foil coating. To achieve an effect that both the master and the client will like, you can fulfill three conditions:
- Purchase high quality foil to minimize possible transfer flaws;
- Do not overdry the coating. After drying in a lamp, the dispersion layer of gel polish must be strong enough so that the print is rich and uniform;
- Keep the coating clean. If dust particles, lint, or nail dust stick to the dispersion, you will not be able to get a solid, clear print.
It is quite difficult for a beginner to observe all these nuances at home. Therefore, it is more expedient to use this method for the craquelure technique of transferring transfer foil.
Option No. 2: glue the foil onto the undried top coat for gel polish.
The advantage of this method is that the master can transfer a design from a roll of transfer foil perfectly accurately, without bald spots or loss of fragments of the design. The downside is that with this technique it is extremely difficult to attach the foil without creases and tightly to the entire surface of the nail. Therefore, it is best to resort to this option when you plan to decorate your nails locally, with a pattern in the form of geometric shapes.
The design is carried out as follows: the selected foil is glued to the wet layer of the top. Next, you should tear off the protective transparent film from the surface of the foil and fix the pattern with a second layer of topcoat. For reliable fixation and comfortable wear, the decor must be carefully covered with a layer of material so that the foil particles do not stick out or puff up on the surface. Essentially, the craftsmen do the leveling, which requires more time than when using the first method.
Option #3: use special glue for transfer foil.
Typically, craftsmen resort to this method in cases where the gel polish chosen by the client has a weak dispersion layer, or the foil they like is capricious in transfer. A special adhesive-iron, the formula of which allows you to tame any foil, is applied with a brush to the colored gel-varnish coating. Before applying it, you need to carefully remove the residual stickiness from the gel polish, apply the glue itself thinly and let it dry completely. It’s easy to catch the right moment: as soon as the white glue on the nail becomes completely transparent (both when drying in air and when drying in a lamp), you can start working.
This option is best used if you have chosen foil with a pattern that needs to be transferred to the entire nail. The glue will help make a print without cracks (or by minimizing the refraction of the foil) even if the client’s nails have a pronounced bend.
Let's take a step-by-step look at how to glue foil on nails using glue:
- Perform standard preparation of natural nails for applying a durable polymer coating (classic trimmed, combined or hardware manicure). Push back and remove the cuticle, remove the natural gloss with a buff or fine abrasive file and degrease the nail plate;
- Apply gel polish base and dry it in a lamp;
- Cover your nails with colored gel polish (or use a camouflage pigmented base as a 2-in-1 coating), polymerize it in a UV or LED device according to the manufacturer’s recommendations in 1-2 layers;
- Apply foil glue and wait for it to dry;
- Stamp the foil onto the glue, pressing it with the matte side to the nail and smoothing it using an orange stick or a “hoof” brush;
- Sharply tear off the foil from the nail. Places of bald spots (if the pattern allows) are masked by re-printing the foil onto the glue, or by resorting to painting with gel paints;
- Cover your nails with a layer of top coat and cure it in a lamp. If necessary, remove the sticky layer from the top coat with a lint-free cloth soaked in a special liquid.
Let's consolidate the information received - in the next section of our review we present to your attention the author's photo master class on transferring foil to classic nail polish. The technology is as close as possible to gel polish materials, but it takes much less time and will allow those girls who cannot afford to wear gel polishes due to an allergic reaction to transform their nails into a stylish nail outfit.
1 Step
Choose your favorite foil design.
2 Step
We cover the nails with the base color of the varnish and wait until the varnish dries. I note that in this design, the darker the color of the varnish, the brighter the design will be. Apply transfer foil glue to the nails in accordance with the intended design. Let the glue dry (at least 5 minutes). Peel Off bases (bases for glitter varnishes) can be used as glue. They do a great job too.
- Milv, foil adhesive, 10 ml
3 Step
The foil has two sides that are different from each other, one bright side (with a pattern) - the front and back. Place the reverse side of the foil on the nail where the glue was applied. Lightly press it against the nail and smooth it out.
4 Step
With a sharp movement, tear off the foil from the nail. If somewhere the design is not imprinted, apply the foil again in this place and repeat the “tearing off”.
5 Step
It is important not to hit the place where it is already printed, otherwise the foil will crack. Do not apply sealer immediately after applying the foil to avoid micro cracks.
6 Step
We wait 2 minutes and cover the design with a top coat. Avoid applying too much pressure with the brush. Some sealers can make the foil look dull, so you'll have to experiment with what you have.
7 Step
Photo out of focus.
8 Step
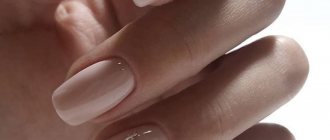
Plain manicure with “liquid foil”
Cover your nails with your chosen shade of polish, then highlight two fingers of each hand with liquid foil gel polish. Shiny decor can be chosen to match the rest of the nails.
In tandem with beige, coffee, and dark tones it will be a wonderful choice for an office worker’s manicure.
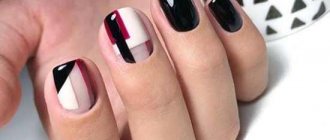
Elegant geometry and foil instead of rhinestones
To add elegance to strict geometry or to replace sparkles, glitter, and rhinestones in a design - “liquid foil” gel polishes will also help. Moreover, such nail art options will not be inferior in beauty; they look very noble and expensive. Perfect for business ladies and those who don’t like wearing rhinestones on their nails. Liquid foil can also be used to create designs.
Master class: How to make a “Liquid Gold” design on nails
Let's start with the simplest design. Namely gold casting on a black matte backing.
Photo of the finished manicure using the “liquid metal” technique
For this design you will need:
- standard set: base, top, matte top;
- black gel polish;
- transfer foil of any shade.
Step-by-step instructions for performing a manicure with casting
Step 1 – Cover your nails with base coat and gel polish.
Step 2 – Creating a matte texture (using the RIO PROFI Velvet top as an example).
Advice for beginners
If the matte top does not lie smoothly (with bald spots), then try increasing the drying time to 3 minutes and remove the stickiness only after the top has cooled for 30-60 seconds.
Step 3 – Apply a thick base onto the nail. 1-2 drops are enough, just not very large. Keep in mind that the base spreads under the weight of the foil. Next, place the pre-cut pieces of foil. We don't press. We quickly send it to the lamp.
Important!
For liquid metal manicure, it is best to use a thick rubber base, because... it will spread less. The top is not suitable due to its liquid consistency.
Step 4 – After the top has dried, remove the foil with tweezers. There should be beautiful prints left.
Step 5 – At the final stage, we add volume and depth to the design. We cover the prints with topcoat. You can use 2 layers, extending half a millimeter beyond the edges of the foil.
The design is ready. It looks great both on a dark background and on pastel colors.
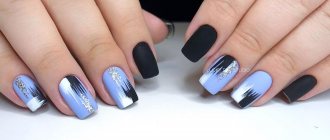
Matte manicure and liquid foil
In pursuit of a flawless manicure, a new idea may well be a combination of matte and shiny textures on the nails. It is this top-end design that will become a lifesaver for stylish women.
- We recommend on the topic: “Spiderweb” design - original photos and manicure ideas.
- Milk manicure is a hit novelty, stylish ideas and photos.