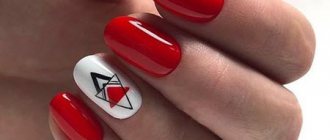
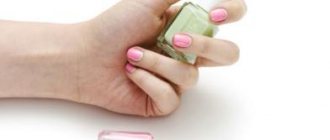
Beautiful nails give self-confidence, lift your spirits, and increase the status of their owner.
But not everyone can afford to visit a salon all the time. For many, the topic of manicure at home is relevant.
To properly make a beautiful manicure, preliminary preparation is necessary.
It includes the purchase of manicure tools, disinfectants and related items that you cannot do without .
Necessary tools for manicure at home
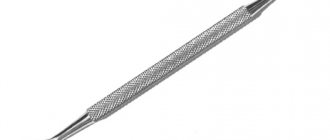
Good, high-quality tools are the key to high-quality cuticle care, prevention of nail splitting and high speed of the procedure. For a classic edged manicure you will need the following tools:
| Tool | Description |
| 1. Cuticle tweezers. Buy | It is best to purchase a Solinger brand tool, this is an old German brand of cutting tools. Tweezers have their own sizes. They determine the length of the blade. It’s good to take 0.5 cm. |
| 2. Pusher (translated as pusher) Buy | Double-sided cuticle spatula: on one side it resembles an oar, on the other it resembles a hatchet. Must be metal. |
| 3. Knipser Buy | Tool for cutting the length of the nail. It looks like a small guillotine, it can be used for fingernails and toenails. |
| 4. File 180 grit Buy | The grid should be imprinted on the file itself. |
| 5. Polisher 2000 grit Buy | There are double and triple polishers, then the grit for each side must be printed. |
| Related Items: | |
| 1. A large bowl, preferably ceramic - it holds the temperature well; | |
| 2. Towel or napkin; | |
| 3. Cotton pads; | |
| 4. Orange sticks; | |
| 5. Nail polish remover. | |
| Disinfectants: | |
| 1. Chlorhexidine; | |
| 2. Alcohol solution 70%. | |
| 3. You can purchase a professional product for treating hands and metal tools at the pharmacy. | |
Which manicure tools should you use and which should you not?
If you still have little experience in nail care, orange sticks will come in handy . They can move the skin near the cuticle and clean the eponychium.
nail scissors to trim cuticles This is acceptable, but the best quality manicure will be if you use tweezers . Scissors have straight blades, while tweezers have beveled blades. Therefore, it is the tweezers that cut the skin more and deeper , and after using them the manicure lasts longer.
Nail fork
| Caution: There are many manicure tools on the market. One of them is the “fork”. This is an unprofessional tool that has caused a lot of damage in its lifetime. It is assumed that this “fork” will cut off the excess skin around the nail. This tool, no matter how you take it, scratches and cuts through the delicate nail on the hole. In addition, it does not cut off the excess skin (eponychium), but the thin skin of the roller. Therefore, when using it, your hands bleed. |
Since we are talking about the cuticle area, no blade pressure is allowed. This can damage the matrix - the growth cells of the nail under the hole. As a result, the nail will grow crooked for the rest of its life.
Indications and contraindications
A classic manicure is recommended for all those who have very rough, dense, keratinized or overgrown cuticles. This also applies to those women who have not had their nails done for a long time, as well as men who naturally have denser and rougher cuticles.
Classic manicure is not for everyone. Moreover, there are a number of contraindications for performing this procedure. Trimming cannot be performed:
- in the presence of injuries, defects or diseases of the nail plates, for example, nail fungus;
- if the skin around the nails is inflamed and there are wounds, it is better to avoid the procedure for a while;
- very thin skin also serves as a contraindication for the procedure, since there is a high risk of skin injury;
- if your blood vessels are close to the skin, then this manicure is not suitable for you;
- for diabetes and diseases associated with blood clotting, trimmed manicure is strictly contraindicated;
- You should not do this manicure for children.
In the Moscow salon "Manicurof" you can get a classic manicure. The price of this procedure is quite affordable. To sign up for the procedure, you should call the phone number provided.
Choosing a nail file, which one is used for what
Files vary depending on the grit. Grits measure the amount of abrasive applied to 1 square centimeter of a file:
The coarsest file is 80 grit. It is used to reduce the length of artificial nails;
From 100 to 150 – to give shape to artificial nails;
From 180 to 240 – for working with natural nails;
From 400 to 2000 – polishers.
It would be a big mistake to use the wrong saw. In stores you can see nail files without a grit mark. You shouldn't buy them. These can be rough files that will only “soak” the nail and it will crumble and flake.
there are files or clippers for this . He, like a guillotine, cuts the edge at the right angle.
| Caution: Nails in their structure resemble a honeycomb. If you cut the honeycomb with scissors, the edge will break and a lot of honey will leak out. If you cut with a knife, a few drops will come out. The same goes for nails. If you cut with scissors, the edge of the nail will be broken . This is not visible to the naked eye, but the destruction produced can be observed through a microscope. |
The file moves in one direction . Then the edge of the nail does not become frayed. You cannot use a file on wet nails. Nails absorb a lot of water and become flexible. They follow the file and it’s impossible to make a good cut. Moreover, you can break off the edge of the nail. Therefore, use a file only on dry nails.
They also use a polisher on dry nails . This is a tool for the final stage of the manicure procedure.
Problems and solutions
There were, of course, difficulties. I will give several such examples and give advice on how to solve such problems:
- The most common problem I encounter is when a client shows her preferred manicure option from a catalog, and in the end, it looks a little different on her nails (pictures are sometimes different from reality).
She refuses to admit that she herself did not agree to do extensions and on short nails the design turned out to be slightly changed, but I stipulated what procedures were required to obtain the desired result. In this case, I simply ask you to pay for the service and continue to clarify your preferences. Sometimes the situation does not end so simply, which leads to the next point.
How to choose the shape of the free edge of the nail
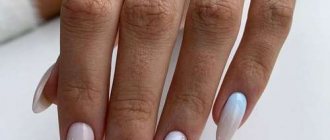
The shape of the nail can visually lengthen the fingers , making them thinner and more graceful. But often you see nails of different lengths, asymmetrically filed or too short.
The fingers on the hand are all different, the nails are also different. The nail on the big toe is wider than the others, but longer. The little finger has the most beautiful, narrow nail. The ring finger also has a beautiful nail. But the index and middle ones are usually shorter than the others. This happens because they have a lot of work to do. They are hard workers and therefore do not have time to grow up.
Short nails should be trimmed to length. Especially if you are going to cover them with clear varnish. The free edge will show through and it will become clear that it is not the same length on all fingers.
The shape of the free edge is:
| Square | Oval |
| Soft square | Almond |
A square is sawed like this : first the length is removed, then several movements are made with a file on one side and the other to emphasize the square shape.
Soft square : made from the previous shape, slightly rounding the corners and giving the straight cut a slightly smiling line.
Oval: made from a square shape, at the corners the file is placed at an angle of 45% and the corner is sawed off. Then the resulting obtuse angles are smoothed with a file.
| Tip: You cannot make an oval by filing first on one side of the nail, then on the other. You definitely need to go through the square stage, then the corners cut at 45%, and only then cut out the oval. Otherwise, the nail will not be symmetrical. |
Almonds: First a square is made, then a file at an angle of 60% cuts off the corner on both sides. Then all the corners are smoothed out. The almond shape is only given to long nails. On short ones it looks awkward.
After shaping the nails, you need to remove the sawdust from under them. This can be done by placing the file perpendicular to the free edge of the nail and making several upward movements with the file.
How and where to start doing manicure at home?
First of all, many people think about registration. How to register an individual entrepreneur?
- The process of organizing almost any business of your own begins with this step. The manicure salon, officially, is no exception. It is registered in the same way as a hairdresser - the same codes must be specified.
- Next, we will decide on the taxation system - you need to choose the simplified tax system or UTII. Everything here is at your discretion, but let’s say that the simplified version in many cases turns out to be more convenient.
Photo from Weise Master Studio website
- After registration has been completed, you must purchase a cash register. They buy it from the tax office; this cannot be done anywhere else. Therefore, you will have to wait about 20 days. This is quite a long period of time, especially when you are ready to work and earn money. Therefore, there are special services that, for a fee, can take care of this matter and provide you with the device within three days.
- During the registration process of an individual entrepreneur, a stamp must be made. This rule works for any business, including manicure. Many masters nevertheless ignore this point - but in vain. Most foreign suppliers refuse to deal with such companies.
Photo from the site https://xn--80adetbltib4b8c.xn--p1ai/
- You don’t need a license - this is a positive thing, but you will still have to provide a certificate. As you can see, the legal organization of a business can only be carried out by those who have undergone special training and have a document confirming completion of the courses.
And most importantly, documents that will confirm the legal conduct of business.
- Lease agreement or document confirming ownership. The first option is necessary for those who open a salon, and the second for craftsmen working from home.
- Help from RosPotrebNadkho.
Photo from the site www.securitylab.ru
- Conclusion from the SES that the inspection was passed and sanitary standards were met.
- Invoices for all goods that you intend to use.
- Price list for your services.
The question arises: is it necessary to collect all these documents and bother with SES checks? Let's look at the pros and cons of registration.
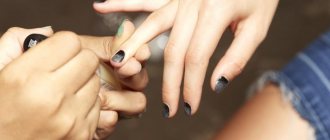
Trim manicure at home
Technique for classic edged manicure:
Hand washing
Step 1: Wash your hands thoroughly with soap, remove old nail polish and give them the desired shape;
Removing varnish
Step 2: Completely remove the old varnish;
Nail polish removal
Step 3: Lay out a towel and place a bowl of hot water on it. You can add a little liquid soap;
Soaking hands
Step 4: Place your left hand in a bowl of hot water (if you are left-handed, your right hand);
Step 5: Remove the little finger from the bowl, dry it with a towel and push back the cuticle with a pusher;
Pushing back the cuticle
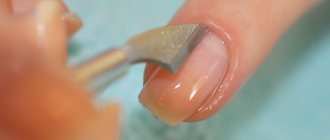
Step 5: Use a hatchet to clean out the pterygium (eponychium);
Cleaning the pterygium
Step 6: Using tweezers, trim off the white dead skin on the rollers and cuticle area. Hold the tweezers on the rollers with the blades parallel to the nail, and perpendicular in the cuticle area. This results in a smaller cut and there is no chance of accidentally touching the roller with the back of the blades;
Cuticle removal
Step 7: Take out your ring finger and repeat steps 4 to 6;
Step 8: Take out your middle finger and repeat steps 4 to 6;
Step 9: Take out your index finger and repeat steps 4 to 6;
Step 10: Take out your thumb and repeat steps 4 to 6; Step 11: Change the cooled water and put your other hand in it;
Step 12: Repeat steps 4 to 9.
If a manicure is being done for a man or a child , the next step is polishing the nails and massaging the cuticles with oil.
Moisturizing with oil
If a girl does not want to paint her nails, then they are covered with a colorless base for natural nails. This will keep them from being dried out by detergents and washing powders . And also at the end, massage the cuticle with oil.
My business plan
I quickly came up with my own business plan for developing my future business. First, I looked at what manicure equipment was required and their prices.
Of course, I didn’t get such beauty right away.
According to my calculations, I had to spend approximately 6,000 rubles (less than $100 at that time) for a complete set of tools :
- gel polishes,
- ultraviolet lamp for drying gel polish,
- couchers,
- files,
- napkins,
- apparatus for hardware manicure, etc.
I planned to get a manicure every 2 days; I had to earn at least 15,000 rubles (more than $230) a month. All manicure equipment was supposed to pay for itself in a third of a month, which made me very happy.
Also, every month I have to buy about 10 bottles of varnish, which is about 1,000 rubles (approximately 16 dollars).
With earnings of 15,000 rubles and expenses of 1,000 rubles, my profit should be somewhere in the region of 14,000 rubles (about $220). Not bad pocket money for a tenth grader? Everything was calculated, all that remained was to get financing somewhere.
Unedged manicure at home
In the salon, unedged manicure is performed using a special device. It has a cutter, different attachments and speeds. You can do this manicure at home using files of different shapes and sizes. There is a file that is called “a file for European unedged manicure . It is small, square or rectangular in cross-section and often has a rounded end. It is convenient for them to move the roller in the cuticle area.
Ceramic hoof
Another tool that can be useful for removing eponychium is a ceramic hoof . It should not be confused with a silicone hoof. They are very similar in appearance, but the silicone is very soft. They cannot clean the nail from the dried skin that has stuck to the nail. It is only suitable for pushing back the roller in the cuticle area. Unedged manicure is performed without soaking, on dry skin. Special products are used to soften dry areas.
Cuticle removers
They produce two types of products: alkaline and acidic. Both of them work well to soften hardened skin areas with hyperkeratosis. You should ask the seller whether you need to wash off the purchased product and after how many minutes to do this. There are also products based on fruit oils ; they do not need to be washed off the skin. They will not dry out or cause inflammation if they are not washed off. On the contrary, they nourish and moisturize the skin. Such cuticle removers are applied between manicure procedures to prevent the growth of eponychium (pterygium). High-quality and inexpensive cuticle removers can be purchased here.
Technique for performing European unedged manicure at home:
Step 1: Wash your hands with soap;
Hand washing
Step 2: Apply cuticle remover;
Applying cuticle softener Cuticle treated with cuticle softener
Step 3: Starting with the little finger, use the rounded tip of a file or an orange stick to push away the roller;
moving away and grinding the roller
Step 4: Remove the softened thin skin from the surface of the nail;
Cuticle removal
Step 5: Process the rollers with a 180 grit file;
processing rough rollers with a file
Step 6: Wash your hands with soap; Step 7: Degrease nails with an alcohol solution;
Degreasing nails
Step 8: Apply varnish.
Varnish coating
Manicure training for beginners
Have you decided to train as a nail technician? Where should I start? Study on your own or under the guidance of experienced professionals? Let's figure it out.
Nuances of self-study:
- It is extremely difficult to understand the flow of available information. Trying to study the entire unstructured volume of materials on the basics of manicure, you will spend more effort and time. Moreover, there is a chance that you will never understand the execution technique.
- In order to practice everything you study, you will have to spend money on purchasing training materials.
- In addition to materials, you need to find models who will agree so that you can start learning the basics of nail service with them.
- No one will tell you whether you are doing the right thing or point out mistakes, which will create even greater misunderstanding.
Why you should choose professional manicure training:
- Save time. A certified expert will correctly convey to you all the necessary information on manicure techniques and help you perfect it in a matter of days.
- Saving money. The specialist will give you an accurate list of the most necessary and proven consumables for honing your skills, which will eliminate spending on the purchase of products that are useless at the start of work.
- By studying at a nail service school, you don’t have to buy tools and equipment. This is all provided by the educational institution.
- In addition to tools and materials, you will be provided with models on which you can practice, and an expert will point out all the mistakes and tell you how to correct them.
- By studying with an expert, you will be able to prepare a portfolio of work completed during your studies. This will allow you to start earning money immediately after completing the course.
- Upon completion of the course, you will be issued a diploma confirming your qualifications, with which you can find work in any salon.
How to paint your nails evenly and beautifully
There is no difficulty in painting your nails easily and quickly and doing it exactly at home, without using a brush on the roller.
First of all, the varnish must have a certain consistency. The new varnish applies well and dries quickly because the solvents have not yet evaporated from it. If the varnish has thickened, add 3-5 drops of varnish solvent to it.
Do not try to thin the polish with acetone or nail polish remover. These products will cause the varnish to curl.
Technique for applying varnish in bright or dark tones:
| To prevent the color coating from being absorbed and staining the natural plate, you should apply a transparent base before it. |
Step 1: Dip the brush into the varnish, squeeze out the excess with the back of the brush onto the bottle in a forward motion.
Step 2: Place the brush in the middle of the nail at a 45 degree angle and move towards the cuticle. Before reaching the roller, stop the brush and move towards the free edge of the nail. This entire double movement must be done without lifting the brush from the nail or stopping it.
Positioning the brush Smooth movement towards the cuticle Movement of the brush towards the free edge
| Tip: Before you start painting your nails, practice your brush movements well. An ordinary light bulb is suitable for this. |
Step 3: Place the brush on the nail in the cuticle area so that the brush lies in the hand perpendicular to the finger. Make a stroke with the brush along the cuticle to the side roller, round the stroke along the contour of the nail (the brush changes position - now it lies in the hand parallel to the finger) and finish it to the free edge of the nail.
Movement to the side roller
Step 4: Repeat this movement on the other side of the nail. If you run out of varnish on the brush during the process, turn it over and continue.
Moving in the other direction
Step 5: With a well-pressed brush, brush along the end of the nail, sealing it.
Result
Technique for applying varnish in nude and dense pastel colors:
Nude polish
Step 1: Dip the brush into the polish, squeeze out the excess with the back of the brush onto the bottle in a forward motion.
Step 2: Place the brush in the middle of the nail at an angle of 5 degrees and move towards the cuticle, holding it almost suspended. The brush does not put pressure on the nail, only the polish touches the nail. Before reaching the roller, stop the brush and move towards the free edge of the nail.
Step 3: Bring the brush to the cuticle area. Keep the hand parallel to the finger. Barely touching the nail, move the brush towards the side roller and down to the free edge. The brush should go along the side of the nail without touching the roller.
Step 4: Repeat this movement on the other side of the nail. If you run out of varnish on the brush during the process, turn it over and continue. Step 5: With a well-pressed brush, brush along the end of the nail, sealing it.
Funding and training
After the business plan was ready, I rushed to our family bank (home) and submitted an application to our family accountant (mom) to give me 6,000 rubles free of charge to make my dream come true. But I was refused, since the analysis of my grades at school was not entirely appropriate.
However, I was still given 500 rubles (less than $10), and they also gave me a promise that I would receive further funding after receiving at least some profit from my endeavors.
The Internet helped me
Of course, manicure courses seemed too expensive to me, and I couldn’t afford them. But I didn’t even think of losing hope. I couldn't screw up this plan.
Then I came up with another solution: to learn the art of manicure via the Internet. For about two weeks I studied videos that talked about applying nail polish, additional devices, etc.
After that, I borrowed a set of manicure tools from a friend and ordered three gel polishes and a lamp for drying gel polish through an online store at a big discount. After 3 days, the varnishes and the lamp arrived in excellent condition with a receipt. I spent about 500 rubles on this, the same ones that my mother gave me.
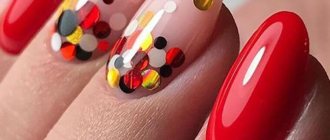
Nail designs at home
There are beautiful design options for which you don’t have to go to the salon. They can be done at home: rhinestones, glitter, gel pen painting, stickers, bouillons, varnish painting, craquelure, velvet, cat's eye.
Cat's eye - stripes Cat's eye - waves
1. Cat's eye design . For it you will need to purchase magnetic polish and a Cat's Eye nail magnet. They also produce variants “Wave”, “Stripes ” and others. But the most spectacular is “Cat's Eye”.
Cat's eye - made with gel polish
It is done on the newly applied layer of varnish. The magnet is brought to the nail so that the strip is along the nail. Hold for 1 second.
If you hold the magnet closer to the nail, there will be a clear line, further away it will be blurry.
If you bring a magnet first vertically and then horizontally, there will be a bright point.
Gel polish - made with ordinary varnish
2. Craquelure design . A new product, hard varnish, has appeared on the product market. More details can be found here. This is a special cracking varnish that is applied to the dried previous layer.
Substrates made of gold, white, and black varnish look good. Crack polish dries quickly. It can be thinned like regular varnish.
If you apply it in a thick layer, it will crack into large pieces. If in a thin layer - into small ones. You can combine it: make one side of the nail with large fragments, and the other with small ones.
Craquelure - large, medium, small.
3. Velvet design. The varnish for this effect is called “Satin”. After drying, it becomes matte, hiding all the unevenness of the nail.
If you apply a top coat on it, it becomes shiny, like regular varnish. You can make two nails shiny and leave the rest matte. This design looks good in dark or bright colors. On pastel colors it is almost invisible.
4. Leopard design. On a dried substrate (for example, coffee-au-lait color), uneven spots are applied with a brush with a slightly darker (beige) varnish and, without waiting for them to dry, a black dot is added to each spot. Using an orange stick, each dot is given the appearance of a comma.
Leopard design
This design is classic. It can be performed not only in natural tones, but also in avant-garde ones. A turquoise backing with blue spots and black commas looks good.
5. Zebra design.
Zebra design
Black lines are applied to a dry white substrate with a thin brush. There are varnishes for design, they have just such brushes.
The lines are drawn diagonally on the nail. The first line is drawn simple. The second, parallel to it, with a thickening coming from the middle of the line. It looks like a very narrow triangle. The third line is drawn simple along the previous one. The fourth is drawn with a thickening on the other side. The fifth is simple.
You can draw with a regular black gel pen. When the drawing is dry, simply seal it with topcoat. One zebra nail looks good, the rest are white.
Nails with rhinestones and bouillons
6. Design with stickers, bouillons and rhinestones . It is used on special occasions (weddings, graduations) and requires a beautiful dress.
Decorate two nails, tightly covering them with rhinestones of different sizes . Swarovski rhinestones are suitable; they can be purchased in a set. The largest stone is placed in the center, closer to the cuticle. Near it on both sides there are smaller stones.
The smallest stones are placed on the edge of the nail. The space between large stones can be filled with golden broths . On the remaining nails, place one small stone in the center near the cuticle.
Pencil for rhinestones
Place the stones on the wet varnish . The stone is taken by simply bringing an orange stick moistened with water or a special pencil for rhinestones to it and it sticks to it (there are special pencils for attaching rhinestones on sale). It is placed on fresh varnish, corrected, trimmed, it sticks to the varnish and releases the stick.
How the idea came about
My name is Lapkina Alena Vladimirovna, I am from the city of Khabarovsk. When I started my business, I was 16 years old. I launched my so-called business in 2015, and fortunately, it is still thriving.
At the beginning of 2015, I had problems with money, or rather, I had no money at all.
In general, this is a typical problem in adolescence, when you have a wallet but no money. I tried everything I could to fill my wallet with banknotes, but all my ideas ended in failure.
Once on the Internet I saw a set of manicure courses. I thought that I could provide manicure services.
This idea was ideal, because manicure is very popular and, as far as I know, every manicurist is not left without clients. I liked this option. I dreamed of becoming a manicurist. Fortunately, I was not mistaken.
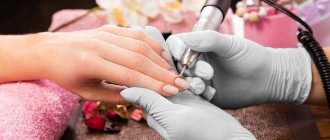
Sterilizing instruments at home
In nail salons, instruments are sterilized in a dry-heat oven.
Manicure tools
At home, you can use the oven for these purposes. Place metal tools in a specially designated bowl, turn on the oven at 250 degrees and heat for 15 minutes.
If during the procedure a wound was caused and blood came out, before sterilization the instrument is soaked in a chlorhexidine solution or wiped three times with 70% alcohol (if special pharmaceuticals , it is better to carry out treatment with them, according to the instructions).
Files and orange sticks can also be soaked in a disinfectant solution . But if there was no blood while working with them, it is enough to wipe them.
Below you can watch a detailed video about sterilizing manicure instruments; some information will be useful to you at home.
What pharmaceutical products may be useful?
In addition to chlorhexidine, you can buy hawthorn tincture 70% in the pharmacy. This alcohol solution can be used as a disinfectant.
The professional line of pharmaceutical products for sterilization is very diverse. Disinfectants are divided into two types: for hands and for metal tools. The pharmacist at the pharmacy will always tell you what products are available. You may also need BF-6 glue . This is a medical glue for treating wounds. It is convenient for cuts, disinfects and seals the wound instead of a band-aid.
It’s good to have on hand the remedy for warts “Mountain Celandine” , a brown herbal balm. If a wart is discovered during the manicure procedure, you can immediately cauterize it with this balm.
Rule 3. Proper storage of tools.
Sterile instruments are stored either in craft bags or in a UV sterilizer. Despite the name, tools cannot be processed in it. It only keeps them sterile for up to 160-170 hours. The specific period is indicated in the operating instructions.
Safety and ease of use are important to this device. In the Germix UV sterilizer, the lamp does not emit ozone and there is an auto-shut-off mode when the device is opened. This allows you to reduce risks to the health of the master.
According to SanPiN, a master must have 3 sets of sterile instruments at the same time: 1 in use, 2 in storage.
Is it profitable to do manicure at home?
Is it profitable to do a manicure at home? What is the difference between salon service and home beauty workshop?
Photo from YouTube
There are pros and cons to both options. Why do many clients choose a salon?
- They know for sure that their rights are protected.
- We are confident that the premises and all devices have been tested by the SES, and therefore comply with hygiene standards.
- They know that every employee is qualified and has undergone the necessary training.
Many people are even willing to overpay a little for this. But those who choose to visit a manicurist at home value the budget cost of the service more. And yet, the second category of people, who will become your client base, also want to be sure that their health is not in danger.
If many may not even look at your certification with an official diploma, paying attention only to practical skills and previous work, then you will have to comply with sanitary standards. In addition to all the necessary equipment directly for manicure, you will have to purchase a disinfectant and maintain sterile cleanliness in the work room and especially on the table. This is the only way your guests can trust you.
Be sure to devote time to sanitary cleaning of the work area - there should be no dust, used accessories or dirty files!
A detailed and extensive business plan for a manicure business will have to be written by those who open their own salon with hired workers - craftsmen, administrators and cleaners. And for those who will work for themselves, this point is much simpler.