Instructions for applying gel polish: cat's eye
An unusually dense, rich coating with a bright highlight won the hearts of gel polish lovers several years ago. Imitating the shine of semi-precious stones on nails has not gone out of fashion to this day. The metal particles that make up the gel polish, with the help of a simple device - a magnet, as well as the sleight of hand of the master, are formed into one flickering line, so reminiscent of a cat's pupil.
No matter how amazing and magical the effect may be, the secret of such a manicure is extremely simple: application is no different from the usual, and then it’s a matter of physics - a magnet attracts microglitters. Manufacturers of products for the nail industry took care of creating gel polishes with a cat's eye effect, so that a long-lasting manicure will please you for as long as possible.
Doing this manicure at home is as easy as shelling pears! For this you will need:
- manicure tools;
- lamp for drying gel polish;
- base for gel polish;
- cat eye gel polish;
- black gel polish optional;
- top;
- means for removing the dispersion layer.
Step-by-step instructions for creating a cat eye design from a photo
Traditionally, the nail plate needs to be prepared: remove the old coating, do a manicure, treat the cuticle, and degrease the nail plate.- Apply gel polish base to your nails.
- Dry in a UV lamp or LED lamp. In the first case, hold your nails for 2 minutes, in the second – 30 seconds will be enough.
- To create a rich finish, apply black gel polish.
- Dry the layer under the lamp.
- Apply a “magic” gel polish, which will create the desired 3D effect. It is not necessary to magnetize the first layer; the effect will not become deeper.
- Dry the coating.
- Apply a second coat of colored cat eye gel polish and dry in a lamp.
- Bring the magnet to the nail at the angle in which you want the glare to be directed. To get the effect, 10-15 seconds will be enough.
- Dry the layer under a lamp.
- If desired, the design can be supplemented with other elements and paintings.
- Apply a finishing topcoat, which is also dried under a lamp.
- Remove the dispersion layer.
Features of this manicure
It gets its name from the chrysoberyl stone, which is popularly called a cat's eye, and has a peculiar effect in the form of a narrow strip of light that is concentrated in the middle.
When turned, this strip glows and shimmers, creating the effect of a cat's eye watching you carefully.
Tips and secrets for proper application
While the gel polish is not used, all metal particles stagnate at the bottom. To prevent the brush from simply catching them, it is extremely important to shake the bottle vigorously.- To obtain greater depth and brightness, craftsmen often resort to this trick: they apply black gel polish as a base, which must be dried before applying subsequent layers. The remaining colors used as a base will influence the shade, but no one forbade experimenting with the palette. Quite the contrary - the more interesting the color, the more successful the cat eye manicure with gel polish will be.
- The main condition for choosing a magnet is that it be strong. A magnet for simple varnish or one that is in every home is suitable.
- The special device has a handle that will not allow it to be imprinted on the newly applied coating.
- The reflective spot in the center of the nail does not have to be in the form of a blurry vertical line. You can play with the pattern using special magnets.
- The outline of the resulting flickering strip practically does not depend on the distance at which the magnet is located to the nail. But if you place it more than 1 cm from the nail, the highlight will be very blurry. If you bring the magnet very close, there is a risk of damaging the coating with a dent. The optimal distance is 0.5 cm.
- The magnet should be stored as far as possible from cat eye gel polishes so that they do not lose their magnetic properties.
- In the photo, the effect looks better if the highlight is located in approximately the same place on each nail. Didn't you manage to place the shiny particles correctly the first time? Using the same magnet, you can correct the location of the glare with pulling movements.
- Please note that a large number of layers thickens the nails and makes them unaesthetic, but the effect does not become richer. The best option is gel polish in two applications.
- On a nail plate with damage, bumps and dimples, the effect will not look so impressive, so there is no need to neglect the leveling procedure.
- It is better to cover, magnetize and dry each nail separately. Then no unevenness or smudges will bother you.
- Some masters believe that removing the sticky layer before applying the finish is the key to a high-quality manicure with a cat's eye effect using gel polish.
Tips for Beginners
In order to avoid failures in the first stages of creating a cat-eye manicure, I recommend reading my tips:
- Before use, shake the bottles of varnish thoroughly so that the metal particles are evenly distributed.
- Do not neglect degreasing and basecoating, otherwise you risk the varnish peeling after 1-2 days
- If for some reason you cannot apply the base, then first apply gel polish without a magnet, dry it, and apply the next layer using a magnet
- Hold the magnet as close to your nail as possible, but never let it touch
- For the first two days after coating, avoid going to the sauna or bathhouse, as temperature changes can cause peeling and destruction of the coating.
So, my dear readers, in my next article I told you about the secrets of beauty and taught you how to do a cat eye manicure. I really hope that I was able to benefit you, and after reading the article, you decide to try to make it yourself or your loved ones.
As you can see, it’s not at all difficult to learn, just look at photos and videos and repeat the procedures that are described in them. And now, as usual, I’m waiting for feedback from you, write in the comments what type of manicure do you prefer, do you do it yourself, or do you turn to professionals for help?
I will be very glad to talk with you and learn from you your experience in creating original nail designs. Read my articles, comment, share on social networks with your friends, family and acquaintances, let's be friends and be beautiful together!
Matte cat eye is a new trend
You can go even further and turn a glossy cat eye gel polish into a matte one. This coating looks even more stylish. It’s simply impossible to take your eyes off the soft matte shimmer in the photo. There are several ways to create an elegant effect:
- Use a matte topcoat. This is the easiest and fastest way to turn a glossy finish into a soft, velvety one. After the last layer of colored gel polish, working with a magnet and drying, a matte top coat is applied.
Please note that this layer also needs to be polymerized. The final touch is removing the dispersion layer.
- Buff the surface. This is painstaking work that requires the experience of a master, because overzealous actions can lead to the removal of the top. The correct sequence of actions is as follows: applying a base - color coating - top - removing stickiness - sanding the glossy coating.
Little tricks
- Different magnetic plates create different patterns;
- The pattern must be formed immediately after applying the final layer of gel polish; it is important not to let it dry out; each nail should be decorated separately;
- The magnet must be kept at a distance of 3-5 mm from the nail;
- The time of exposure of the varnish to the magnet is 10 seconds.
- By applying a magnet horizontally, vertically or diagonally, you can create a wide variety of patterns;
- Magnetic gel polish can serve as a background for subsequent nail designs; in this case, you can add rhinestones or sparkles.
Cat eye manicure colors and designs
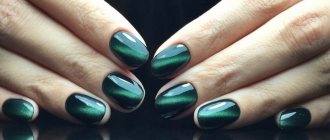
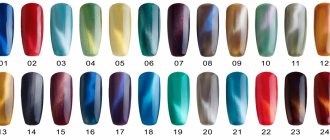
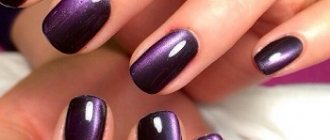
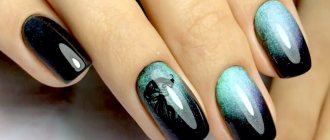
To create this effect, a wide variety of colors are used. The photo does not convey all the grace and luxury of dark green, opal, brown, turquoise, blue, burgundy and mustard cat eyes on the nails.
The iridescence effect looks incredible even without decorating elements. However, sometimes special occasions force fashionistas to look bright and festive. And then the surface of the nail turns into a canvas, and a manicure with gel polish turns into art, where there is a place for rhinestones, bright colors, patterns and paintings.
Exotic lovers will love the design with a snakeskin pattern on a cat's eye. Animalistic designs of several nails, imitation of water drops, a combination of matte and glossy finishes - all these are options for creating an original, creative gel manicure.
When the ideal design has been created, it is recommended to avoid temperature changes and contact with abrasive surfaces for a couple of days in order to enjoy the beauty of your nails without chips or scratches for as long as possible.
Benefits of Cat's Eye nail art
Not all women can, for various reasons, have medium-length or very long nails. A cat-eye manicure is perfect for nails of any length, even for fairly short nail plates with different shapes.
Therefore, this particular type of manicure has become popular among the office crowd. The office of any company - from a large reputable company to a very small one - is a place where nails simply must be well-groomed. Well-groomed hands, nails, the whole appearance, no matter how banal it may sound, is the face of a company that values its reputation.
Therefore, nails should not attract the gaze of others too much. Elegance is another distinctive feature of the new universal brand . Thanks to creativity and the magnificent depth of shades used, the manicure looks great even on very short nails, successful nail art of which is often a difficult task to accomplish.
If you dilute such art with a little shades of velvet sand and suitable exquisite decorative stones, this solution will be a good choice for both office life and special parties.
Are you intrigued? And already want to admire all this beauty in your own hands? We assure you – this is a dream come true! With our help, you will be able to create such beauty without leaving your home.
Photo of nail coating: cat eye gel polish
Even more photos at the link: Cat eye gel polish.
Popular cat eye polish brands
There are many popular brands, but there are 3 of the best gel polishes:
- Leaneil. Uniform distribution over the entire surface. For dense coverage, one layer of base coat (base color) and a layer of cat's eye are enough. Large selection of colors.
- Bluesky. Large palette. Has a healing effect for brittle nails. Quality and reasonable price, this is the best combination.
- TNL magnet. One coat is enough for rich color. Manicure lasts up to 3 weeks.
Reference! Typically, a cat eye is applied on a dark base, called a base coat. Light versions of the cat's eye are less common, since it is more difficult to achieve a noticeable glare on them.
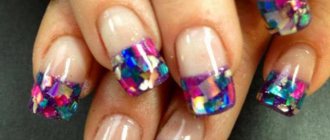
Cat eye design with stained glass effect
If you are already bored with a monochromatic manicure with a cat-eye effect, you want to add some zest to it, then try making a cat cover with an aqua design. That is, apply a design to your nails and hide them under the stained glass gel.
The design of a cat's eye with a stained glass effect is also easy to do:
Stage 1
Sand the nail plate with a buff and shake off the dust with a fan brush.
Stage 2
Apply the base and dry your fingers in a lamp. Apply black shellac on top of the base coat and dry again. Then we paint the nails with “cat’s eye”, magnetize them, and send them to the lamp.
Stage 3
Using a thin brush, draw any design on your nails and dry your fingers.
Stage 4
Apply one drop of stained glass paint to the foil (you can buy it at an art store, it is sold in small tubes) and the same amount of topcoat, mix with a thin brush. Using a topcoat brush, apply the mixed paint to the colored coating and place your fingers in the lamp.
Stage 5
Cover the plate with top and place your fingers under the lamp.
What is good about the shimmering effect of gel polish?
Coating with cat eye gel polish allows your imagination to run wild: you can fill the design with rhinestones, patterns and sparkles. To get a bright and colorful manicure with magnetic gel polish, you need to understand a little about its composition. Gel polish with a shimmering effect contains a different number of metal particles, different in color, size and shape. It is these parameters that you need to pay attention to when choosing a certain type of cat eye gel polish.
So, let's look at what affects the quality and depth of the glare:
- The pearlescent shade of gel polish is very convenient, as it can be combined with many colored coatings. Thanks to this, a special depth and volume of the manicure appears.
- Pearl “cat's eye” consists of a large number of iridescent particles. This gel polish is applied without any substrate and has a pronounced neon highlight.
- “Cat eye” with golden shimmer looks great on any main shade of gel polish.
All types of cat eye gel polish look harmonious when creating original nail art. To add tenderness to your manicure, you can draw designs, monograms on the surface of the “stone,” or decorate it with rhinestones.
Execution technique
It's simple, the general idea is the same as a regular manicure:
- Prepare your nails as you would for regular gel polish.
- Apply cat polish in one thick layer. Don't overdo it - it should dry well. If desired and if the varnish is very liquid, apply it in 2 thin layers.
- Before drying, hold the magnet up and count to 5. 5 seconds is usually enough for the pattern to form completely. There is no point in holding it any longer; it will not make it clearer.
- When the varnish is applied and dried, you can make decoration. Or simply coat your nails with top coat and dry again.
- Remove the sticky layer.
As for drying, a lot depends on the quality of product and manufacturer you use. Some varnishes bleed and are too liquid. To maintain the clearest highlight possible, in this case, dry one nail at a time: magnetize it and directly into the lamp. If the gel polish is thick, then you don’t have to rush too much - you have time to paint several nails at once.
Magnet patterns
Once you become familiar with the technique of applying shimmering gel polish, you will be able to perform various manicure designs. Next, let's look at unusual types of magnetic flare:
- If you hold the magnetic plate strictly parallel to the nail, you will get a direct highlight that can be moved along the nail plate in any direction (diagonally, along and across the nail).
- If you hold the magnet perpendicular to the nail plate, you will get a gradient overflow. The ombre effect looks especially beautiful if you apply a “cat’s eye” to a black base.
- When the magnet is placed edgewise along the center of the nail, blurry and dark edges are formed. This effect allows you to visually lengthen the nail plate.
- If you install a magnetic plate edgewise along half of the nail, in the upper or lower part, you will get a shining arched jacket.
When using a magnetic pen, you can practically draw with metal shavings, creating sinuous patterns. The print imitating crocodile skin is very popular.