A stylish and well-groomed appearance is an important condition for a successful modern woman. One of the components of this image is a neat manicure. However, not every girl has the opportunity to visit salons or at least devote enough time to creating a manicure at home.
It is for such women that they came up with a special method that allows you to quickly and in the shortest possible time give your nails a neat and original look - stamping.
What are nail stamps and stamping?
Stamping is a special way of applying a design to nails. This method involves the use of a special stamp with a finished image, which is imprinted on the nail plate. This is very convenient, especially for those who do not have sufficient artistic skills.
The nail stamp itself is a special soft plate onto which the design is transferred from an engraved hard disk.
To create a manicure using the stamp method, you can use ready-made kits that are sold in professional salons or cosmetic stores. You can also make your own stamping stamp at home. However, it is necessary to take into account some subtleties in its manufacture, and also use only suitable materials, otherwise the result will be far from perfect.
Advantages
Stamping is a relatively new technology in nail art that allows you to achieve an attractive result in the shortest possible time. The main advantage of this manicure method is its simplicity.
Not so long ago, in order to give her nails an original appearance, a girl had to spend a lot of time on the procedure or, without the necessary artistic talents, go to expensive salons. With the advent of stamping, this problem was solved by itself.
The advantages of this manicure method are:
- Ease of use and accessibility. To apply an original pattern to your nails, you just need to purchase a stamping kit, which you can use more than once.
- Positive result. The clear and beautiful image obtained using stamps does not differ in appearance from a salon manicure.
- There is no need to spend a lot of time manually applying the image.
- A variety of designs that you can apply to the stamp yourself.
Flaws
The stamping method allows you to give your nails a well-groomed and original look without spending a lot of time on it. Despite this, the procedure also has a number of negative aspects.
The main disadvantages of stamping are:
- It is impossible to immediately, the first time, apply a complex pattern to your nails. Therefore, beginners are recommended to choose the simplest image options.
- Quite a high cost of quality stamps. Low quality devices also have a lower cost, but they can be used no more than 1-2 times.
- The need for strict adherence to all stages of the procedure. In particular, after applying the image, it is important to let the drawing dry completely and only then apply the fixing layer. Otherwise, the clarity of the drawing is lost.
Stamping kits
Kits, which include all the necessary accessories, can be purchased in special stores or nail salons. The easiest way, of course, is to buy ready-made, but you can also buy it in parts - as needed.
The set includes the following tools:
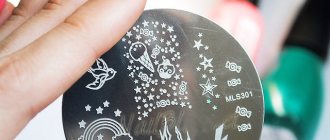
- A stamping disk is a special metal plate on which patterns are engraved. When purchasing, it is important to pay attention not only to the complexity of the design, but also to the depth of the engraving (the deeper the recesses, the better).
- A scraper is a special tool used to remove varnish residues from the surface of a metal disc. Instead of a scraper, you can use any solid device, such as an unnecessary plastic card.
- A soft stamp used to transfer a design from a metal surface to the nail plate.
- Paints with a dense consistency. Instead, you can use thick nail polishes.
What you need to create a manicure
In addition to the devices indicated above, the procedure will require other important elements.
You need to prepare in advance:
- A base coat that should be a different color from the paint used to create the design (it is best to use the most contrasting color shades).
- The topcoat is a transparent topcoat that is applied at the end of the procedure. Using a fixing varnish will allow you to maintain the original appearance of your manicure for a long time.
- Cotton swabs and nail polish remover, necessary for correcting the result (for example, to remove excess polish from the skin around the nails), as well as for cleaning tools.
Reverse manicure or multi-color stamping
Resourceful artists began reverse stamping for nails not so long ago, but fashionistas really liked this new nail product. Today we will teach you how to do reverse stamping on gel polish or regular polish at home.
We will need: - the stamping kit described above; - base varnish, varnish for the pattern, several shades of varnish for decorating the pattern; - nail remover; - cotton buds; - cotton pads.
Algorithm of actions: - coat the prepared nail with base varnish and leave until completely dry; - if you have a stamping plate with an oriental or any other unusual pattern, we recommend using it; - cover the pattern you like with black or other dark varnish (ideal for the outline of the design; - remove excess varnish with a scraper and transfer the design to the stamp; - leave for a minute to let the varnish dry; - using a special brush for drawing patterns, decorate our pattern directly on the stamp ; - leave until completely dry; - apply protection (skin defender) to the cuticle; - cover the nail plate with transparent varnish; - remove the varnish film from the stamp very carefully so as not to accidentally tear it. Place it on the nail plate, pressing tightly so that under there is no air left; - after 2-3 minutes, cover the nail again with transparent varnish or top coat.
Ready! You will get gorgeous stamping on your nails, photos of other girls’ work are proof of this!
Secret: you can stamp only the tips of your nails (a la French manicure). To do this, use nail stencils to protect the area of the nail where the ornament should not be.
We hope that you will be able to create a chic manicure the first time; we selected stamping ideas taking into account the latest trends, so you can safely use them for yourself. The main thing is to be patient and do everything as efficiently and quickly as possible.
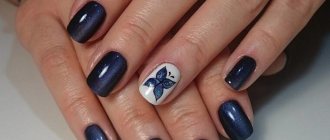
By the way, it is not at all necessary to do a stamping manicure, the photo confirms this, on all nails. Nail design with one or two painted nail plates looks very interesting. Don’t be afraid to experiment and practice; very soon you will get a manicure using the stamping technique no worse than in elite beauty salons.
Color combinations in stamping
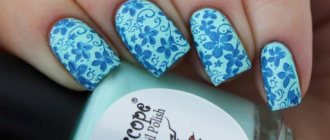
The main rule when choosing color shades is contrast. So, if you plan to apply a light base, then it is recommended to choose dark tones to create a picture. Conversely, if the main color is dark, then an image made with a light varnish will look more neat and attractive.
Another feature: it is recommended to choose varnishes that have a matte finish as a base. In this case, the drawing will be brighter, clearer and more expressive.
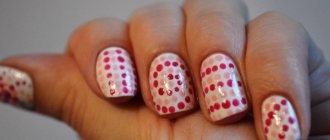
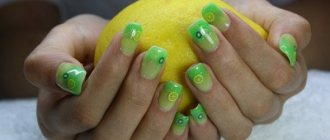
The most commonly used option is when a dark pattern is applied to a light base layer. For example, black, blue, and red patterns are most harmoniously combined with a white base. The beige base looks more restrained and casual. To create a picture in this case, it is best to choose black, blue, and emerald colors.
Silver varnish as a base harmonizes with the pattern of purple, hot pink, and blue colors. For a red or pink base, images made in black, white, blue, brown, gold or silver colors work well.
For a dark base (such as blue or black), it is recommended to choose designs in white, pink, silver or gold.
Transparent stamp for stamping: shape features
A transparent stamp for stamping is an innovation in the world of nail services, which has significantly improved the quality of this type of manicure. If you want to know everything about regular stamping, then hurry up and read our previous article.
- The stamp is made in the shape of a tube with an open top. This allows you to observe the stamping process and have complete control over it.
- The silicone stamp pad is completely transparent. You can see absolutely everything through it. You can control how the design is imprinted on the nail.
- The optimal structure of the material contributes to the creation of high-quality images. The stamp pad is made of fairly hard silicone, which is convenient to work with.
- You can find stamps with transparent walls. This allows for even better observation of the work stages.
What to look for when choosing
An important point in creating attractive nail art is choosing a suitable and high-quality set. The quality of the result depends largely on this. First of all, you need to pay attention to the quality and clarity of the engraving applied to the metal surface.
Equally important are the correctly selected stamp and varnish that will be used to create the base and image. The surface of the stamp must be dense. If it has a porous structure, it is impossible to achieve image clarity in the future.
Types of stamps
Stamps for applying designs to nails can be either original, produced by well-known brands, or produced with the “no name” mark.
Branded tools are usually of better quality, but also have a higher cost. You can also choose a high-quality option from among non-original stamps, but to do this you need to pay attention to various nuances, in particular, the material and its structure, the number of working surfaces, and the color of the product.
Stamps are made of rubber or silicone. Rubber products are less elastic and more durable. Such devices are best suited for applying small-sized graphic elements. In addition, the rubber surface allows you to add certain images yourself, which means you can use them to create the most original manicure.
Silicone stamps are more convenient to use - with their help you can create a clearer and more voluminous design. Silicone is considered a softer material than rubber. It adheres better to the surface of the nail, which means it allows you to apply a clear image to the entire nail plate.
Depending on the available number of working areas, it is customary to distinguish single-sided or double-sided stamps. The first option is considered simpler and more budget-friendly; it has only one working surface on which the drawing is applied.
Double-sided stamps typically have different densities and surface textures, making them more versatile.
The color of the stamp can be colored or transparent. The colored product comes with additional pads that can be changed as needed. On a transparent stamp, the design remains as clear as possible for a long period of time.
Which varnish is better to use
Choosing the right polish is also an important point in creating beautiful nail art. At the same time, it is not at all necessary to spend money on purchasing special coatings, which can easily be replaced with regular nail polish. However, when choosing, you must give preference to the thickest, matte, pigmented coatings.
To create an attractive manicure, gel polish is most often chosen. A type of coating such as shellac is not suitable for stamping - it spreads over the surface of the stamp, as a result of which the design turns out blurry and unclear, and small details of the image may not be drawn.
Popular manufacturers
The modern beauty industry offers women many options for high-quality and inexpensive products for creating a good “correct” manicure using the stamping method.
When choosing a varnish, it is recommended to pay attention to products from such brands as:
- Konad - the company also produces high-quality stamping kits;
- Kand Nail;
- El Corazon;
- Golden Rose.
Special varnish for stamping: what is it?
First of all, let's talk about special acrylic varnishes that are intended specifically for stamping design. What is special about these coatings, and why do manufacturers of nail stamping products claim that only with the help of these varnishes is a truly high-quality and beautiful manicure possible? In order to understand this issue, you should consider the list of necessary qualities that a special acrylic-based stamping paint should have.
- In order for the design to be as clear as possible when transferred from the stencil to the surface of the nails, a thick varnish is needed. This consistency will allow you to maintain the even outlines of the pattern, every small detail, and thin line.
- Varnish paint for stamping should be well pigmented. A dense and rich shade will look great on the base coat, making the reprinted design bright and colorful.
- The shade itself also matters. It is important that it is dense and rich. This way the pattern will stand out against the background of the main coating. If you choose between matte and glossy varnish, it is better to go with the first option, since mirror shimmer and shine can visually make the picture blurry.
Acrylic nail polishes, which are created specifically for stamping design, have all these qualities. By using these coatings to transfer patterns from plates to nails, you can be absolutely sure of an excellent result.
How to do stamping correctly
To do stamping, first of all you need to prepare your workplace - make sure that there are all the tools on the table that you will need in the process of creating a manicure. It is important to correctly select colors that will successfully combine with each other, and only after that you can proceed directly to the procedure.
Regular gel polish
An important point is preparing nails for coating. First of all, it is necessary to treat the cuticle, shape the nails and degrease the surface. For this, in addition to regular hand washing with soap, special liquids are also used.
The procedure then includes the following steps:
- Application of primer. The primer is a transparent base that provides a better application of the base color layer. After using the primer, you must let it dry completely.
- Applying a colored base in one or two layers (this depends on the consistency and pigmentation of the composition).
- Processing the base layer with a special brush (sealing).
- Drying nails in a special UV lamp.
- Treating the metal surface and the stamp itself with acetone (this is necessary to remove dirt, dust and varnish residues from the working surface).
- Applying varnish to a metal disc: take a small amount of coating, which is evenly distributed in a thin layer over the surface, filling all the details of the engraved design.
- Transferring the image to the soft surface of the stamp. To do this, it is pressed tightly against a metal disk so that all the details of the image are imprinted on it.
- Drawing on nails. The stamp is firmly applied to the desired area, after which it is rolled over the surface of the nail, transferring the image.
- Drying. First, you need to let the design dry for a few minutes, and then you can dry your nails using a UV lamp.
- Applying the final layer. The top coat should be transparent and may also contain fine glitter.
- Final drying.
Reversible gel polish
The reverse stamping method allows you to create a more complex and original design. However, this procedure is considered more complex and requires certain skills and experience to perform it.
Main stages:
- Basic manicure (cuticle removal, shaping, degreasing).
- Apply primer and colored base coat.
- Drying.
- Applying varnish to a metal disc, spreading the coating using a scraper.
- Transferring an image to a stamp.
- Additional drawing of details directly on the stamp surface. To do this, use special thin manicure brushes.
- Drying the stamp in a UV lamp (no more than 20 seconds).
- Removing the resulting pattern from the surface (use tweezers).
- Transferring the image to the nail, securing the result with a top coat.
- Final drying.
Stamping with acrylic paints
Despite the fact that gel polish is a very affordable means of creating a manicure, the question of what can replace it remains relevant. The most popular alternative medium is acrylic paints. They compare favorably with their cost, but do not always have the desired thickness and consistency. Therefore, unfortunately, it is impossible to guarantee a positive result.
The steps of stamping using acrylic coating are standard; the sequence of actions does not differ from the procedure using gel polish. However, there is one important point: before using the product, it is recommended to hold the jar of the composition open for 10 minutes - this will make the paint thicker and more suitable for use.
Do you know what stamping is?
Stamping (in the original language - Stamping nail art) is a modern nail design technique. Here the design is applied to the nails using tools such as stamping dies. In addition, stamping discs or plates, with embossed or engraved patterns, and a scraper must be purchased as part of the stamp kit.
The process is quite simple:
- a small amount of varnish or gel polish (necessarily very pigmented) is applied to the stencil or disk with drawings on the pattern we need;
- use a scraper to carefully remove excess varnish so that only the pattern remains filled;
- by simply pressing the stamp against the design with varnish, you can easily transfer it to the stamp;
- print the design on the prepared nail plate (coated with varnish or gel polish);
- To consolidate the result, craftsmen recommend covering the design with a clear varnish.
This is the simplest and most popular algorithm of actions, but today we will also teach you how to do stamping with patterns of different colors.
Recommendations
The main recommendation is to use a high-quality color coating for applying both the base layer and image elements.
There are other important features that must be observed:
- It is necessary to remove the protective film from the surface of the metal disk (otherwise the design will spread).
- Use nail polish remover that does not contain oil elements.
- Quickly apply the varnish to the surface of the disk and stamp so that the composition does not have time to dry.
- Dry each subsequent layer thoroughly.
What it is
Translated from English, “stamping” is translated as “stamping” or “applying a stamp.” Stamping on nails is essentially the same thing - applying an imprint of a certain design using a rubber or silicone stamp. The design on the stamp is copied from a metal disk on which it is previously stamped.
Despite the apparent complexity, stamping is quite simple to perform. To apply nail polish in this way, home conditions are quite suitable.
The high popularity of the technique is explained by the fact that to perform high-quality stamping, no special artistic or professional skills are required. Time costs will also be minimal. You just need to practice a little and your manicure will turn out perfect.
Silicone stamp is most convenient to use
In order to do stamping at home or in a salon, you will need special tools and materials:
- metal disks (or plates) with engraved designs;
- stamp;
- special stamping varnish or stamping paint;
- scraper for removing excess paint.
All of the above can be bought in specialized stores or ordered online. Despite the fact that truly high-quality stamping kits are quite expensive, they have a long service life and will very quickly pay for their price.
Varnish and paint for stamping
Many people mistakenly believe that any acrylic or gel varnish can be used to apply stamping. This misconception usually leads to the fact that all efforts to apply a design to the nail are wasted - the print blurs, spreads and turns out completely unclear.
Stamping kit
In order for the result to meet your expectations, a necessary step is to purchase a special varnish or paint for nail stamping.
Requirements for varnish
Varnishes and paints that can be used for stamping must differ from ordinary ones in a number of indicators. Even the currently highly sought-after shellac, which has a fairly thick consistency, will not be suitable for applying decorative elements to the nail using a stamp. The gel polish will simply spread over the stamp pad, and the print will be blurry and indistinct. An even less successful solution would be to replace stamping paint with regular varnish.
Some are trying to find ways to do stamping without buying a special varnish. But to choose a more or less suitable option, you will need to put in a lot of effort. Even if the varnish is thickened, there is a high probability that when the stamp is removed, the composition will follow it, leaving unsightly hairs along the edges of the design. In addition, ordinary varnish can simply dry directly on the stamp.
A good stamping varnish should be thick, dense, and well pigmented.
Thus, when answering the question of what kind of varnish is needed for stamping, we should mention a special gel paint. Its cost is slightly higher. But the result of the work will be excellent.
For your information. As an alternative to stamping with gel paint, acrylic varnish can be used.
Acrylic varnish for stamping
According to many masters, acrylic varnish is suitable for applying a design to a nail using a silicone stamp no worse than specialized gel compositions. Acrylic is thick and has a density suitable for the use of technology. Thanks to the above, the design applied with acrylic varnish will be voluminous and rich in pigmentation.
Important! Regardless of the material used for stamping, a good manicure will only be achieved if the master (or other performer) has a sufficient amount of practice. You can gain the necessary skills by practicing on nails whose varnish layer is planned to be removed in the near future.