Beautiful, neatly processed nails, decorated with a carefully selected pattern, which is made in fashionable shades - this is an important part of any look.
One of the most popular manicure options today is nail design made using a special tool called a dots. These can be a wide variety of dot patterns, floral curls, abstract patterns, etc. You can create such a manicure yourself, the most important thing is to be patient and arm yourself with convenient tools. Naturally, beginners who have just begun to master the art of manicure will not immediately be able to draw neat dots, circles and curls, but after 2-3 sessions the patterns will become much better.
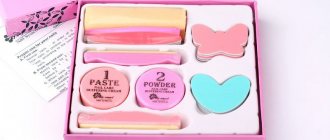
Dots for manicure: what is it?
What is this tool? Dots for nail art are a manicure tool that looks very similar to a double-sided crochet hook. The body of this instrument is most often made of plastic, although exclusive instruments with a handle made of wood or bone can also be found on sale. Dot tips are made of stainless metal; they are a thick needle with a ball at the end. It is this ball that takes part in drawing the pattern.
On sale you can find dots for nail design with different diameters of the ball at the end, it depends on the size of the dots and curls applied using this tool. Dots can be single-sided or double-sided, they are sold both individually and in sets. A very convenient option for a set of dots for nail design is a set of removable tips with balls of different sizes and a comfortable handle in which these tips are attached.
Current nail design ideas at home for beginners
To get started, the first thing you need before starting work is to be patient. Because even simple designs are not easy and quick for everyone. The main thing in this matter is training and more training. So, before choosing the art you need, let’s immediately talk about what tools can be useful and for what pattern.
Dots
Dots is a tool that will help you create a wonderful dotted manicure without any special skills.
It comes in various shapes and sizes. The ball that you see above will be the main assistant in the art. The patterns can be varied, everything will depend on your imagination.
For example, an interesting job with a dotted manicure with a gradient. To do this, you just need to select several shades of the same or similar colors and arrange them from light to dark or from dark to light.
This kind of work also looks pretty good. Choose contrasting colors to make your design look as vibrant as possible.
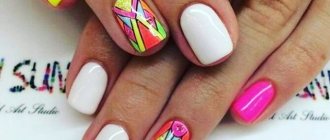
Excellent idea - dotikkur. A real trend in the world of nail service. It consists in the fact that the points should be connected in various geometric patterns. For example, circles, triangles, diamonds.
Here in this photo you can see a step-by-step design for dotticure nails for beginners. Everything seems complicated only at first glance.
And this is a job for more experienced nail art masters. It looks very cute when animal patterns are made from dots.
Owls look especially original and stylish in this technique.
Variations of this manicure can be very interesting.
If you don’t have Dots and can’t buy it, then don’t worry. There are great replacements for this tool that you can definitely find at home. For example, it could be a toothpick, a cotton swab, or a hairpin.
Thin brush
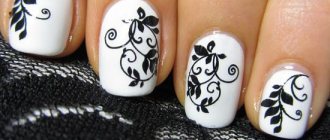
An indispensable tool for creating nail art. For example, you can make simple geometric patterns.
Or make bright, juicy designs for summer in the form of fruits or flowers.
For beginners, this tool is perfect for designing nails in the form of monograms, for example, as in the step-by-step photo.
Such patterns look incredibly beautiful and elegant. They will be a beautiful addition to your everyday and evening look. Don't be scared by this art. It only seems difficult, but in fact, little by little you can achieve good results. The main thing in this matter is scrupulousness and patience.
This kind of art looks beautiful when combined with other decor. For example, rhinestones here only emphasize the delicate lines and make the manicure more festive.
Velvet monograms look very beautiful. In order to create such beauty on your nails, you must immediately draw the lines with regular varnish, then sprinkle with special powder on top and simply shake off or blow off the remains.
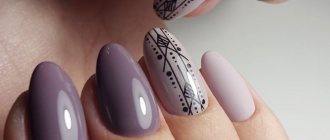
Variants of floral monograms, and even velvet ones, look simply amazing. The matte finish emphasizes the delicacy of the composition.
The glitter lines also look original. They are made in the same way as velvet monograms. Sequins on a matte finish will perfectly highlight your graceful hands.
To make things easier, you can use the following tip. For beginners, many recommend using acrylic paints for nail design with step-by-step videos or photos. They are very easy to use: they do not spread like gel polish and do not dry out as quickly as regular polish.
Stencils
If you want to do a French or moonlit manicure, then stencils are your indispensable assistant. They are sold almost everywhere and cost pennies. But if you have problems acquiring such help, you can always replace the stencils with tape. To do this, you just need to cut out the desired pattern and place it correctly on the nail plate.
Stencils can be used not only for French and moon art. You can also use them for other patterns. Making such drawings is quite easy. The main task in this technique is to carefully glue the stencil so that the varnish does not flow under it and the pattern line does not come out crooked.
Here you can even come up with your own designs and cut them out of the same tape. It is not necessary to use ready-made ones. Start with cute, simple drawings. And gradually complement them and cut out more complex ones.
Stamping
Stamping (i.e. printing) is a real revolution in nail art. With it you can make a variety of bright, stylish patterns of any complexity. It is, of course, more expensive than other tools. But it is multifunctional.
Stamping is very easy to do. You just need to apply varnish to any pattern, transfer it to the nail with a special silicone seal and cover it with a fixative. By the way, even experienced craftsmen use it.
You can perform a variety of designs, do them on all fingers or focus on individual ones. You can use the entire pattern, or you can select only a fragment.
Various patterns are sold: floral, geometric, animal art or silhouette.
Using stamping you can create incredible art. The main feature of this technique is that it only needs to be done with gel polish. After all, ordinary varnish will not have time to reprint, but will simply dry out.
Stickers
Stickers are simply a salvation for beginning craftsmen. They can easily help you create the most beautiful and complex nail art (visually) without much effort or skill. Stickers are divided into types: water-based, adhesive-based and thermal. For beginners, we recommend using water-based or adhesive based ones. They are the most convenient to use.
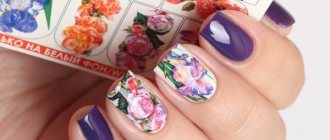
Slider stickers that cover the entire nail look beautiful. Floral patterns look especially beautiful. They will be a very good option for the spring-summer season.
Stickers with funny children's drawings also look original. Cheer yourself up. Make fun and simple art.
The difficulty with sliders is that you need to be careful with the edges of the sticker. After applying to the nail, their edges need to be trimmed so that later they do not catch or peel off.
A more simplified option is sticker fragments. They will last longer.
There are different options for such stickers: flowers, animals, geometric patterns. It could be anything.
To make a manicure using water stickers, you just need to cut out the desired element, dip it in water for 2 minutes and transfer it to the nail. Then secure everything with finishing. Everything is easy and simple!
But it’s even easier to use stickers with an adhesive backing. Their variety is a little less, but you can make incredible art with them. They even sell special stickers for lunar manicure. Here, for example, is an interesting metallic lunar design.
Or you can make a bright juicy manicure with fruits. Great idea for summer.
Video dots for nail design:
How to use dots: step by step procedure
Anyone can use dots for nail design to create a beautiful and fashionable manicure. All you need to do is buy a set of dots or at least one double-sided tool with balls of different sizes on the tips (this will be quite enough for a start), choose nail polishes that match the color and get to work following the rules given below.
Everything about
Cat eye nail designs can be found here. Manicures for short nails can be found in this article
To apply any design efficiently and accurately using a tool, you must proceed in the following order:
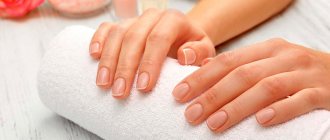
- A hygienic manicure is performed to make the nails neat, clean, even out their length and remove hangnails;
- Apply a base coat to dry, grease-free nails and dry thoroughly;
- The first layer of base varnish is applied over the base, dried and dots, commas and other curls are drawn on top of it using dots, depending on the chosen ornament;
- Finally, a topcoat is applied and final drying is performed.
It is most convenient to hold the nail design dots like a pen or pencil. Although this, of course, is an individual question. When working with dots, you need to remember that it needs periodic cleaning of varnish. To do this, you can use an ordinary paper napkin, and if the varnish has already dried, you will have to use a liquid to remove it.
How to do a dots manicure - theory and practice
This tool is extremely easy to use. Before doing a dots manicure, apply a small amount of polish of the selected shade to a piece of foil, dip the edge of the stick there and make an imprint on the nail plate. Usually, the nail is first coated with colored varnish, and then dots are placed with a coating of a contrasting shade. The theory and practice of such design is quite extensive. You can make dots of different colors and sizes on one nail. Some girls dip the tool directly into a bottle of varnish, but this method is not very good - you cannot see how much varnish has accumulated on the metal ball. To make something like a comma on your nail, take a dot like you would a regular pen or pencil, place a dot on your nail, and then gently stretch it out to form a curl. A dots manicure can be done in minutes, don't forget to apply a top clear coat after the dots have dried.
Spot Manicure Ideas
Drawings made using dots always look interesting and attract the attention of others, especially if they are done very carefully. Dotted nail design is equally suitable for young girls and older women, provided that the colors of the varnishes used are correctly selected.
For everyday wear, you should perform a manicure using nail design dots in discreet colors or limit yourself to a small number of dots. This could be a stylish two-color manicure, for example, coffee-beige or mint-white, done in a French style. In this case, coffee or mint is used as the main color, and neat dots are applied along the edge of the nail with beige or white. A regular manicure with polka dots all over the nails in discreet colors will also be a great addition to your everyday look.
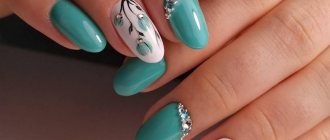
When going to a special event, you can create a fashionable and bright design on your nails using various shaped elements - leaves, curls, spirals, etc. When drawing leaves and lines using dots, you need to remember that the faster the line is drawn, the longer and thinner it is it will work out.
Applying beautiful and unusual designs on your nails using dots is a pleasant, creative and very exciting process. If suddenly you really want to create neat dots on your nails, but you don’t have a dot on hand, a hairpin, a ballpoint pen that has run out of paste, or a sharpened pencil can temporarily replace it.
Drawing with dots
Before designing with this tool, you need to prepare your nails. That is, get a manicure, apply a protective base, and then a background coating of the type and color you choose. After this, you need to pour a little varnish onto the palette and dip the dots into it. You should not apply varnish to it with a brush, as the dots may turn out uneven or with emptiness inside. With the help of dots you can create many decorative elements.
- Straight lines;
- Dots;
- Circles;
- Commas;
- Curls.
The last two elements are obtained if, while drawing a line, the tool is gradually lifted from the surface. This is done quite quickly and sharply when creating a comma, softly and smoothly when creating a curl.
Thus, as is clear from the description of the elements and the posted video, manicure and nail design using dots involves not only the design of “polka dots” and the like. You can create flowers, clouds, hearts, graphic designs using circles, dots and lines. Some especially skilled dotsom nail service masters can even create very complex multi-color designs.