- 2913
- 18-06-2020
- Author: Mysekret Team
- 0
Gradient on nails is a stylish and fashionable manicure design for 2020-2021, which will suit both young fashionistas and adult women. Gradient nails look elegant, match with clothes of different types and styles, and look harmonious on nails of various lengths and shapes: almond-shaped, square, sharp, oval, “ballerina”, “stiletto”.
Ideas for a manicure with a gradient to attract the attention of others and delight the woman herself were collected taking into account all fashionable and current trends. This season, the trend is amber nails in two, three and even four shades.
Nails with a gradient can be complemented with rhinestones, sparkles, and stones. There are several options for placing a gradient on your nails: vertical, horizontal or diagonal. Ombre manicures with glitter and French are also trending.
Masters of the nail art industry perform ombre nail designs using a sponge or an airbrush. It’s difficult to paint an ombre manicure with a brush, as the blurry effect and smooth transition won’t work. At home, you can easily draw a gradient on your nails with a regular makeup sponge.
See also...
✅ It's time for a pedicure: fresh and stylish ideas for spring-summer 2021
✅ Fashionable nude manicure 2019
✅ French manicure for short nails: photos, ideas 2019
✅ Fashionable manicure autumn 2018
To make nails with a gradient look stylish, you need to know what shades of gel polish to combine for the ombre effect. Also today, a sharp gradient is in fashion, when monochrome shades are applied one after another and do not smooth out the transition.
Photos of the latest ombre manicure collected in our gallery will appeal to even the most spoiled fashionista, sophisticated lady, or stylish teenager. We'll tell you what colors to combine, what direction to choose, and how to make a gradient on your nails yourself at home.
What is stretching in gel manicure?
A manicure with color stretching is a technique of applying a color coating that smoothly transitions from a dark to a lighter shade.
To work, use a special brush made of natural material, the surface of which evenly distributes the coloring composition over the surface of the nail plate. Professional artists call this technique gradient or ombre. A manicure done using this technique looks impressive. It is suitable for everyday and evening wear. To prevent the coating from looking vulgar, it is recommended to choose bed or light shades of gel polish.
You can dilute the color horizontally, vertically and diagonally. To do this, the brush is held at a certain angle. The drying process plays a huge role in the design process. To work, in addition to a brush, you may need additional tools and materials:
- Foam sponge;
- Spray gun for gel polish;
- Set of brushes.
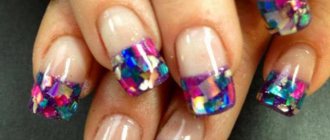
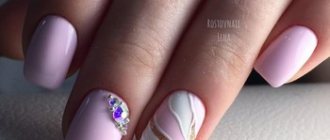
Ombre with rhinestones
Ombre or gradient look original and beautiful on their own. But additional decor gives them originality, attractiveness and style. This look is suitable for a special occasion, for a festive evening out.
Advice! The rule of good form allows the use of sparkles that imitate jewelry in the evening, in the shine of candles or lamps!
Ombre or gradient look original and beautiful on their own, but additional decor gives them originality, attractiveness and style. Decorating with shiny rhinestones decorates the hands, making the image sophisticated.
Decorating with shiny rhinestones decorates the hands, making the image sophisticated. The fashion for super-long nails is gradually fading away. Neat short plates are convenient, do not interfere with everyday life, and manicure lasts better and longer on them.
Advice! Gel polish makes your nails thicker (there’s nothing you can do about it!). Therefore, you should not generously sprinkle bright short nails with shiny pebbles. You can place glitter on several fingers or decorate each nail with a small stone.
Gel polish makes your nails thicker (there’s nothing you can do about it!) You can place glitter on several fingers or decorate each nail with a small stone.
Gel polish allows you to hide unevenness and other nail defects.
The fashion for short nails opens up great possibilities in the variety of their decoration. This is a transition of colors, the use of sparkles, the application of a miniature pattern or mesh. In the small space of a short plate, all these nuances fit harmoniously.
Benefits of Ombre Design
Manicure with stretching is considered a current trend. Decorating your nail plates this way has a number of advantages. These include:
Durability of the coating. Gel formulations last well for 25 days from the moment of their application.
Decorative gel varnishes allow you to strengthen the nail plate and make it smooth. If a sponge was used for the technique, a slight roughness may form on the surface, which is difficult to correct with a finishing coat. This is why many craftsmen prefer to work with a brush or spray gun.
A huge color palette allows you to combine any color and shade. Particularly popular is gel polish with metallized particles, which allows you to create a complex “cat’s eye” design. Gel polishes based on glitter are characterized by long-lasting wear.
What shades should I choose? Professional masters recommend choosing bright colors to create a high-quality manicure. As for the length of the nail plate, they rely on short nails. They look bold, but at the same time elegant.
Black, chocolate, burgundy, and coffee shades help fashionistas stand out from others. As for summer manicure, in this case it is best to choose lilac, yellow, blue and red.
To create a smooth gradient, choose a shade 2 shades lighter. Additional decorations are best done with rhinestones and glitter of different sizes.
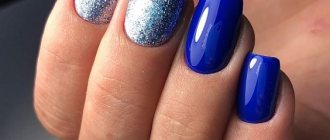
Glitter Gradient
The technique of gradient manicure with gel polish is achieved by using pigments. After applying the base color and drying your fingertips in the lamp, you need to pick up a “petal” of glitter with a brush, apply a thick layer to the base of the nail, moving up to the middle of the plate. The pressure should be smooth. A dense layer of glitter is formed at the tips of the nails, gradually the pigment becomes thinner and ends at the base. This is how the color transition on the nails is achieved.
This coating looks very elegant even despite the shine and shine.
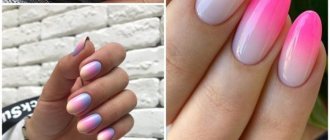
Ways to create a gradient on nails: classic and new
A fashionable gradient on nails provides a unique opportunity to play with color and create unique pictures on your nails. The classic technique involves performing a horizontal gradient. You can also combine this design with additional decorative elements, patterns, abstract or floral designs. A vertical ombre manicure looks very interesting, for which it is recommended to choose contrasting shades of varnish.
Gradient with a comb brush
A special flat brush called a “comb” will help you create a nail design with a gradient. Thanks to its use, you can create both horizontal and vertical ombre. A gradient with a brush has the main advantage; to master the technique, it is enough to study the step-by-step principle of operation.
So, how to make a gradient on your nails with a comb brush at home:
- Apply two colors of varnish to the nail plate with a flat brush;
- Using a comb brush, carefully brush along the border of the varnish, shading it;
- you can move the brush to the sides, creating a more blurred background;
- At the end, a colorless varnish is applied to consolidate the result.
Gradient air puffing
Aeropuffing is a device for quickly applying a gradient, both classic and stencil, which can be done using an airbrush. The new trend for 2022 is a weightless multi-layer gradient consisting of small patterns. These could be autumn leaves, winter snowflakes, or anything at all. Aeropuffing is very convenient to use, although you will have to stock up on replacement sponges.
Gradient airpuffing can be done as follows:
- the first layers are base and colored gel polish;
- selected shades of gel polish or special gel paint, which is often sold in a set with a pouf, are applied to a metal or plastic palette;
- the pouf is dipped in gel polish or gel paint, printed on the palette a couple of times to remove excess paint, and only then applied to the nail;
- the resulting gradient is dried in a lamp;
- You can apply a top coat (glossy or matte) on top
Airbrush gradient
Airbrush is a simple artistic painting, for which a special device is used. It is used to spray paint over the nail plate, thereby creating a blurry image.
The airbrush gradient is performed according to the following scheme:
- airbrush is applied to the nail in one color;
- after the first layer has dried, apply the second using a varnish of a different shade;
- a gradient on long nails can be done with 3-4 colors of varnish;
- The design is fixed with colorless varnish.
Ombre with a sponge
In addition to the brush, you can use a special sponge. It has a fine structure that allows for smooth color stretching. Several layers of a light shade are first applied to its surface. Movements should be smooth.
For a bright gradient, it is recommended to apply 2-3 layers of a contrasting shade. We fix the decor on the nails with a finishing coat.
Stretching manicure with glitter allows you to create an unusual design. This decor can be chosen for a daily or evening look. In the first case, he combines a pastel palette of shades and a discreet color of glitter.
To create the second option, choose bright colors that highlight the individual characteristics of their owner. Brilliant decor can be made in the same color scheme or, on the contrary, stand out from the general background.
How to make ombre on nails: step-by-step instructions
There are three most current ways to create a gradient on your nails. In the salon, masters use an airbrush, with which they can carefully and quickly spray gel polish onto the desired part of the nail plate. Not many people have an airbrush at home, so they use improvised means. You can draw ombre on your nails using a sponge, sponge, or flat brush.
Ombre nails with gel polish are easier to achieve than with regular polish. To get a gradient manicure using a sponge, follow the instructions:
- Do a manicure by trimming the cuticle and preparing the nail plate;
- Apply primer and let it dry;
- Apply a base for gel polish and dry in a lamp;
- Apply the base color and dry in a lamp;
- Apply the main color and additional colors to the sponge in stripes if you want a three-color gradient and only additional if you plan to make a French coat with an ombre effect;
- Apply the sponge to your nail;
- Wipe off excess polish and dry your manicure in a lamp;
- Don't forget to apply a matte or glossy topcoat and dry it again in a UV lamp.
This is a simple instruction on how to create ombre nails with a sponge. With a brush, all stages are identical, only it is more difficult to paint, since smoothness is not so easy to achieve.
The best gradient from Instagram nail blogger @sukhova_alena
Today we will also talk about nail blogger Alena Sukhova, about her love for gradient manicure, and show her best works.
My name is Alena Sukhova @sukhova_alena, work experience since 2013. Relatively recently, since August 2022, she began to develop as a nail blogger and teacher of online and offline courses. It all started with my love for gradient design. I really wanted to convey to the masters that this design deserves respect and love. It can be done much easier and faster if you know certain techniques. Thus, my first course was born online, then offline.
I’m also trying to convey to girls that you can and should develop while on maternity leave with small children. I show with my own example. And at the moment, I have my own developing blog @sukhova_alena, two children the same age. Our own online design courses: the famous gradient course, which won the hearts of more than 300 students, a course on textures, watercolor painting and “turnkey visual”. On my blog you can find a large number of creative ideas for manicure, master classes, and a lot of useful information. For example, how to make your own photo backdrop, photo wall, photo box, what accessories to use, and more. And, of course, my blog will only grow and develop further.
Gradient manicure design
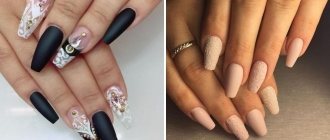
As mentioned above, the gradient design itself looks very beautiful. However, many girls still want to add interesting details to it. This can be decor in the form of beads, rhinestones, sparkles or foil elements. But increasingly, the gradient is combined with other types of design.
Gradient glitter on nails (stretching glitter with a brush)
Gradient glitter on nails or stretching glitter with a brush is one of the varieties of ombre manicure. In this case, the base is glitter, which is distributed over the nail plate from top to bottom or bottom to top, creating a smooth transition.
Gradient manicure with glitter on gel polish is performed as follows:
- the nail plate is prepared, gel polish is applied in several layers, and dried;
- for design you can use loose glitter or gel polish with glitter;
- glitter is applied as close to the cuticle as possible;
- take a flat brush, place it parallel to the nail and gently shade the glitter;
- topcoat is applied and dried.
Gradient with stencil
This design option is very simple to implement. Using special stencils, you can create a variety of patterns on your nails. To make the manicure look interesting and stylish, it is better to apply the design on one nail. The technique is very simple - a classic ombre is done, but a stencil is glued to one nail, which is filled with varnish of a contrasting color. Once the varnish has dried, the sticker is carefully removed and the design is fixed with colorless varnish.
Ombre design with rhinestones
Rhinestones on nails are always relevant at all times. But keep in mind that if the banner is made in bright neon shades, then you should not overdo it with the decor. Ombre in nude shades can be decorated more richly.
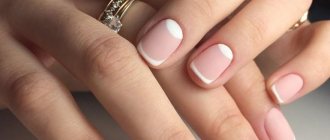
French combined with ombre
French using the gradient technique is very interesting both in bright versions and in nude tones. This design is made using gel polishes or colored gels.
- We cover the prepared nails with a camouflage base.
- We draw a jacket on one side with one color, on the other with a color in harmony with the first and in the center.
- We blend them together.
- On each finger it is possible to perform ombre in different shades.
A French jacket on a gradient looks interesting and relevant. We make a transition from light color at the tips to dark at the cuticle. Then we draw the jacket along the free edge with a dark color.
Stamping using gradient technique
Stamping is performed with special varnishes that are more pigmented than usual. You will also need a plate. They come in different sizes, iron, plastic. If the engraving is thin, a minimal amount of varnish gets there and it dries quickly. Therefore, it is necessary to translate the drawing as quickly as possible.
The drawing is transferred using a stamp and a scraper. The stamps vary in size, transparency, and softness. Important: When working, do not put pressure on the stamp. We work with a gentle roll. It should seem like we are practically not touching the drawing.
If the stamp does not imprint the design, take a soft buff and lightly buff the entire surface of the stamp. Wipe with adhesive tape. Gradient stamping is very easy to do. We apply several colors of varnish that match each other on the selected pattern on the plate. Using a scraper, smoothly mix them together, moving slightly up and down. The colors mix well and create beautiful effects. We transfer the design onto the nail with a stamp.
A bright stamping gradient is obtained using neon dry pigments. Apply the pigment to the stamp and mix the colors with each other using rubbing movements. Apply white varnish to the selected print. It will stick to the pigment and create a perfectly bright design. This stamping looks beautiful on any color background.
Air gradient
The air gradient received its name because of the technique used to perform it. It is done using an airbrush, a device that sprays paint in a thin layer under air pressure. An airbrush is usually used for horizontal ombre. Paint is poured into the device, the compressor is connected and the varnish is applied in a thin layer to the nail plate.
Next, the color changes and is sprayed onto the ends of the nails so that a smooth stretch is formed. The colored coating must be dried and covered with topcoat. Residues of sprayed varnish are very easily removed from the skin; just wash your hands. The airbrush not only creates a neat and beautiful ombre, but also significantly saves work time. The air gradient is suitable for young girls and adult women. You can use any of the current season shades.
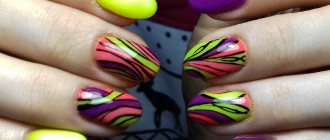
Chaotic gradient
This nail art involves a technique in which the borders of colors can be located anywhere on the nail, and the shades can change direction. The main thing is that the transition between boundaries is smooth. A striking example of a chaotic gradient is the Skittles design.
This type of manicure is more suitable for bright and ambitious young girls. Manicure looks impressive in bright colors. The coating technique is practically no different from a conventional gradient. The only difference is that colored gel polishes are applied to the nail in a chaotic manner.
geometric gradient
This nail art is distinguished by clear lines and a contrasting transition from one figure to another. Blurred shades are not relevant here. Various geometric shapes on a gradient are created as drawings, which are made using tapes, stencils, and brushes. Often this manicure is complemented with acrylic powder or shiny sand.
The geometric gradient uses both nude and bright tones. Nail art is suitable for creative young girls and women who love originality and experimentation. Current designs - rhombuses, triangles, lines in various variations, zigzags. A geometric gradient is made according to the principle of a regular ombre, only using stencils or ribbons. Some artists prefer to paint figures with a brush.
striped gradient
To create a striped gradient, transitioning straight or curved lines are made. The lines are made thin, with transitions that become darker with each application.
This design is suitable for both business women and romantic girls. The current colors for a striped gradient are bright or saturated shades in combination with light and delicate tones. For example: rich orange turning into peach, and then creamy yellow turning into white.
Striped gradient technique:
- Prepare your nails for gel polish as standard.
- Cover with base.
- Apply the base color closer to the base of the nails. Dry under a lamp.
- Using a sponge, apply a contrasting shade to the ends of the nails, blending towards the center. Dry the coating.
- Do contrasting stripes in parts, adding deep color towards the ends. Dry well under a lamp.
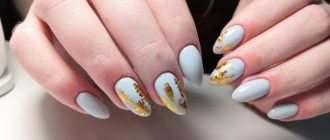
Fashionable manicure with foil
The design with the thinnest gold leaf-like foil is trendy. Apply the base color and dry. We tear the foil into small pieces. Using an orange stick, spread the decor onto the sticky layer in a chaotic manner. The cuticle has larger pieces, and smaller ones towards the free edge. Cover with top.
As an unobtrusive decor, thin foil can be laid out in small fragments over the entire surface of the nail. Or focus on only one part of it. Foil of different shades printed on a sticky layer of gel looks beautiful.
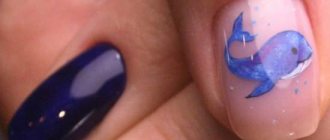
Fashionable gradient in the form of a pattern
Drawings occupy a special place in nail design. Ombre in the form of patterns looks very impressive and becomes the main accent in the image. In combination with a gradient stretch, it is recommended to use pastel and light shades, so that the design will not be lost against the general background and will remain bright and expressive. The transition between colors can be used as a base or become a decoration for just a few fingers. The most relevant are geometric and floral designs.
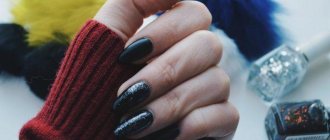
Rubbed gradient
Fashion trends have not ignored such universal nail decor as rubbing. Metallized pigments do not lose their relevance and are used to create almost every fifth manicure. Rubbing is indispensable for creating a home gradient, because it allows you to create something “beautiful” without any special skills or talents. Gradient rubbing is very simple.
All you have to do is coat your nails with your favorite gel polish and choose a suitable shade of rub. On dark shades, mirror pigment looks more advantageous; for light shades, it is better to use pearl rubs. You can also choose other fashionable colors of varnish - for example, the black and red design option looks interesting.
The following lesson will help you create a beautiful gradient by rubbing yourself:
- nails and cuticles are prepared;
- apply the base and black base (on black nails the mirror effect will look bright and unusual);
- Before applying any rubbing, it is better to degrease your nails;
- the rub is applied using an applicator or finger and literally rubbed into the surface of the nail;
- Remains of pigment are removed with a brush and the finish is applied.
Another way to apply a gradient
The transition of colors is done with a thin brush. Step-by-step implementation of manipulations:
- Treat the nail with acetone and apply the base coat. Dry under the lamp for 1–2 minutes.
- Gel polish of the same color is applied to half the nail.
- The second half of the plate is painted a different color. The border is shaded with thin brush strokes. This results in a gradual color transition. Dry the picture for 2 minutes.
- We repeat the application of varnishes and again under the lamp.
- We cover the finished image with a protective layer.
The transition of colors is done with a thin brush
Treat the nail with acetone and apply the base coat.
Dry under a lamp for 1-2 minutes. Apply gel polish of the same color to half of the nail. When ombre is done with a sponge or brush, roughness inevitably appears on the nail. They are smoothed out under the finishing varnish.
Fashionable gradient colors
The modern fashion industry offers girls a huge selection of a wide variety of nail polish shades. Calm nude and pastel shades (milk, coffee, pink, mint, blue, sand, yellow) and their combinations do not lose their relevance. Bright colors of varnishes, play on contrast and the most unusual combinations look interesting and stylish - for example, rich green tones, black, blue and different shades of red. To meet the latest fashion trends, don’t be afraid to experiment and feel free to combine a wide variety of shades, getting an unusual and bright manicure that will definitely not go unnoticed.
Pastel
Bright
Dark
Light ombre manicure
An incredibly light, beautiful, airy gradient is obtained with a milk base. This is a very easy manicure to perform, but it looks incredibly beautiful.
From the cuticle to the center of the nail, stretch the glitter or colored gel polish. We paint the tip with a gel of a similar shade and also stretch it towards the center. After drying, cover this gradient with a milk base. For a delicate ombre we use light shades of colored gel.
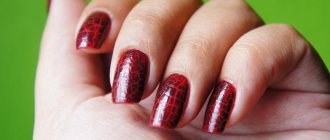
Bright red gradient on nails
Red color in combination with contrasting black gives your nails brightness and extravagance. If you want to darken the tip with black or, conversely, lighten the tip with white, then this design is best done using a sponge or sponge. From the contrasting color at the cuticle, the transition to the main color is done with a brush.
The most fashionable gradient color is white
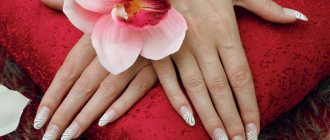
The white gradient will always remain in trend regardless of the year, month and days. Indeed, thanks to such a beautiful transition from light to white or vice versa, this look can even be used for a wedding.
Contrast gradient
This style can also be defined as quite close to the classics. Contrast and play of colors now occupy one of the highest positions in the fashion world.
Peculiarities:
The choice of classic colors is preferable - a manicure with a white gradient (from white to black) is one of the most contrasting.
In addition to white and black, you can also experiment with different colors of the rainbow - transitions from blue to green or red are also among the most contrasting.
Delicate transition with white color
This nude design can be done with a sponge, airbrush or ombre brush. The easiest way to create such a gradient is with a sponge or sponge. Paint the edge of the sponge with white gel paint and, using patting movements, stretch the white color from one edge to the middle of the nail, after first applying a camouflage layer of the base and drying it. This design can be complemented with various decor.
Chrome gradient
A trendy chrome, mirror or metal manicure will look new if done in a gradient style. With this manicure, you can focus on one or several nails by covering them with a mirror rub. This design will definitely be the center of attention, and women's hands will acquire charm, grace and sophistication.
Gradient manicure is a sophisticated and sophisticated solution for a stylish and fashionable look.
This nail art goes well with both summer and winter looks. Regarding the color scheme, you can completely rely on your personal preferences, because there are no obstacles to the gradient. This design is very difficult to resist, which is why it is so popular and in demand. Feel free to experiment by adding rhinestones, stickers, patterns or negative space elements and stay on trend.
Ombre manicure for short nails
The variety of possibilities of this technology is great. The vertical transition from one edge to the other looks very harmonious on a short length. This option visually lengthens the nail plate. You should avoid any designs, but a little shine is welcome. It distracts from the short length.
Long manicure using ombre technique
The design of a gradient on long nails looks interesting and stunningly beautiful. At a long length you can demonstrate all the charms and top ideas of this design.
Gradient options
Nail artists have come up with different ways to use gradients in nail art. The photos with examples below will help you choose a gradient manicure.
Vertical gradient
The most important thing in any type of gradient is choosing the right shades. They should not be very different from each other, unless of course you want to create a brighter and catchier image. For bright ideas, use bright and acidic gel polishes.
For a more subdued variation, you can choose delicate shades of purple, green, blue and other colors that complement each other beautifully.
Horizontal Gradient
When creating a horizontal pattern, you can be guided by two options: select colors from the same palette, resulting in a smooth color, or use contrasting colors, bringing originality and a little extravagance to the manicure.
Angular gradient from center
The next contender for the most fashionable manicure is an angular gradient.
Its peculiarity lies in the unusual iridescence of colors - there is a gradient not on each nail, but on the entire hand as a whole.
That is, for example, dark blue varnish is applied to the thumb and index finger; on the middle – a little lighter; on the nameless one there is a border between blue and violet; and on the little finger it’s closer to pink, or even purple.
Corner Gradient Marigold Design
New interesting ideas do not keep fashionistas waiting long. More recently, the most popular designs for nails have become a gradient manicure from the center of the nail and a smooth angular transition. The main feature of the angular gradient is that the varnish is stretched diagonally, and the design from the center of the nail is done on a white base. Against this background, you can make a transition of rich color from the center of the nail to the end. Both options are a sophisticated solution for stylish nail art. This unusual design is very popular with many girls due to the harmony and sophistication of the design.
Manicure with a smooth transition at home
We suggest performing the ombre technique on your nails with your own hands. To work you will need:
- Set of nail files;
- Degreaser;
- Three-phase gel polish system. This list includes the base, color coating and protective composition. For work, it is best to choose brands with a good composition. The cost of decorative varnishes should not be less than 100 rubles;
- Disinfectant solution;
- LED lamp.
To make the stretching smooth, it is recommended to follow the sequence of actions:
Filing the nail plate to give it a neat shape. The free edge can be shaped into an almond, square or oval. For short nails, it is best to choose a square. This makes the manicure look more neat.
Using a manicure set, we remove the cuticle and traces of visible deformations on the nail bed. It is recommended to pre-treat instruments with a disinfectant composition. Antiseptic to prevent infection.
Use a soft nail file to remove the glossy coating on the nails. During the manipulation, you should not make sudden movements that could injure the nail. This deformation improves the adhesion of the colored coating to a thin plate.
We pre-treat the fingers with a disinfectant solution. We treat each nail with a degreaser.
Next, apply a thin layer of base coat to even out the nail. Use a brush to make rubbing movements. The varnish composition will evenly fill the deformed areas and improve adhesion to the colored coating.
Dry the transparent composition for 2 minutes in an LED lamp. The brush should be at an angle of 45 degrees. This position helps to evenly distribute the base coat and improve its adhesion to the surface of the plate.
Now you can proceed to applying the color coating. In the upper part we paint with a light varnish, and near the edge with a darker one. Use a flat brush to distribute the pigments. When the gradient is completed, proceed to drying for 2 minutes.
We use a finishing coat to secure the result. The photo of a manicure with vertical stretching shows the finished result.
Manicure with gel polish with color transition
When choosing a color scheme, you should practice applying regular varnish. It can be easily wiped off with liquid. Gel polish will be difficult to fix, let alone remove. For this manicure you will need:
- Special lamp with ultraviolet rays;
- System for gel nail coating - base, colored varnishes - gels, finishing treatment;
- Primer or bondex;
- Dressing brush;
- Sponge;
- Nail polish remover;
- Paper tape;
- Cuticle oil;
- Nail file and soft polishing file;
- Nail polish remover, cotton swabs;
In the color scheme, you should practice applying regular varnish. Gel varnish will be difficult to correct, and even more so it will be difficult to remove. In addition to the usual treatment of cuticles and nails, remove a thin layer of the nail with a sanding file and treat the surface with a primer.
In addition to the usual treatment of cuticles and nails, remove a thin layer of the nail with a sanding file. and treat the surface with primer.
Advice! The purpose of this treatment of the nail is to level it and more tightly adhere the gel polish to the surface. Remove as small a layer as possible so that after removing the gel polish, your nails do not peel off for several months.
Next, do everything according to our instructions:
- Apply the base polish to the nail plates and let it dry under the lamp.
- Mix colors on foil. We do it this way - we apply parallel stripes of two or three colors to the foil. The overall width of the zebra is no more than the width of a fingernail. We shade the borders of the flowers with a toothpick.
- Using a foam sponge, blot the finished composition and transfer it to the nail.
Next, do everything according to our instructions. Using a foam sponge, blot the finished composition and transfer it to the nail.
- Immediately remove excess varnish from the skin around the nail with a cotton swab dipped in acetone. Under the lamp it can harden so much that it will be impossible to remove it.
- Dry your nails under the lamp and repeat applying the colored stripe to your nails. Dry again.
- We coat the plates with finishing varnish and dry for 2 cycles.
The gradient can be decorated with sparkles. To do this, after applying the varnish, dip the tips of the plates in glitter before drying. The result will be a chaotic, elegant pattern. Shiny particles are used only in the festive version of a gel polish manicure with a color transition.
Photo of manicure with stretching
- https://manikyurdizajn.ru/manikyur-s-rastyazhkoj/
- https://womenshealth.su/kosmetologiya/gradient-na-nogtyah/
- https://mysekret.ru/nogti/modnyy-gradientnyy-manikyur-ombre.html
- https://pix-feed.com/gradientnyj-manikjur-2/
- https://manikyurtips.ru/ombre-manikyur/
- https://ladysdream.ru/gradient-na-nogtyah-gel-lakom-foto.html
- https://womans.ws/2019/04/22/gradient-na-nogtyah-gel-lakom-55-foto/
- https://manikjur.org/manikyur-s-gradientom/
- https://MakeUp.ru/article/manikyur-gradient
- https://dream-body.ru/gradient-na-nogtyakh-gel-lakom