Today, beautiful nail art does not require extraordinary artistic abilities or a lot of free time. The technique of applying drawings and patterns using a stamp is available to both professionals and beginners. With the help of branded tools and special stamp paints, any girl can create luxurious nails in a matter of minutes.
Stamping, better than hand painting, reproduces the smallest strokes and details of drawings that cannot be accurately executed with a brush. The stamp conveys any image on the nails, from a lace jacket to geometric abstraction. It looks equally good on natural and extended nails, on shellac or gel polish.
Flaws
- high cost of high-quality branded tools;
- inability to create a three-dimensional pattern;
- the need to redo the entire nail in case of mistakes
- difficulty of working with the right hand (for right-handers).
But minor defects in manicure, such as scuffs, staining, blurring of the design line, can be corrected before the varnish dries. To do this, use an orange stick, a toothpick and a lint-free napkin.
Another option is to glue rock crystal, matte pebbles, or a crumpled piece of foil to the problem area.
Devices and tools
It’s better to buy high-quality paints, fireboxes, varnishes, etc., so that you don’t regret the money spent later, the same goes for fixtures and tools. Give preference to quality even if the cost is a little higher because you will be using the equipment more than once.
- A base for gel polish, shellac itself (one or more, as desired), as well as a top coat.
- Special UV lamp
- Discs or metal plates that are pre-engraved with various motifs, designs or designs that we will later transfer onto the nails.
- A scraper that will remove excess ink from the engraved plate and the stamp itself.
- Varnish or special paint for designs of different colors.
Today there are many offers on the market where everything necessary for stamping is already presented in a complete set, including bright and rich colors of varnishes or paints. Such a kit will be cheaper than buying everything separately, but the quality of the materials in the kit may be questionable.
Stencils
Stencils are plates of various shapes and sizes on which motifs are engraved. They can be plastic or metal. The first option is more suitable for working with thick paints.
Metal stencils are more versatile, as they are suitable for working with paints of any texture. But over time, scratches from the scraper appear on their surface. This has a negative impact on the result.
All stencils differ from each other in the material from which the product is made, the depth of embossing, pattern and shape. It can be: rectangular, round, figured. Up to 30 models can be presented on one plate.
The most common option is a disc-shaped stencil. It can display 4 to 8 designs. It is better to buy larger disks than rectangular disks.
Laser engraved stencils are of high quality, especially Konad brand stencils.
The plates are always protected by a thin film that may not be noticed. When using for the first time, you need to carefully move a pointed object along the part of the stencil where the pattern is missing. This will allow the film to peel off and be easy to remove.
Paints and varnishes
The technique of decorating nails involves the use of special varnishes and paints, the bottles of which are labeled “for stamping.” Theoretically, regular nail polish can be used to create printed designs, but it must have a high concentration of coloring pigments.
It should be borne in mind that there are quick-drying varnishes and paints, the use of which requires efficiency from the master. If you miss the moment, the paint may dry out on the stencil.
Is it possible to do stamping with regular varnish?
The basic requirements for stamping varnish are thickness, bright, rich color. In addition, many prefer the coating to be matte - this way the greatest clarity of the design is achieved. This is where a popular question arises: is it possible to use regular varnish if it meets these requirements?
Theoretically, this is possible, the main advice is to first try to manipulate the transfer of the pattern with a regular coating, and only if the experiment is successful, create a full-fledged manicure.
In order to avoid buying a special varnish and replace it with a regular one, you will have to work hard to find a more or less suitable one. But even here, not everything may turn out so smoothly. Ordinary varnishes may behave “badly” in the process:
- when transferring the design, it may turn out that the varnish is not pigmented enough, the picture will turn out pale and translucent and will lose all attractiveness;
- some slightly thickened varnishes may pull behind the stamp when removing the stamp, leaving small “hairs” on the edges of the design, which will make the appearance of the nails sloppy;
- Often, ordinary varnish simply dries on the stamp sheet itself and simply does not transfer to the nail.
If you managed to choose a good regular nail polish that allows you to create neat and beautiful designs when stamping, you can safely use it.
Popular brands:
- MoYou London;
- TNL;
- Born cute;
- El Corazon;
- Konad;
- Dance legend.
For loose patterns you need a thicker varnish, for thin and elegant ones (lace) - a medium consistency.
Types of stamps
Not only the plates with the finished images differ from each other, but also the stamps onto which they are transferred in color.
When choosing, it is important to remember that branded nail stamps are not always of the required quality. Often non-original ones are much easier to use.
Scraper
A plastic tool is much preferable because it doesn't scratch and does the job well. If you don’t have a scraper, you can use improvised means, for example, a plastic card. The end of the plastic scraper will develop dents over time. This results in poor image quality.
A scraper with a metal blade more thoroughly cleans the surface of the stencil from excess paint, but tends to leave scratches on it. Thus, we can conclude that an ideal scraper does not exist in nature.
Execution technology
Before the procedure, you need to prepare all the necessary tools and accessories. In addition to the basic set, you will need nail polish remover, cotton swabs and discs, and nail files.
We do stamping on nails:
- Nail preparation. Use an orange stick to push back the cuticle and remove all burrs. Give your nail the correct shape.
- Base coat. A base is applied to the nails. It is best to apply the primer coat twice, waiting a few minutes after the first application.
- Stamping varnish is applied evenly in a thick layer to the selected disc design. It is necessary to ensure that the paint penetrates all lines of the image.
- The scraper should be placed on the disc (some artists recommend holding the scraper at a 45 degree angle) and with a quick and safe movement, using light pressure, move the design to remove excess paint. If it doesn't work the first time, you can repeat it.
- The stamp is pressed tightly against the disk for several seconds, so that all elements of the design are imprinted on the surface.
- The stamp should rest against the edge of the nail on one side and with a quick rotating motion “imprint” the design across the entire nail - eventually the stamp will end up on the other side of the nail. Under no circumstances should you repeat the movement, otherwise the drawing will be smeared.
- Using a cotton swab dipped in nail polish remover, wipe the skin around the nail to remove any remaining polish.
- After the design has dried, apply topcoat to the nail.
- Clean the stamp and disc with a cotton pad soaked in nail polish remover.
Everything needs to be done with quick and precise movements to prevent the paint from drying out prematurely.
Step-by-step instructions for creating a manicure using DIY stamps
Stages of creating nail designs using stamping technique
- Degrease the nail plate. Apply a base coat to it and dry. Apply a background coat. It should dry well.
- Select the disk with the desired stencil. Remove the protective film from it if you are using it for the first time.
- Choose the polish you want to create the pattern with. Distribute it with quick movements over the entire surface of the stencil.
- Remove the unnecessary part of the varnish with a scraper.
When working, hold the scraper at a 45 degree angle. It must be pressed down with such force to remove all excess, but at the same time preserve the paint in the stencil engraving. Only practice will help you understand how to use a scraper. - Press the stamp onto the stencil using a rolling motion.
Check to see if the design is completely printed. If not, you should delete it and repeat all the steps again. After all, the quality of the manicure depends on this. If you do not have time to transfer the paint, it dries quickly on the stencil, treat the disc with acetone. Its droplets will slow down the drying process of the pigment. - Press the stamp onto your nail using a rolling motion.
If the image is partially printed, it means the varnish has dried out or the nail has a greasy surface. If part of the image gets on your skin, remove it with a cotton swab. - Remove any remaining paint from tools.
- Apply sealer after the design has dried.
This should be done with one stroke so that the pattern does not smear. Do not press the brush onto the nail, but spread a drop of fixative over the surface of the nail.
Example of French manicure with stamping
Multi-colored stamping on long nails
A video for beginners will tell you more about how to stamp your nails at home.
How to do stamping on gel polish step by step
You should choose special acrylic paints for painting. They have fairly bright pigments, making the drawing clear and beautiful. Such paints do not “float” and do not get dirty when applied to the surface.
Reversible
A base is applied to the prepared nails, followed by a layer of gel polish. All this is qualitatively dried in a lamp. Clean the nail from the sticky layer, and also degrease the scraper and stamp with solvent to get the best result.
Apply the paint of the desired shade to the surface of the selected pattern, and then carefully spread it over the surface with a scraper, while removing excess.
Rotate the stamp so that the design is imprinted on its elastic surface. You need to press the tool well, but under no circumstances crawl with it, otherwise nothing will work and you will have to start over.
Take a thin brush and several suitable gel polishes. Using this, you need to very carefully and carefully decorate the design already printed on the stamp, trying to prevent the colors from merging. Dry the gel polish on the stamp directly under the lamp. If necessary, repeat the coloring procedure, but make sure that the layer is not very thick.
Apply a thin layer of base gel polish to the nail, remove the design from the stamp using tweezers and glue it to the surface of the nail plate, paying special attention to the perimeter edges. It needs to be well leveled and smoothed, and the excess parts need to be very carefully trimmed with sharp manicure scissors.
A transparent top is applied on top and dried under a lamp for two minutes. After this, if necessary, you need to remove the sticky layer with a special liquid.
Doing this kind of stamping at home will be more difficult than usual, but it is possible to learn. This original manicure will help make your look stylish and unusual.
Ordinary
- Apply the base coat to the surface of the previously prepared nail plate.
- Before starting work, clean all surfaces (plates with a pattern, scraper and the stamp itself) with a special liquid.
- Using a brush, drip a special acrylic varnish for printing onto a disc with a pre-selected pattern. Scrape off excess paint with a scraper, trying to distribute the paint evenly over the surface. You must learn to do this with light and precise movements.
- Gently roll the stamp so that the pattern runs across its entire elastic surface.
- If you don't like the image or it gets smudged, you can easily wipe it off with regular acetone and redo it without changing the base coat.
- After the acrylic dye has completely dried, the surface of the nail is covered with a transparent topcoat, which dries under a lamp for two minutes.
Stamping kits
Tools for traditional typing
- metal plates , one or more, on which designs are engraved. Such plates have the shape of a circle or rectangle. One disk usually contains several patterns. Plates can also be purchased separately;
- stamp , with which the pattern is transferred from the plate to the nail;
- scraper - a scraper that is used to remove excess varnish from a plate. This is necessary to create a clear drawing.
Some manufacturers include paints for creating images in kits. If they are not included in the set, you will need to purchase them in addition.
For an overview of the stamping kit from the popular AliExpress site, watch the video.
Aids
- top coating;
- colored varnish for the background;
- fixative;
- nail polish remover.
Before you begin your manicure, you need to choose the right combination of colors so that the pattern stands out against the background of the base coat.
One of the popular companies that produce stamping kits is Konad.
Their kits contain 5-7 discs with interesting patterns, a scraper and a handy stamp.
The box also contains three polishes - white, black and a glitter fixer.
Learn more about Konad stamping in the video tutorial.
Stamping manicure ideas in different designs
Stamping translated from English means “stamping”. And the translation fully reflects the essence - the designs are applied to the nails with small stamps. What's cool is that you can print even the smallest details that would be impossible to draw by hand.
The manicure itself is not difficult to do. First, a special coating is applied to the disc with the designs, and then the pattern is transferred to the nail plate using a stamp. You can also stamp with regular nail polish. You will need two contrasting coatings: for example, if the base color is light, then dark shades should be used for stamping, and if black paint is used as the base, then metallic shades - gold or silver - are best suited. We have collected popular stamping manicure trends.
Combined
The printed manicure technique, popular this season, allows you not only to make monosyllabic prints on short and long nails of different shapes, but also to combine and overlap motifs to achieve extraordinary beauty of nail art on your nails. In this case, you can use not only different designs, but also different shades, which will only make the manicure more beautiful.
Multicolored
Paint shades do not have to be bright and provocative; choose calmer colors, for example, pastel or beige variations. In this case, color stretching, decorated with different types of embossing patterns, works great.
Geometric
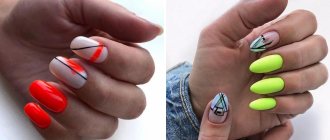
The easiest way to get strict geometry, simple lines and fancy shapes on your nails is to resort to stamping, using plates and a stamp with different printing options. And in such nail art, gradient transitions, “negative space”, and metallic effect varnishes look great.
Minimalistic
If you are bored with colorful and bright prints on your nails, you can always resort to simple and easy minimalist manicure designs. Small patterns, fine lines and basic shades are the perfect solution for you. This design will not let you get bored and is suitable for any occasion.
Nude
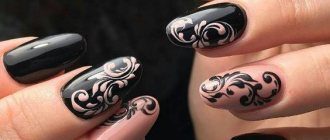
A reverse manicure that can be worn both in everyday life and on holidays is a manicure with nude embossing, complemented by patterns. Artisans offer both matte and glossy nude nails, adorned with sophisticated shimmering prints in gold, silver or neutral white.
Exclusive design ideas from Instagram
Owners of Instagram accounts choose a manicure that looks good in the photo. Stamping is indispensable in this regard. Any drawing will be accurate and neat, even when shooting closely.
Floral
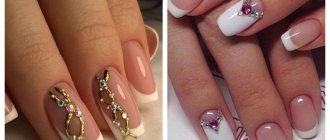
A current and very common theme in the design of French manicure with embossing is floristry, which includes images of twigs, flowers, and buds. A manicure with a floral print looks gentle and elegant and is sure to suit romantic people. You can use several variations of plant motifs on your nails at the same time, sometimes creating complex and intricate patterns.
Roses
This model comes in a base coat of white, yellow, light blue, blue and beige. Sequins, rhinestones, and sequins are used as additional decorations.
Daisies
These flowers are depicted not only in traditional white and yellow colors. Blue, orange, green and pink shades are also allowed here. The core of the daisies is often replaced with a handful of gold sparkles or rhinestones. The print can be interspersed with a continuous coating of several nails with a rich yellow varnish with a sugar effect.
Peonies
A distinctive feature of this model is its characteristic oriental style. This design is not characterized by patterns, but by clear images that focus on the smallest details. It is better to refuse additional decoration of the print so as not to spoil the specific style of Japanese painting.
Manicure with stamping on short nails
This type of manicure is very suitable for short nails. The short length creates difficulties when working with thin brushes that are used in nail art - and lovers of artistic manicure have no room to “walk around”.
© GettyImages
Therefore, stamping is a great solution if you don’t want to grow your nails. In such a situation, small stamping plates will help out. Neat designs will add originality to your manicure, and your hands will always look well-groomed.
© marinashagidze_nails
However, you should not overload short nails with elements of nail art. Try to limit decorating a few nails to a couple of details. Despite the fact that there are no clear rules in nail art, it is better to be guided by a sense of proportion in everything.
© olkapolkanails
We recommend reading:
- Manicure in beige tones 2022
- Red French: the brightest manicure trend in 2022
- New ideas for manicure
How to do stamping at home step by step
Classical
Traditional stamping requires a special varnish, a plate with patterns and a stamp. Before work, it is necessary to thoroughly degrease the plate and the surface of the mold using a nail degreasing agent.
- Step 1 - Prepare your nails and apply gel polish. Prepare everything you need right away so that all tools and materials are at hand. You need to work quickly. Next, using step-by-step photos, I will try to show you how to use stamp paint.
- Step 2 - Apply stamp ink to the plate. It is enough to draw part of the image.
Then use a scraper or plastic card to very quickly run across the plate to remove excess paint and fill in the empty part of the image.
- Step 3 – Take the stamp, place it on your nail and press lightly to imprint the ink onto it. Quickly check print quality.
- Step 4 - Using the fingers of your left hand, pinch and move the side ridges on the client’s finger, using light pressure, transfer the image to the nail.
French with stamping photo 2022 new ideas
French manicure in 2022 is one of the most popular types of nail art. If earlier it was simply universal, so it could easily be combined with any style of clothing, now it has many options. Everyone can choose a fashionable jacket to their liking. What popular trends exist in this area are best seen in numerous photos in glossy magazines.
Stamping is becoming very popular in 2022. The fact is that in the new season, pictures on nails should be extremely neat and sophisticated. It is very difficult to achieve this without excellent artistic skills. Stamping allows you to apply even the most complex patterns, which previously only appeared in photographs of the works of famous masters. The technology is a method of applying designs using a rubber stamp. It’s enough just to purchase fashionable options and enjoy using them.
Your stamping does not print well
- you are not doing all the manipulations quickly enough;
- they degreased the nail poorly and did not completely remove the polish left over from the last manicure;
- the room is too hot or windy;
- your paint is not of good quality.
Stamping is useful for creating designs both in the salon and at home. This greatly facilitates the work of a master who does not know painting techniques. In addition, the use of stamping significantly speeds up the work of the master.
An alternative to French in stamping style
Sometimes you want to push aside the good old classics and move forward to change, to new ideas. Nail artists surprise with their unusual approach to the design of “smiles.” Thus, the design of a French manicure using stamping technology is a stylish option that will suit any length of nails and will not lose its artistic meaning.
Ombre
Here's how to do two-color printing. It is also called ombre or gradient embossing. This technique only vaguely resembles a gradient, but it looks quite interesting. The main thing is to choose shades that are close in tone and not too contrasting.
- Step 1 - Manicure all your nails in advance. Cover them with topcoat. Gradient printing works best on a white background.
To work with gel paints, it is more convenient to use a transparent stamp with a silicone pad.
In order for the varnish to transfer better to the mold, it must be prepared as follows. Remove the varnish from the new mold with a soft disc, roughen the surface with a cloth soaked in Nail Prep and remove dust.
Once your stamp is ready, degrease the design on the stamp plate you want to transfer and let it dry for a few seconds.
- Step 2: Apply two colors of gel polish to the selected design at the same time.
- Step 3: Take a scraper and run it over the plate 1-2 times to remove excess paint.
- Step 4: The silicone stamp is small and you can cover the nail surface completely. There is no need to polish it, as the surface is quite sticky and absorbs paint well.
The big advantage of gel stamping is that you can aim and hold the stamp as long as you like before transferring the design. Gel polish does not dry in air, but dries in a lamp. But there is also a significant drawback. If the gel polish is not very thick and you press harder on the stamp, the print will turn out blurry.
- Step 5 – When transferring the “colorful” design, you need to apply light pressure to the stamp. When transferring gel polish, the pressure should be minimal, otherwise the material will be smeared over the surface. We transfer it with a light movement without pressure, not forgetting to press and slightly move the side rollers back.
Which polish is best for nail stamping: review
With the growing popularity of stamping, the range is also growing; more and more well-known companies are producing high-quality coatings for creating ideal designs on nails. Let's look at the characteristics of the most popular stamping kits today.
Konad Special Nail Polish
The manufacturer Konad produces several versions of acrylic varnishes for creating stamping patterns on nails: in volumes of 5, 11 and 12 ml. The range includes a variety of coating options: pearlescent, matte, transparent, glossy in different shades. It is possible to purchase the rest of the necessary tools for nail design from this manufacturer; only under this condition does he guarantee the perfect design.
The consistency of the varnishes is viscous , the color is rich, which fully satisfies all the requirements for use in stamping.
El Corazon Kaleidoscope
Stamping paints from El Corazon and Kaleidoscope are offered in an economical and convenient volume of 15 ml; a separate collection of 8 ml format has been released, which is gradually being replenished with new colors.
The easiest way to verify this is with the example of white and black varnish - the colors used in a duet completely overlap the substrate, even despite such intense contrast. In the line you can find cream shades, neon colors, and iridescent duochromes, not to mention simple plain glossy and matte options.
The manufacturer notes the high concentration of pigment, which ensures the clearest pattern and 100% color rendition.
Golden Rose Rich color
Many fans of stamping use Golden Rose varnishes, and not only a special collection for nail art, but also certain options from among the usual ones, which are sufficiently rich. A huge advantage of the product is its low cost and prevalence, but before creating a manicure, it is better to conduct several experiments and check exactly how the colors will look on dark and light substrates. Golden Rose varnishes are available in different volumes depending on the series; the product for nail art comes in long 7.5 ml bottles.
The varnish has good durability and lasts about 5 days. For best durability, it is recommended to apply a base and top coat.
Kand Special nail polish
Available in standard glass bottles (10 ml), the price category is average. Produced in South Korea. Products can be easily found in online stores and choose the color you like from the offered range. This brand also produces convenient stamping kits that will allow you to immediately begin creating a beautiful design.
Kand brand varnish has the necessary consistency and saturation to obtain clear and expressive patterns. Not intended for use alone as a single-color nail coating.
Born Pretty Nail Art Stamping Polish
Born Pretty stamping paint is famous for its excellent quality. The varnish is dense and spreads well over the plate; prints when transferred with a stamp turn out clear and bright. It does not dry quickly, which allows for high-quality drawing. During the year of storage of the bottle, the consistency of the paint does not thicken and does not require dilution.
The only drawback of the paint is the difficulty in removing it from the nail plate. You need to rub it well with nail polish remover to get rid of the pigment. But this is most likely a disadvantage of all stamping paints.
Brilliant
For this technique, a material with good residual adhesion should be used. This is usually a gel polish or rubber base. Conversely, the base should not have a sticky layer so that the film is only printed on the drawing.
Before working with regular gel polish, you need to prepare a stamp. Namely, go over it with a buff, give it a slight roughness, remove dust and clean with a degreaser. The photo below shows what a prepared stamp should look like if you want to stamp with other materials rather than special paints.
For the sample we used Patrisa Nail varnish, which is intended for embossing and Chinese painting. It is dense and highly pigmented. You don't have to put a lot on the plate.
The tips are coated with gray gel polish and a thin layer of non-sticky topcoat.
- Step 1 - Apply a small amount of paint to the edge of your chosen design.
- Step 2: Then use a scraper to run it over the plate a few times. Both times you need to move in the same direction so that the paint does not get dirty on the plate.
- Step 3 – Then transfer the design.
- Step 4: Here is the printout. The paint hasn't flowed, but there are some small gaps. If there are few of them, you can tint them with a thin brush. If there is a lot, then it is better to repeat it again. Possible causes of gaps when printing with gel polish: poorly cleaned plate, poor-quality varnish, insufficient pressure on the stamp when removing varnish from the plate, too deep engraving on the plate.
- Step 5: Before applying the film, dry the gel polish in a lamp. Next, degrease a piece of transfer film, wait for the cleaner to evaporate, and print the transfer film onto your design. Then cover with a finishing layer of glossy topcoat.
Rubbing
Another technique that allows you to quickly create shiny designs on your nails. You can use any rub.
- Step 1 - Apply a brown shade to the ends and cover with a thin layer of top coat.
- Step 2 - To print just the wear on the design, lightly buff the entire surface.
- Step 3: Remove dust after sawing.
- Step 4: Apply a small amount of rubbing compound to the clear stamp.
- Step 5: Select a design and fill it with gel polish.
- Step 6: Apply gel polish to the stamp over the rub.
- Step 7: Make an imprint on your nail.
- Step 8 - Lightly shake off the excess rub with a brush.
- Step 9: Cover the entire nail with topcoat.
Now you know how to use stamping, correctly and quickly create beautiful designs on your nails with any print and design.
Manicure with stamping on long nails
- Girls with long nails are also better off going without frills - otherwise there is a risk of “cheapening” the look. This also applies to manicure with stamping.
- The size of the nail plate allows you to use stamping with more noticeable and complex patterns. The main thing is not to overdo it and remember that minimalism is still in trend.
© GettyImages
If you want to emphasize the length and shape of your nails, choose a polish color that will draw attention to them. To prevent a monochromatic coating from looking boring, add variety with the help of stamping and our ideas.
- Stamps on two or three nails will be enough if we are talking about large designs. You can decorate all your nails with small patterns. This way you will not violate the laws of harmony.
- You can experiment with color, the number of stamps and the location of the prints on the nails. This provides many opportunities to create interesting stamping manicure options that will undoubtedly decorate long nails.
© lanka1611
Useful tips
To create the perfect stamping design, you need to know a few secrets.
- It is better that the first attempts to use the molding are made in advance. They will help you understand at what speed you need to work, how much paint needs to be applied to the stencil so that the design can be printed well. This can be done on any surface.
- Do not use nail polish removers containing oils.
- The paint must be removed from the scraper immediately, without waiting for it to dry.
- The polish on the disc dries quickly, so you need to immediately apply it to the nail.
- Do not work in areas exposed to air conditioning as it will speed up the hardening of the paint.
- Spread the paint over the stencil using quick brush strokes.
Watch our video review for more tips on perfect nail designs.