Many beauties get an amazing ombre manicure at least once a year. Gradient manicure has always been and will be in fashion. This type of nail design, although no longer a novelty, is still considered the most popular among modern fashionistas. Moreover, almost every year more and more interesting ideas for creating a French ombre style appear. For example, this season the French ombre look, combined with chrome and mirror design, looks very fashionable and original. We invite you to get acquainted with several interesting manicure options, where the main role is played by French ombre.
French ombre color combination
The whole idea of an ombre manicure carries the meaning of the correct combination of colors of the varnish coating. Smooth transitions of shades can turn women's nails into a real work of art. But in spite of everything, manicurists use in some cases several color shades, applying them with simple and rough lines. That is, they deprive a woman’s manicure of smooth transitions. This type of decoration for women’s fingers looks great on a long nail plate. Short nails should be decorated with French ombre in calm and light shades. Those representatives of the fair half of humanity who have rather long nails can decorate their manicure with combinations of several bright shades. For example, blue, green and orange tones. This style of play of shades can add originality and uniqueness to a lady’s look. It will also be able to show the outside world that the girl is quite self-confident and ready for extraordinary actions. Transitions of bright tones of varnish can be used for a beach holiday.
Ombre manicure 2022 – fashion trends
The popularity of interesting and unusual designs is due not only to their spectacular and attractive appearance. This solution can visually correct the shape and width of the nail plates. In addition, if you have irreparable flaws or unevenness on the surface of the nail, then stretching the shades will help distract attention and even smooth out the imperfections. Today, the ombre effect in the nail-art industry is not new. But every year stylists offer more and more new and original ideas. Let's review manicure 2022 gradient - fashion trends:
- Vertical
. One of the popular solutions for conveying stretch marks with color on nails is vertical gradient transitions. This option visually lengthens the fingers and gives aristocracy to the hands as a whole. - Horizontal
. Horizontal transitions are considered the most popular. Here, blurred boundaries look more rich and always catch the eye. But it’s worth remembering that a visually horizontal ombre will make your fingers look fuller and make your nail plate wider. - From finger to finger
. This solution looks especially impressive and is perfect for those who are not ready to experiment with sudden transitions. In this case, the shades are selected in the same color scheme, and the nails are painted uniformly from dark to light - each in its own tone.
Ombre manicure 2022 for short nails
Today, natural length is in fashion and this solution is suitable for any look. However, it is important to be able to choose the right design so as not to visually spoil the shape. Current gradient manicure 2022 for short nails - vertical direction. This option will visually lengthen the plates and add sophistication to the fingers. Stylists recommend choosing shades in the same color scheme and not making sharp transitions. A soft stretch will emphasize the neatness and accuracy of the choice. An ombre from one finger to another, where you can use glitter or rubbing, is considered a win-win.
Manicure 2022 gradient for long nails
Girls with a beautiful long shape can realize any design fantasies. Both the vertical and horizontal directions of the pattern are relevant here, as are abstract diagonals, transitions from one finger to another, and even a geometric effect. Evening and summer manicure 2022 gradient can be complemented with voluminous and textured finishing - rhinestones, stones, modeling. Winter and everyday ideas are best done in a discreet style. However, the boundaries can be sharp. In addition, for long lengths you can use contrasting shades of varnish. The current shape would be a soft square and almond.
What will you need to perform a French ombre style?
To perform this type of manicure you don’t need a lot of equipment. All you need are varnishes of the desired shades, a base, a foam sponge or a special brush. Ombre is often made from two or even three colors. The most important thing is that the shades are combined with each other, otherwise the entire idea of the master may be ruined. For a more simplified version, you will need a white and bed-tone varnish coating. The bed tone will emphasize the French man’s smile line. First of all, the nail plate should be covered with a base and dried in an ultraviolet lamp. Then apply the main background of the manicure. Then you should start applying the second shade. To do this you will need a foam sponge. The main thing to consider is that the foam rubber must have a dense structure. So, apply a thick layer of the desired shade to the sponge and lightly dip the nail polish into it. In the shade transition zone, you should apply the sponge as lightly as possible. This will give smoothness in the transitions of shades.
French on almond-shaped nails: a classic version
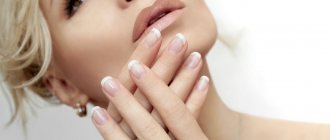
If a girl is choosing a design for her almond-shaped nails for the first time, she should choose a win-win option. We are talking about a classic French jacket.
This design involves a combination of a perfectly even, smoothly polished nail plate in a nude color with a contrasting tip of the nail, painted with a white coating by the careful hand of the master. White French on almond-shaped nails looks amazing, as confirmed by the photo with this design.
It is recommended to view them before visiting a beauty salon to gain new ideas and get a charge of inspiration.
The technique of applying the design is also not very intricate. It consists of several steps:
- To make a French manicure look neat, it begins with adjusting the shape of the nails and treating the cuticle growth area. Then a base layer of varnish is applied to the polished and leveled nail plate, which acts as a base.
- The next step is to apply neat white stripes to the tips of the nails. To get the perfect result, you should use special accessories - thin brushes or stencils on adhesive paper.
- When the previous layers have dried, the master applies a finishing coat, which secures the achieved result for the period until the girl comes to him for correction.
Tips for performing French ombre
To ensure that your amazing manicure is not spoiled, before work you should treat the area around the nail with a light layer of tape (special glue). After the glue has completely dried, you can begin to work. Well, and of course, when finishing the manicure, the tape must be removed with a light movement. If this device is not at hand, then the varnish that has gone beyond the boundaries of the manicure should be removed immediately after application. There is also a main tip for performing French ombre. Do not press the sponge too tightly onto the nail plate. This will spoil the smooth transitions of color shades. The varnish coating should be renewed after each drying of the nail.
DIY ombre tutorials
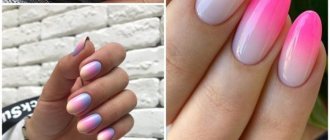
Ombre is a variety of color combination options - a transition from a darker shade of one tone to a light one, or iridescence within related shades (red-orange, violet-blue, yellow-brown). You can choose a solution that will be appropriate in any situation - at work, on vacation, at a special event.
Ombre - a variety of color combinations
There may be a transition from a darker shade of one tone to a light one, or iridescence within related shades. Gradient (multi-color) manicure has been at the top of popularity for several seasons now.
Gradient (multi-color) manicure has been at the peak of popularity for several seasons now. And for those who have not yet appreciated the innovations, we advise you to do ombre on your nails. Ombre is a type of gradient. For the first time, you can “splurge” on a salon manicure, and then you can try to create beauty on your nails with your own hands.
What we need:
Varnish set:
- colorless varnish for the base coat;
- white or beige varnish to create an even background;
- 3-4 different shades of the same color (for example, rose - fuchsia - burgundy);
Supporting materials:
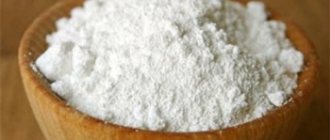
- a sponge made of small foam rubber or an ordinary household new sponge;
- cotton buds;
- acetone-containing liquid;
- foil, cardboard, paper tape, old disk - one of the listed things for the palette on which the varnishes will be mixed.
For the first time, you can “splurge” on a salon manicure, and then you can try to create beauty on your nails with your own hands
There are a lot of options for ombre manicure. Choose colors that match each other and go for it.
The preparatory stage plays a big role in obtaining the expected result. Nails should be processed in the usual way - filed, polished. Carefully trim or push back the cuticle. By default, the main condition is met - hands and nails must be perfectly clean, without peeling or damage, without dark spots.
Step-by-step guide to doing your own ombre manicure
At first glance, performing ombre seems very difficult, but after several sessions you will master this art to perfection. A little patience, good materials and a lot of desire will lead you to success. We offer you two ways. The first method requires effort and time, but the results are beautiful, incredibly smooth color combinations.
Ombre nail design step by step. Step 1-4
Ombre nail design step by step. Step 5-8 Ombre nail design step by step. Step 9-12
Ombre nail design step by step. Step 13-14
Step 1.
Apply a layer of clear varnish to the prepared nails. Between stages of applying varnish, you need to allow time for each layer to dry completely. When the clear varnish is dry, cover the nail plates with a white or beige base shade. It should be opaque and dense. Then the drawing will be smooth and saturated. Take your time and apply 2-3 coats of base coat if necessary. The rainbow effect will be stronger on a white background. Flesh or beige color slightly dampens the brightness of the shades. The background must be perfectly smooth.
Step 2.
After the background coating has dried, you can begin to create the ombre directly. Everything should be at hand - multi-colored varnishes, sponges, palettes. Cover the skin around the nail plates with baby or other rich cream. Instead, the edges can be sealed with paper tape.
Now on foil or cardboard with a brush, apply parallel stripes of the colors that you want to see on your nails in the order in which they will be located in your design. Smooth the edges of the strips together with a wooden stick. Transfer the finished drawing to the sponge. To do this, simply attach it to the drawn stripes. Make sure that the varnishes are not absorbed deeply into the foam. Now apply the sponge to the nail (now it’s clear why we protected the skin around it with tape?). Moisten the sponge a little with water before applying the design.
It is important to correctly apply the design to the plate. We place light colors at the base of the nail on the hole. Towards the edge of the nail, the colors will become darker and more saturated. This transition visually lengthens the nail.
Step 3.
Here, do not let the colored drawing dry, but immediately cover it with transparent varnish. Then it will look perfectly even, and the nail will be smooth and shiny. Such complex decoration is usually done with gel polish for a long time. At the same time, nails do not grow extremely long. This is impractical for a modern woman. Therefore, you can visually lengthen them using ombre.
Step 4.
We clean the skin around the plates from excess varnish. To do this, soak a cotton swab in nail polish remover and carefully, without damaging the design, remove excess colored varnish. The rainbow shimmer remains only on the nails.
The gradient transition should be blurred. Use several shades of the same color.
Another way to create ombre at home
The result will be the same as in the first option. But the method of drawing is somewhat different. Maybe just the borders of the colors will be a little clearer. But this method is much simpler than the first. Let's get started...
Step 1.
The preparatory stage is not cancelled. Next, instead of background white or beige, apply the lightest of the selected tones in an even layer and let it dry.
Step 2.
Place the second shade on the edge of the nail and the middle. We do not cover the base with a second layer. If you plan to use 2 colors, this nail art can be considered complete. We fix the result with transparent varnish.
Two-tone ombre Two-tone ombre. Step 1
Two-tone ombre. Step 2-3
Step 3.
Apply the richest and darkest shade with a sponge to the tip of the plates. More than 30 shades are usually not applied in ombre. Lastly, a top coat is applied to protect your drawing.
As you can see, creating a stylish manicure is quite accessible at home. This technique gives unlimited flight of imagination in combining colors and their arrangement on the nails.
French ombre with multi-colored tips
There is another amazing way to perform a French ombre style. For this manicure, you need to have a base, a foam sponge, a palette, a stencil for making a French manicure and, of course, the necessary varnish coatings. The shades depend on the choice of the future owner of the manicure. So, as everyone already knows, first of all you should apply a base to the nail. The next step is to attach a stencil for further French work. For the desired transition of shades that were planned, you should first try it on the palette. You can also use regular toothpicks to connect tones. If the master has already “done his hand,” then this procedure will seem unnecessary to him. The specialist will immediately begin applying varnish coatings directly to the sponge. To transfer colors, the sponge should be positioned vertically to the nail. In order for the manicure to have a bright and rich color, it is worth repeating the procedure several times. At the end of the work, the stencil is removed using cosmetic tweezers. Finally, the nails need to be covered with top coat. For female representatives who like to experiment with their image, each nail can have a different combination of color shades.
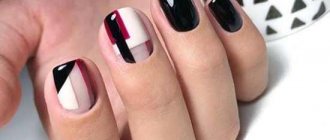
Almond-shaped manicure and French manicure with a geometric pattern
This season, geometric patterns are a trendy nail design. Neat and strict geometric lines go perfectly with the white color of the jacket and the almond shape of the nails. To create such a pattern, you can use a special stencil or apply the lines manually. Images of triangles, squares, dots, lines or other geometric shapes will look great with a jacket on almond-shaped nails. This pattern can be made in both bright contrasting colors and delicate pastel colors. A French jacket with a geometric print on almond-shaped nails will perfectly complement any created look and will allow every girl to look stylish and confident.
All kinds of techniques for performing a French ombre style
Some modern manicurists use an airbrush when performing French ombre. This device provides an amazing opportunity to apply several shades to the nail smoothly and evenly. And most importantly, it controls the thickness of the paint when sprayed. It all depends on the close contact of the nail and the apparatus. The further away the device, the weaker the hue saturation. This makes it possible to have complete control over color transitions. But before you start working with an airbrush, you should familiarize yourself with its functions as thoroughly as possible. Of course, you may not get the desired effect the first time. But don't despair, you need to try again. After all, if you don’t try, you may not understand all the features of newfangled technologies for performing modern manicure.
Many girls prefer to do a modern manicure on their own. That is why we hope that our article will become an excellent assistant in creating a French ombre style. After all, this style of manicure can often be found as a decoration for the hands of modern models and, of course, ordinary girls who are interested in fashion.
What is the difference between gradient and ombre?
Ombre is the application of colors with a gradual transition from one to another. Boundaries are being erased. You can use calm pastel colors, slightly shading the main color. Young, brave girls can afford a combination of completely unrelated colors. The result will be an avant-garde original drawing.
Ombre is the application of colors with a gradual transition from one to another. The boundaries are erased. You can use calm pastel colors, slightly shading the main color. Young, brave girls can afford a combination of completely unrelated colors. The result will be an avant-garde original drawing. Cosmic colors.
Ombre manicure can be done with regular polish, but more often it is applied with gel polish and fixed under a lamp. This pattern will last for many days; it does not need to be renewed or corrected. He will delight you and surprise others.
A gradient is also a transition of colors, but it can be performed not only in a horizontal distribution of shades, but also diagonally or vertically on the nail plate. His rainbow has few colors. If up to three colors are used in an ombre, the gradient is usually made in two colors. The transition of colors can be not only on the nail, but also from finger to finger.
A gradient is also a transition of colors, but it can be performed not only in a horizontal distribution of shades, but also diagonally or vertically on the nail plate
If up to three colors are used in an ombre, the gradient is usually made in two colors. The transition of colors can be not only on the nail, but also from finger to finger
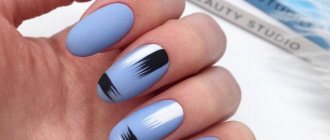
In a cold palette
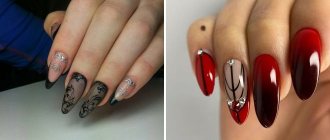
Throughout its history, French manicure has undergone many metamorphoses. Initially, the nude color began to be varied into pink, brown and other pastel colors. Later, a fundamentally new trend appeared - a black jacket. Resin-colored varnish could be used to cover both the base of the nail and its top. Then the craftsmen even thought - why limit themselves to a monochrome range, and began to make French clothes using red, green, pink and blue tones. It is the latter that turned out to be the most common and in demand in this technique. At first, only the “tops” of the marigolds were covered with a blue tone, leaving the base white or beige. But then they decided to “stretch” it and it turned out to be a French ombre in blue tones. This solution is a godsend for the winter holidays. The manicure looks as if it was invented by the snow queen herself. It is noteworthy that the blue color when stretched looks most advantageous against the background of an unpainted nail, that is, applied to the base. This polish can be either glossy or contain shimmer to create an even more festive and magical look.
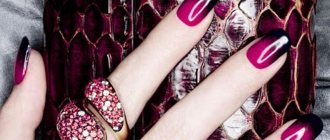
For lovers of luxury and sparkle
Rhinestones have long ceased to be the prerogative of weddings, birthdays and other holidays. Women use them when they paint their nails dark colors, when they do a moonlight or French manicure. Often we see a clear overkill with this decorative element, especially if ala diamonds flaunt on a pink or red background. But a reasonable amount of rhinestones based on a French gradient manicure is what you need to create the image of a real princess. This nail art is especially relevant for a wedding, New Year or other important celebration. A French ombre manicure with rhinestones is best performed using the standard colors for this procedure - beige and white. “Diamonds” can be placed on each finger, but little by little, or you can concentrate a large number of them on the ring finger. If the master does his job competently, then such a miracle will be able to last on the nails for a long time and, in some way, prolong your holiday.
Give yourself a holiday
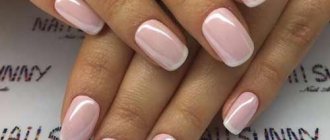
Often, in honor of the holidays, girls prefer to do a French manicure, replacing the usual nude polish with a shiny one. As a result, the nails are completely covered with shimmering pigment, and only their edges stand out, which remain snow-white. French ombre manicure with glitter is a type of nail art that is also considered rare. Nails painted in this way look magical, fabulous and evoke a feeling of holiday and celebration. It is important to note that this technique has some features that distinguish it from standard French. Nude polish is applied to the nail as a base, and glitter completely covers the tip of the nail, fading away at its root.
For lovers of white
Many girls like to paint their nails white. But this tone requires extreme caution; it is much more capricious than red and black. In order to make such nail art more unique, they couldn’t come up with anything - lunar design, sparkles, rhinestones, drawings. But we offer the most gentle and touching solution to the issue - white French ombre manicure. Its peculiarity is that the white color extends from the tip of the nail to its root and only slightly dissipates, and does not turn into nude or pink. It is noteworthy that such nail art can be performed on one layer of base coat, without the use of colored varnish. Also, if you are looking for a manicure for short nails, a French ombre in white tones will be one of the best solutions. Visually, it will even lengthen the nail plate and make your fingers slimmer.
What is the best way to remove an ombre nail design?
If the ombre is done with regular varnish, then remove it with nail polish remover.
To remove the gel coating at home, follow these steps:
- Use a nail file to file off the top layer of coating.
- Lubricate the skin with Vaseline or cream to minimize the negative effects of acetone.
- Cut nail-shaped shapes from cotton pads, soak them in gel polish remover, apply them to the surface and wrap your finger with a small piece of foil.
- Keep for 10 - 15 minutes.
- Remove one piece of cotton wool. The varnish that remains is carefully pryed off with a manicure spatula. Repeat this procedure with each finger in turn.
- Use a buff to polish the nail plates.
- Rinse your hands and apply a restorative mask.
There is a similar option for removing the coating, but for this, each nail is wrapped in a bandage and dipped in a container with nail polish remover.
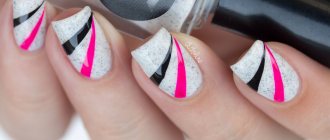
Neon ombre
Bright and bold design that is difficult to take your eyes off. Neon manicure has gained immense popularity on social networks, new products were demonstrated in different shades and techniques. The transition from one tone to another creates a fashionable and colorful manicure that can become the main decoration of the image.
Changing the places of terms
This type of nail art, of course, can hardly be called a French manicure. However, the technique of its implementation is no different from the French ombre technique, only the colors change. At the root, the nail is filled with a black tint, and at the tips it gradually turns into beige. Only at first glance, this gradient is very aggressive - in fact, it is one of the most discreet and sophisticated solutions for nails. Firstly, the pastel palette is preserved, and the black tone gives the image just a little severity. And secondly, this is an ideal solution not only for long, but also for short nails. Visually, they become more elongated and the fingers appear slimmer.
Beautiful marble manicure for almond nails 2022
Marble has been one of the leading nail trends, and it's easy to see why. It gives your hands a chic, discreet and elegant look. In 2022, you can try marble pattern as a design on one or two fingers.
Please note: How to achieve beautiful relief on your arms with strength training?
Or do a completely marble manicure on each nail; this design looks especially impressive on dark shades of polish (black, burgundy, brown, blue).
ALL PHOTOS TAKEN FROM YANDEX IMAGES
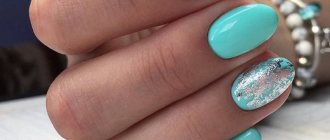
Without rubbing anywhere
The shining pigment that can be used to cover absolutely any color of shellac is called rubbing. A new trend in the beauty industry is to apply it to a French manicure done using the ombre technique. With this approach, it becomes more expressive, bright, and at the same time remains gentle and light. Most often, a pearl rub is applied over a gradient jacket. It shimmers only slightly and gives the nails a light pearlescent tint. An important aspect is that the pearl pigment makes the coating lighter, even whitish, and this applies not only to white varnish, but also to nude (or pink). This solution looks especially advantageous on tanned skin. But for the New Year, such a manicure will be an excellent choice.