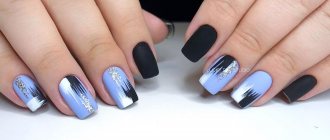
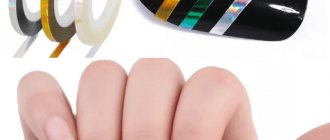
Manicure with self-adhesive strips
To perform this manicure you will need special self-adhesive strips, which can be bought at a cosmetics store. Also, such stickers can be prepared from ordinary tape or polyethylene. A similar technique is used when performing French manicure.
The execution technique involves layer-by-layer application of varnish after each previous layer has dried. First, apply the base polish to the entire surface of the nail plate. Then, after it has completely dried, strips of stickers are glued in the right places, and the desired part of the nail is painted over with a varnish of a different color. After the varnish has dried, the stickers are removed. You can use several colors and layers of varnish.
Sometimes a striped design can be achieved using strips of foil that are glued to a base that has not completely dried. A fixative must be used.
Preparing nails for decoration
Even the most beautiful design will lose its charm on unkempt nails. That is why, before painting your nails and drawing on their surface, you need to put them in perfect order. Of course, for this purpose you can visit a nail salon or make an appointment with a professional. But to save your precious time and save money, you can do all the work yourself.
- First of all, you need to remove the previous coating using acetone or a special nail polish remover.
- Then use a nail file and manicure scissors to make the desired shape of the nails.
- Then soak your hands in a warm, vitamin-enriched bath, which will not only moisturize the skin of your hands, but also strengthen your future manicure as much as possible.
- After the water procedure, you need to push back the cuticles with an orange stick or use a cuticle remover.
- To make your hand skin velvety and soft, after manicure procedures you should make nourishing masks or apply traditional hand cream.
Materials and nails - tools for manicure design
In addition to traditional manicure procedures, do not forget about the necessary nail materials, which for convenience should always be at hand. Therefore, before starting work, you should prepare all the materials to beautifully paint your nails, and the necessary tools for decorating your manicure. Namely:
- Varnishes of several colors, gel varnishes or acrylic paints. As a rule, this criterion depends on the technique of manicure and its decoration.
- Sequins, rhinestones, small beads, bouillons and any other nail decor you like.
- As tools you can prepare the simplest toothpicks, manicure tape and a sewing needle.
- Thin brushes for painting on the surface of the nails, and it is not necessary to purchase professional brushes, you can buy ordinary ones.
The list can be continued or, conversely, shortened, it all depends on the manicure design technique. Therefore, before painting your nails, you need to carefully consider the future design, prepare all the necessary materials and, if necessary, apply patterns to paper with a toothpick, brush or needle.
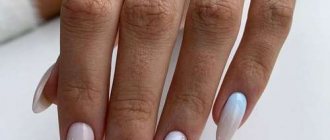
Gradient nail art
The technique of this manicure involves the use of a sponge. Usually two colors of varnish are used, which smoothly flow from one to another. To do this, both colors are applied to the sponge and, by pressing it against the nail, they are imprinted on the nail plate.
You don't have to apply two colors to the sponge at once. First, do the base coat with one color of varnish. And then, using a sponge, apply a different color to part of the nail plate. After this, the skin around the nail is cleaned of varnish, and a fixative is applied to the nail itself.
Another way to get this manicure is to use shellac gel polish. In this case, two colors are applied to the nail plate. Then, using a special stick or toothpick, the border between the colors is smoothed out. This manicure needs to be polymerized under a UV lamp.
What brushes are needed for manicure: fluffy classification
If you go to the store unprepared, the variety of brushes can easily confuse you. Different thickness and shape, price category, how to figure it out?
The first classification is by purpose. Simply put, there are tools for extensions, and there are tools for nail art. So, if you just want to practice with non-trivial patterns, then the range of choices narrows.
Otherwise, brushes are divided according to three criteria:
- Material of manufacture. It can be artificial or natural. It is clear that the latter costs more. The best brushes are made from sable or kolinsky (this is a predatory animal). But, to be honest, in practice they are not much different, except that natural ones last longer.
- Pile thickness. The thinnest one is indicated by the numbers 0 or 00, and the plumpest one will have the sign 8.
- Form. There are instruments with a pile a little thicker than a hair, and there are those that open like a fan, and they all have their own purpose.
Water manicure technique
This spectacular manicure is performed in a bowl of water. First, apply a transparent base to the nail. Then the skin around each nail plate is sealed with tape or cellophane. After this, different colors of varnish are dripped alternately into a container with water. The result is a pattern of concentric circles. Then, using a toothpick, we form a pattern of circles, stretching and moving them through the water. To ensure that the coating adheres well to the nail, you should not paint on water for too long.
Then we lower the prepared nail into the water and slip it under the varnish pattern. We lift the phalanx of the finger so that it passes through the varnish stain. We wipe off the excess varnish layer from the leather. Peel off the adhesive tape and apply a fixative to the nail plate. Manicure is performed separately on each nail.
Silicone brushes
Progress does not stand still, and now almost every brush from the standard set has a backup in a silicone version. The name of such brushes is shapers.
“New Shift” can boast several advantages:
- Durability. No hairs deteriorate or become brittle, and the silicone is very easy to clean.
- Convenience. It’s not easy for beginners to draw the same smiles on a long-pile French coat. And such a brush is no more difficult to control than a pencil. In addition, the varnish does not spread on it.
- Versatility. In addition to drawing patterns with shapers, you can rub in pigments, shape the molding, smooth out the decor, use a sharp tip to erase your own flaws in the work, and even put rhinestones on the nail.
In the video, the master will tell you why these brushes are useful:
Whether or not to use shapers is your choice. You can buy a futuristic set to play around with original tools. However, absolutely everything that shapers can do can be easily done with ordinary brushes.
Manicure with decoration using foil
This manicure is done using foil and special glue, which can be bought in a store or ordered online. Their prices are quite reasonable. To do it, just cover the nail plate with varnish and apply glue in the right places. When creating a design, a stencil is used to apply glue. Then foil is applied to the adhesive base and pressed down. After the varnish has completely dried, the non-glued foil is removed with a brush. The entire manicure is fixed using a fixing coating.
Drawings on nails with a toothpick
This method of nail design in essence and consistency is not too different from the option of applying a design with a needle. The only exception is that the tip of the toothpick is thicker and it will not be possible to draw the smallest details. In addition, the toothpick is not so sharp, which means there is virtually no risk of damaging the base coat.
Let's look at the technique of drawing leopard spots.
Step 1. Dip a toothpick in golden varnish and apply oblong spots on the surface of the nail.
Step 2. Place black varnish on a toothpick and circle each spot randomly, leaving small areas unpainted.
Using toothpicks, you can create a more complex “rainbow” nail design.
Step 1. The surface of the nail is covered with a white base.
Step 2. From right to left, draw a spot with pink varnish, which is bordered with an arc of yellow, then purple and turquoise.
Step 3. Having placed a toothpick in the center of the pink spot, they begin to slowly draw a line towards the edge, forming outgoing “rays”, as in the picture. After drying, cover the nails with colorless varnish.
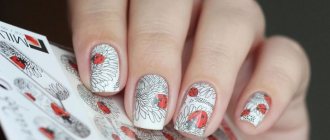
Drawings with toothpicks (photo)
Newspaper nail design
To create this manicure you will need alcohol and newspaper stencils. Typically, this manicure is done in black and white, so white or milky varnish is often used as the main color. Then the manicure is performed on each nail plate separately.
First, a transparent base is applied. While it is still wet, the newspaper clipping is dipped in alcohol for a few seconds and glued to the nail. To improve the imprint, the newspaper is pressed tightly against the nail plate. Then the newspaper is removed, leaving an imprint on the nail.
Finally, the finishing coat is applied. This manicure can also be done with white letters on a black background.
Nail art using dots
Dots are a special tool for painting ornaments and designs on nails, made in the form of a rod with a ball tip through which colored material comes out to the surface. The material used is tints - transparent watercolor compositions, similar to simple varnishes, but they contain special pigments. Such varnishes can only be applied to the base, since, due to their transparency, they do not have a rich color.
With Dots you can not only color, but also draw dots, lines or commas. Using this useful tool, you can create full-fledged dot designs on your nails.
Artistic manicure
This technique is the most difficult, because hand painting is used to decorate the nail plate. This requires a special tool, a toothpick or brush. To complete the drawing, both varnish and special acrylic paints can be used. The completed drawing is secured with a finishing coating.
In our Manicurof salon you can order a manicure performed using any technique. Our masters are fluent in all nail art techniques. To sign up for a procedure or check the cost of services, you just need to call the phone numbers listed on the website.
Acrylic paints for drawings
You can, of course, paint with varnishes, but with the help of varnish you can make the most basic drawings. Manicure brushes are not very suitable for polish, as the texture of the polishes is too thick. Paints are more suitable for beautiful, original drawings.
What paints do professionals use? Masters use acrylic or watercolor paints. Watercolor drawings are more complex; this technique is called watercolor. Water is added while drawing. This allows you to get a blurry picture with a gradient. The acrylic drawing turns out convex, this is noticeable on the nails.
The choice of acrylic paints is rich and varied. Manicure acrylic paints come in four types: translucent, opaque, opaque and impasto. In order to get the desired color, you need to dilute the paint with water. The more water in the paint, the lighter and more delicate the color. You can combine 2 colors to create a unique shade.
It is better to buy acrylic paint in tubes, as it dries quickly. Tubes must always be tightly closed. St. Petersburg paint is best. Watch the thickness of the acrylic; it must not be very liquid, otherwise it will flow off the nail.
Drawing on the nails flowers acrylic paint
Gel polishes
Reviews about gel polishes are mixed; they have many advantages, but there are also disadvantages. The main advantage of a manicure with gel polish is that it lasts a long time, at least 2 weeks. It is necessary to repaint only as the nail plate grows. Gel polishes penetrate the top layer of the nail, making it strong and resistant to damage. The brightness of colors and the possibility of beautiful design are also an undeniable advantage of gel polish. The disadvantages include the high price and the fact that gel polish is quite difficult to remove from nails.
Manicure. Gel polish coating. All stages and application techniques.
Draw step by step
- +30
- -3
- 33 rating
33 ratingX
| Like! | Dislike! |
| 90.9% | 9.1% |
4.6/533
Lecture 3. “Chamomile Glade”
You will need: base, green, white and gold varnishes, fixative.
Step-by-step diagram:
- Apply base coat to your nails.
- Cover the nail with green color and wait until it dries.
- Use a brush to paint 3-4 dots in white - these are chamomile petals.
- Use gold to draw the center of the flower.
- Finish the procedure with a fixative varnish.
Lecture 4. “For lovers”
You will need: a base base, 4 contrasting varnishes (less possible), a fixative varnish.
Execution steps:
- After spreading the base coat, apply the background color to your nails and let it dry.
- Place 5 dots with other colors and draw lines through the centers of the drops with a brush so that they look like hearts.
- Secure the result with a fixative.
Creating art on nails is a very exciting process that any girl can do step by step. Be creative and be inspired by our works.
Nail designs: video
Nail designs: roses
Nail designs: fruits
Nail designs: delicious cakes
Nail designs: bow
Nail designs: butterfly with rhinestones and pigments
Nail designs: TEDDY bear
Nail designs: palm tree
Tags: nails
Market Analytics
- 10 most revolutionary scientific developments in the beauty industry in 2021
- Top 10 Best Beauty Products in 2022
- Global cosmetics market 2022: an unprecedented test for the global cosmetics industry
Convenient search for beauty salons on our website
Beauty salons in Moscow Beauty salons in St. Petersburg Beauty salons in Ekaterinburg Beauty salons in Novosibirsk
Latest blog posts on our website
- Naturecream / Properties of the “Sunny” oil itself
- Naturecream / “Sugar” wrinkles - or what glycation can do
- Naturecream / Esterified oils
- Naturecream / Arnica - the magical plant of alchemists
- Naturecream / Tremella Extract - Snow Mushroom Detox for Skin
- Prostye-sovety / How to visually enlarge your lips with makeup
- Naturecream / Apricot kernel oil for face
- Naturecream / MATRIXYL3000 - the best skin elasticity stimulator
- Naturecream / SPF in Natural Oils
- Naturecream / Geranium (Pelargonium) oil for skin health and beauty
Latest forum topics on our website
- Natalya / How to properly make a gelatin mask?
- Mrs._Smith / Badly sunburned! What to do?((
- Ice / Is it necessary to combine fitness classes with a diet?
- Antonova / What can be used for hair loss?
- Radio operatorKat / Who was on a protein diet?
Other articles in this section
| How to choose and make the right nail shape The choice of nail shape directly depends on the shape of the cuticle edge and the length of the nail plate. A manicure can look completely different in each case. Choosing the shape of your nails is like choosing a silhouette in clothes: it will help hide imperfections, visually lengthen your nails, or vice versa, make your hands coarser and your fingers shorter. |
| Correction of ingrown toenails with plates and staples: what you need to know about the procedure An ingrown toenail (onychocryptosis) is a rather unpleasant phenomenon. Typically, the problem occurs on the thumbs and little fingers. A piece of the nail plate “cuts” into the soft tissue, and while walking, pain, redness, and discharge appear. If the problem is not corrected in time, suppuration and infection will occur. Everything can end sadly, including sepsis and bone deformation. Recently, in addition to the surgical method, nail correction using plates or staples has been used. The methods are relatively new, but have already proven themselves to be the best. What nuances you need to know about the procedures will be discussed in the article. |
| Step-by-step manicure: autumn leaves on the trees We offer you a master class of step-by-step photos of autumn manicure. You can easily repeat these beautiful designs on your nails of autumn leaves that have not yet fallen from the trees. Our autumn leaves will be yellow-orange, and we will use a gradient nail design technique as a basis. |
| European unedged manicure An unedged manicure is a cosmetic nail care procedure that differs from a classic trimmed manicure in that the thin skin of the nail cuticle is not cut, but is moved and removed using special products containing fruit or lactic acid. Read our article about how unedged manicure is performed (it is also called European), what products and tools are needed for it. |
| Medical pedicure The beauty of your legs is achieved through a good pedicure, however, if medical problems arise, a regular pedicure cannot help. |
| Manicure for Halloween In this article we will learn how to do a manicure for Halloween, since the holiday is just around the corner. We offer you a step-by-step simple Halloween manicure that you can easily do at home. Traditional colors of choice for Halloween manicures are black, orange and white, but we diversify it with other colors. |
| Nail art at home Nail design is a great idea for self-expression and completing your look. The most popular way to decorate nails is to apply drawings and patterns. It turns out that decorating your nails yourself is not at all difficult, and the samples of nail designs presented in our article at home will help you see this. |
| Manicure with the effect of broken glass Manicure with the effect of broken glass will allow your own imagination to run wild, since it has many options for nail design. Manicure “Broken glass” is now in trend. |
| Manicure: apple (photo and step-by-step instructions) Today we will look at how to draw apples on your nails. This nail design is suitable for both summer and autumn. Apples can be made red, green or yellow, or you can draw a cut apple with seeds. So let's get down to step-by-step manicure: apple. |
| Strengthening nails with biogel A beautiful manicure is an integral part of the appearance of a woman who takes care of her appearance. And now there are many different materials for nail care on the nail industry market, but knowledgeable fashionistas are trying to find among them those that have not only decorative properties, but also a restorative effect. One such product is biogel. It helps to heal and strengthen nail plates, as well as decorate them. |