Why and how a lamp can affect the deformation of gel polish during drying
Gel polishes as a real miracle of the nail industry have already been appreciated by millions of women who care about the health and aesthetics of their nails. Gel coating allows you to create a beautiful, long-lasting manicure and easily realize your most original ideas. And you can find new ones here: The best autumn color trends in the nail industry.
To polymerize the gel coating, ultraviolet (UV) lamps are used: fluorescent (LL), light-emitting diode (LED) and the most common - hybrid (UV/LED). In this case, drying devices often cause deformation of gel polish. The gel coating may wrinkle and become deformed for the following reasons.
Insufficient lamp power
One of the reasons why gel polish wrinkles is the insufficient power of the ultraviolet lamp. Today the market offers models with power from 9 to 90 W. Not only the polymerization time of the artificial material, but also the quality of drying depends on the power of the device.
In a low-power lamp, ultraviolet rays cannot fully penetrate the thickness of the coating, especially if the gel polish is highly pigmented or applied in a thick layer, so it does not dry well and begins to deform. To obtain high-quality coverage, the power of the device must be at least 36 W.
Worn emitting element and unsuitable lamp model
The radiation power of ultraviolet lamps decreases over time, they dim, and the radiation efficiency decreases. As a result, the varnish will take longer to dry, may wrinkle and have poor adhesion. The problem is solved by timely replacement of the radiating element. This is important to consider if the master serves a large number of clients.
Note! Luminescent elements are sensitive to shocks and changes in mains voltage, so you need to work with the LL lamp carefully.
The ultraviolet LED lamp has a longer service life than the fluorescent model. But still, LEDs lose power over time and if they fail, you will have to buy a new device, since in most models they cannot be replaced.
One of the reasons that gel polish does not dry in an LED lamp may be the incorrect placement of the LEDs in the device. As a result, blind spots are formed where insufficient UV rays reach, which leads to insufficient drying and deformation of the coating.
If a fluorescent lamp is used for drying varnishes of any type, then an LED lamp is not suitable for polymerizing gel coatings from some manufacturers. In order not to be mistaken, you need to look at the mark on the bottle, where the mark UV/LED means that the gel polish can be dried in any type of lamp, and UV Gel Polish can only be dried in an ultraviolet or hybrid lamp.
Attention should also be paid to caring for the device: periodically wipe the mirror surface from dust and dirt so that it better reflects UV rays for effective scattering.
Gel polish wrinkles in the lamp: eliminating application errors
Not so long ago, modern women were able to feel the convenience of manicure using gel polishes. This product not only has unique properties for long-lasting preservation of its original appearance, but also provides additional protection of the nail plate from aggressive environmental factors. Gel polish is applied like regular varnish, but to acquire additional durability of the coating, it must be dried in lamps using UV or LED rays. Manicurists often ask a question. Why does gel polish wrinkle in the lamp? In this article we will try to cover this issue in detail.
Why is it important to apply and dry gel polish correctly so that it does not wrinkle?
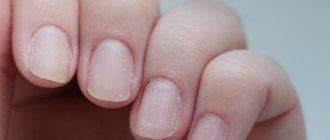
When choosing, applying and drying gel polish in a lamp, many difficulties can arise. It can wrinkle, swell, roll down.
Important! If gel polish is not used for a long time, the pigment usually settles to the bottom. Before applying, the bottle should be gently rolled in your palms, without vigorous shaking, to prevent air bubbles from appearing.
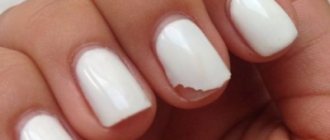
The most common mistake is applying gel polish in a thick layer. In this case, even a good power lamp will not be able to properly dry the entire thickness of the coating. As a result, the bottom layer remains undried, and the top layer will wrinkle. It is better to apply gel polish in two thin layers.
This is especially true for gel polishes with high pigmentation, which slows down the absorption of UV radiation. To make a high-quality manicure with gel polish in highly pigmented colors such as black and white, as well as any other very dark or bright shades, you need:
- apply gel polish in a thin layer;
- use a lamp with a power of at least 36 W;
- dry for 60−120 seconds.
A manicure can be ruined due to expired gel polish. Usually, 2-3 years after opening, the varnish becomes dense, thick and does not allow a thin layer of coating to be applied, which is why old gel polish can curl up.
Take note! Do not forget to twist the gel polish tightly after use, and also store it in a dark and cool place, away from natural and artificial light.
It is also important to monitor the quality of gel polish and purchase products only from reliable manufacturers in trusted stores.
Manicure stages and possible mistakes
Today there are 3 main types of manicure:
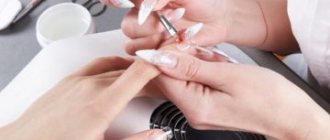
Combined and hardware manicure must be done using a special manicure apparatus, but before using it, it is better to undergo training, since improper operation of the apparatus can lead to damage to the nail plate, for example, cuts. For beginners, it is better to do a classic manicure at home.
Stage 1. Shape filing, cuticle processing
Before applying gel polish, you need to put your nails in order: treat the cuticle, file the shape.
What do we do at this stage?
Stage 2. Preparing the nail plate for coating
What do we do at this stage?
Mistakes at the nail plate preparation stage
Mistake #1:
Typically, people with oily skin or those prone to excessive sweating have a moist and oily nail structure. When preparing such nails for coating, it is necessary to use a dehydrator (nail prep) to deeply dry the nail plate, remove excess moisture from it and improve the adhesion of the natural nail to the artificial coating.
Mistake #2:
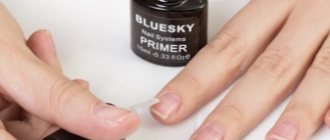
The free edge of the nail is one of the most vulnerable places: if you do not pay proper attention to it, chips and detachments may appear. To improve the adhesion between the nail plate and the artificial material, it is necessary to use a primer. Primer is translated as “primer”. There are acid-free and acidic primers.
The acid-free primer acts as double-sided tape and ensures strong adhesion of the natural nail to the artificial nail.
The acid primer lifts the keratin scales of the nail plate for better adhesion to the artificial material. Since the acid primer contains aggressive components, you must be careful not to get it on the skin and cause a burn. It is recommended to use it before extensions for girls with wet or oily nail texture.
Stage 3. Covering the nail plate
What do we do at this stage?
Errors at the stage of covering the nail plate
Mistake #1:
You used the wrong base for your nails.
The condition of the nail plate is different for everyone: for some it is strong, while for others it is thin, soft and plastic. You cannot use the same base for all nails. It is necessary to analyze the condition of the nail plate and pay special attention to the choice of base coat.
Today there are 3 main types of base coatings: hard, elastic and camouflage. What are their fundamental differences? Which one to choose? Let's figure it out.
Hard bases
Elastic bases
Elastic bases are great for beginners: they are easy to work with, as they do not spread, and the alignment is perfect. Using elastic bases you can extend your nails. Elastic bases are great for soft, highly flexible nails. But on long nails they sag over time, that is, after a while a “dip” appears across the nail.
Why is this happening?
Bases are soft gels, and they, in turn, as we said above, can be elastic or not.
Elastic bases perfectly strengthen the nail plate when leveling, because they are flexible, tenacious, and when the free edge moves, they, like an elastic band, move with it. But this is precisely why shrinkage occurs.
There are bases that contain solid plasticizers. Solid materials do not move with the nail and, accordingly, do not shrink. But keep in mind, UNDER HEAVY LOAD, almost any base will give minimal shrinkage.
What to do?
Strengthening with acrylic or hard gel, but this is a completely different procedure. In addition, the harder the material, the worse it soaks and the more difficult it is to cut.
ADVICE! Sometimes it is not very clear from the name of the base whether it is hard or elastic. To determine the type of base, you can do the following: apply a small drop or strip of base to the surface of a transparent plastic bag and put it in a lamp to polymerize. If after polymerization the drop (strip) bends, it means you have an elastic base in your hands. If you can’t bend the drop and it cracks, then the base is solid.
Mistake #2:
You held your hand in the lamp incorrectly and the coating did not dry well.
How to hold your hand in the lamp correctly?
Mistake #3:
You stored and transported the gel polish incorrectly, it has thickened or air bubbles have formed in it, which is why the coating does not adhere well and is difficult to work with.
Useful tips: how to avoid gel polish defects
The following 5 recommendations will help you avoid mistakes that could cause the gel polish to swell, wrinkle, or peel off during use and after drying.
- The lamp should be positioned as conveniently as possible for the correct placement of all fingers in it, so that the ultraviolet rays hit the nail plate evenly on each side. The thumb should be dried separately in the center of the device, being careful not to tilt the nail so that the gel polish is fixed correctly.
- Improper preparation of the nail plate, namely pre-treatment of the surface not with a buff, but with a polisher, also leads to defects in the gel coating. The purpose of the buff is to create a roughness on the nail surface that will ensure good adhesion of the natural nail to the artificial gel polish. The polisher is designed to create a smooth nail plate, so when using it, the polish simply will not be able to adhere well to the surface.
- Do not rush to prepare the nail, since the surface also largely determines whether the gel polish will wrinkle.
- When applying gel polish, there should be no moisture or grease between the layers, which can be introduced, for example, by accidentally leaning a nail against your face or hands. Before coating, it is necessary to thoroughly treat the surface with a dehydrator to degrease the nail.
- To remove stickiness from the top coat or between layers, you can use a cleanser - a cleanser. You will learn about other secrets of proper application of gel coating in the article Gel Polish. Perfect alignment of one left.
If the gel polish still begins to wrinkle after drying, bubbles and swelling appear, you will have to remove them using a file or pusher. Afterwards, you need to clean the nail plate from any remaining dust and wipe it with a degreaser. After this, you can re-coat your nails with a thin layer of gel polish. Small defects can be corrected by quickly applying topcoat and fixing it by holding it under the lamp for a few seconds.
By adhering to these rules, you can create not only a beautiful manicure on your hands, but also decorate your pedicure with single-phase gel polish from the Pedicure Line UNO collection - 10 shades for a long-lasting pedicure.
The most common mistakes a technician makes when applying gel polish
If after a manicure the gel polish quickly peels off (this can happen even in the first hours), then during the application procedure, most likely, serious but frequent mistakes were made. This can happen if the master is a beginner, unprofessional.
- The top layer has been poorly removed from the nail.
- Nails are not degreased enough after treatment.
- Layers of varnish applied too thickly peel off and polymerize quickly.
- One or all layers of varnish were not completely dried.
- The free edge was not sealed sufficiently.
- The base gel was applied poorly and did not cover the entire surface of the nail plate.
- Poor quality tools or gel polishes were used. It is possible that products from different manufacturers were mixed.
However, not only the master can ruin a manicure. Often the clients themselves are irresponsible about the procedure, starting to touch their hair or clothes with their nails during the session, and then wonder why the gel polish is peeling off. It is important to remember that you cannot disturb the master or touch your nails until the end of the session.
How to remove artificial material correctly and why is it important?
You've probably heard that gel polish spoils your nails, making them thin and brittle. It is a myth! It's not the material that ruins your nails! One of the reasons for damage to the nail plate is improper removal of the artificial coating, so this procedure must be approached with special responsibility!
Is it possible to remove gel polish yourself at home without damaging your nails? What materials and tools are needed for this? Let's figure it out.
How long can you wear gel polish?
First, let's figure out what period of wearing the coating is optimal. Often girls wear gel polish for a month, or even longer. However, they do not understand that they can damage the nail plate.
Technologists advise walking with the coating for no more than 2-3 weeks. Prolonged wear puts stress on the tip of the nail plate, its root suffers from the weight of the coating. All this can lead not only to breakage, but also to deformation of the nail plate.
How can you not remove gel polish?
RULE 1: Under no circumstances should you pick at the gel polish or tear it off the surface of the nail plate, because this can cause serious injury! If you are careless, you can remove the top layer of the nail along with the material, and this can lead to thinning and, at a minimum, painful sensations when in contact with water and various surfaces.
RULE 2: do not file away partially peeled off gel polish. In this case, you also risk cutting off the top layer of the nail and ruining it.
What other consequences might arise?
We hope these reasons are enough to convince you not to peel off the coating from the nail plate and do the gel polish removal according to the rules!
By the way, the peeling process itself is quite painful, it’s hardly worth it!