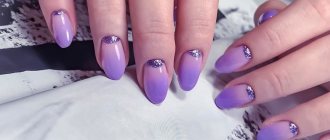
Most modern women take care of their nails. Recently, new ways and techniques of applying varnish to the surface of the nail plate have appeared, allowing you to obtain an interesting and original design. These include stamping, which will be discussed in more detail below.
Stamping on nails looks very stylish and original
What it is
Translated from English, “stamping” is translated as “stamping” or “applying a stamp.” Stamping on nails is essentially the same thing - applying an imprint of a certain design using a rubber or silicone stamp. The design on the stamp is copied from a metal disk on which it is previously stamped.
Despite the apparent complexity, stamping is quite simple to perform. To apply nail polish in this way, home conditions are quite suitable.
The high popularity of the technique is explained by the fact that to perform high-quality stamping, no special artistic or professional skills are required. Time costs will also be minimal. You just need to practice a little and your manicure will turn out perfect.
Silicone stamp is most convenient to use
In order to do stamping at home or in a salon, you will need special tools and materials:
- metal disks (or plates) with engraved designs;
- stamp;
- special stamping varnish or stamping paint;
- scraper for removing excess paint.
All of the above can be bought in specialized stores or ordered online. Despite the fact that truly high-quality stamping kits are quite expensive, they have a long service life and will very quickly pay for their price.
Top 6 ideas for nail stamping designs
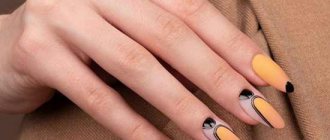
Gradient
The trendy technique of applying a gradient is perfectly performed using stamping on the nails. You can make a smooth transition from one color to another using a stamp, or transfer a gradient pattern by carefully mixing two varnishes directly on the plate. Today, the most fashionable is the radical type of gradient, as in the photo.
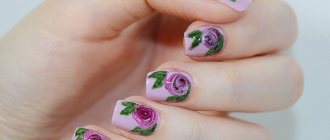
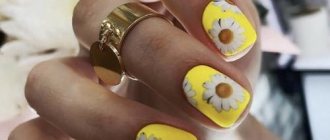
Floral patterns
Floristry is perhaps the most popular subject for the use of stamping. This is the transfer of different flowers, petals, leaves, and all kinds of floral patterns onto the nail. It looks very gentle and feminine. You can create complex, multi-layered patterns with the help of a floral print; this will emphasize your sophistication.
Sign up for eyelash extensions at Anna Klyuchko's studios with a 15% discount until March 7
12 studios throughout Moscow, St. Petersburg, Nizhny Novgorod and Tula
223 masters for every taste
High-quality service with a 7-day guarantee
Regular promotions and gifts for clients
Full volume 1990₽ 1692₽ Double volume 2590₽ 2202₽ Triple volume 2890₽ 2457₽ Hollywood volume 3400₽ 2890₽
Book 15% discount
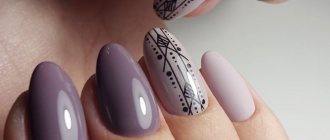
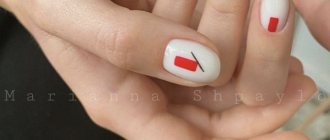
Geometric pattern
Strict geometry, clear lines, squares, triangles - all this is possible: if you cannot evenly draw clear lines on the nail, stamping will come to the rescue. You can draw lines of different colors, cross them, place figures close to each other, creating dizzying patterns. You can use the cool trend with “negative space” by using nail polishes with a metallic effect.
"Animal" nail stamping
The past and upcoming seasons offer fashionable “animal” designs. Animal prints can also be transferred to the nail using stamping. Among the most popular motifs, fashionistas prefer:
- leopard print;
- zebra;
- serpentine;
- tortoiseshell;
- cow and other colors of animals.
The advantage of stamping is that the animalistic pattern turns out identical, smooth and natural.
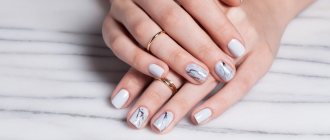
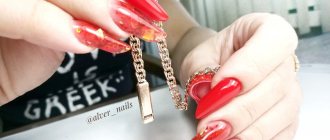
Nail design “different hands”
A trend from past and new seasons that will linger in the nail industry for a long time. Using stamping, you can apply a design of the chosen color on different hands, play with the palette or patterns, change the background or geometry on different nails. Experiment with the shade of the design, realize your fantasies about the style of different nails, this is pure creativity. The “different hands” design suits stylish modern girls who want to emphasize their individuality.
Only until March 7
Win guaranteed gifts in March! Discounts on services, photo sessions, as well as the opportunity to pick up the main prize - IPHONE 13 PRO
Newspaper
Creating the effect of inscriptions, as if on the pages of newspapers or favorite books, is possible only with the help of stamping. The drawing turns out smooth, clear, and identical, and this is very important for achieving the effect of lines. You can make a stylish accent on one or two fingers or decorate just part of the nail plate. Preparing the inscription on a stamp allows you to make a design even on short nails. But it also looks gorgeous on long ones.
Stamping manicure is about how to make something complex very simple. It has made the work of nail artists much easier: now even the most demanding clients will receive intricate, complex designs in a short time. And master manicurists will bring their creative fantasies to life, delighting women with new trendy techniques on the beautiful nails of the fair sex.
Varnish and paint for stamping
Many people mistakenly believe that any acrylic or gel varnish can be used to apply stamping. This misconception usually leads to the fact that all efforts to apply a design to the nail are wasted - the print blurs, spreads and turns out completely unclear.
Stamping kit
In order for the result to meet your expectations, a necessary step is to purchase a special varnish or paint for nail stamping.
Requirements for varnish
Varnishes and paints that can be used for stamping must differ from ordinary ones in a number of indicators. Even the currently highly sought-after shellac, which has a fairly thick consistency, will not be suitable for applying decorative elements to the nail using a stamp. The gel polish will simply spread over the stamp pad, and the print will be blurry and indistinct. An even less successful solution would be to replace stamping paint with regular varnish.
Some are trying to find ways to do stamping without buying a special varnish. But to choose a more or less suitable option, you will need to put in a lot of effort. Even if the varnish is thickened, there is a high probability that when the stamp is removed, the composition will follow it, leaving unsightly hairs along the edges of the design. In addition, ordinary varnish can simply dry directly on the stamp.
A good stamping varnish should be thick, dense, and well pigmented.
Thus, when answering the question of what kind of varnish is needed for stamping, we should mention a special gel paint. Its cost is slightly higher. But the result of the work will be excellent.
For your information. As an alternative to stamping with gel paint, acrylic varnish can be used.
Acrylic varnish for stamping
According to many masters, acrylic varnish is suitable for applying a design to a nail using a silicone stamp no worse than specialized gel compositions. Acrylic is thick and has a density suitable for the use of technology. Thanks to the above, the design applied with acrylic varnish will be voluminous and rich in pigmentation.
Important! Regardless of the material used for stamping, a good manicure will only be achieved if the master (or other performer) has a sufficient amount of practice. You can gain the necessary skills by practicing on nails whose varnish layer is planned to be removed in the near future.
Brands of suitable varnishes for stamping
Girls who want to use their creativity and make attractive nail art on their own will really enjoy nail design technology. After all, in just a few minutes you can decorate your nails with a variety of manicure options using this wonderful tool. To ideally implement your plans, you first need to decide which brand of varnish you are going to transfer the image from the disc to the surface of the nails.
- The reference option can be considered acrylic varnish for stamping design from Konad. This brand produces products that have all the required qualities and characteristics to realize any plans. At the same time, the drawings turn out clear and neat, the colors retain their brightness and saturation, and the pattern does not spread when the image is transferred. There is a wide selection of different shades available. And because of its price/quality ratio, the Konad brand is very popular among buyers. Using stamping technology based on these acrylic varnishes, you can create excellent designs.
- Next on the list is a budget option from GoldenRoseNail. The products of this brand have similar qualities of special varnish coatings for stamping. GoldenRoseNail polishes can be found in almost every cosmetic store at an affordable price. Sometimes when reprinted using a stamp, designs may appear faded and dull. Therefore, when purchasing, you should pay special attention to the color transparency and density of the varnish.
- It is worth mentioning the company KandNail. Varnishes of this brand can be found at a similar price as Konad. However, the consistency of these varnishes is not as thick as we would like. Because of this, this product does not guarantee perfect results. True, it is quite popular on the market among buyers and is often used for manicure.
Concluding the article, we recommend that when you first get acquainted with stamping technology, you use specialized varnishes from Konad. After all, using ordinary coatings, there is a risk of being disappointed in nail art and ruining your mood for the whole day. Remember that only the use of original and high-quality stamping products will help realize your creative ideas and make your manicure truly attractive with bright and voluminous designs.
- Author: Author: Alena
Rate this article:
- 5
- 4
- 3
- 2
- 1
(0 votes, average: 0 out of 5)
Share with your friends!
How to dilute varnish
How to do stamping correctly
Having received information about stamping varnish and what it is, it is equally important to know how to handle it.
You can easily find stamping remover liquid on sale.
Under certain circumstances (for example, when exposed to the sun or in close proximity to a UV lamp), the varnish or stamping paint may thicken. This does not mean that the product will have to be thrown away. If you properly dilute the varnish, it can serve for some time.
Acetone will not work in this case. It makes sense to use it only with ordinary varnishes.
In the case of stamping paint, it is recommended to use one of the following products for dilution:
- Alcohol. Ordinary ethyl alcohol will be a good thinner for varnish compositions based on acrylic or gel. Its main disadvantage is that the pigment of the varnish under its influence will also dilute somewhat and become duller. But, despite this, a bottle of varnish can still be used to create certain effects that involve the use of somewhat muted tones using stamping.
- Top or transparent gel polish. Using a topcoat or transparent gel polish to revive a thickened coloring composition for stamping is also acceptable. To obtain the result, it will be enough to mix the compositions together to the desired consistency. There will be a loss of color intensity, although less significant than in the case of alcohol, but the quality characteristics of the coating obtained after further use of the varnish will not be affected in any way.
- Special liquid. The best option for thinning thick varnish is to use a special liquid. It can be purchased without any problems at any specialized store. The advantages of such liquids are that when used, the color characteristics of the composition do not change in any way; no more than three drops are enough for a full bottle of varnish.
Mistakes when using stamping
In order for the first attempt to be a success, and for you to get a beautiful manicure with stamping on gel polish, you need to adhere to the following tips, failure to follow which will lead to damage to the nail design.
- You should not leave the varnish on the disc for too long, as it dries quickly and you will not get the desired result. That is, the main rule of stamping is speed;
- Cleaning the image is one of the most difficult and important moments; you need to scrape it very quickly, which is better done with a plastic tool or an unnecessary bank card;
- When scraping, you need to apply the correct pressure, that is, it is best to do it at an angle of 45 degrees, since a soft pressure will not completely squeeze out the varnish, but very strong pressure will provoke a three-dimensional pattern;
- Press the stamp onto the engraving for no more than 3 seconds;
- Wait until the drawing you have made is completely dry, and only then cover it with a fixative, and you need to apply the top coat once and quickly so as not to smear the print;
- Liquid coating must not be used.
Thus, we have told you about the most common mistakes that beginners most often make. In addition, remember that such a moment as stamping with gel polish will also lead to failure, since the gel coating does not print well on the stamp, so it is best to use ordinary varnishes with a dense texture. Thanks to these simple tips, you can create new interesting images for your nails, and manicure with stamping will not only become an exciting process for you, but will also allow you to get unsurpassed results.
Step-by-step instructions for use
To use stamping varnish correctly, step-by-step instructions will come in handy:
- A top coat and a colorless base are applied to the nail.
- Prepare the tools for applying the design: the stamp is thoroughly degreased (especially if we are talking about a device made of metal). For degreasing, you can use alcohol tinctures.
- A layer of pigmented shellac is applied onto which the design will be subsequently transferred. First, the nail plates should be degreased in a similar way.
- A layer of varnish in one or two strokes is applied to the selected design on the engraved plate.
- Transfer the design from the plate directly to the nail using a stamp in one of three ways:
- with varnish removal from the stamp (similar to a sticker);
- rolling motion;
- pressing (impressing) movement.
Nail stamping: how to use with gel polish
It is difficult to say which of the listed methods can be called classical, since in practice all three are equally widely used. It all depends on the habits and personal preferences of the manicurist.
To avoid damaging the drawing, apply a layer of transparent protective varnish to it as quickly as possible. This is best done with one movement of the brush.
Advice. When working with plates on which varnish is applied, they should be placed on a napkin. Otherwise, you may stain your manicure tools or work surface.
Performing stamping
After preparing the work area, decorative manicure begins. However, first remove all sawdust from your nails and work surface so that it does not get into the gel polish and spoil the quality of the work.
First you need to apply a base layer, and then 2 layers of colored pigment, each of which should dry in a lamp for 1-1.5 minutes. If there is a sticky layer on the dye, remove it using a dehydrator.
After preparing the base, you can start stamping:
- Fill the engraved design on the metal disc with gel polish. You shouldn’t apply a lot of it so that it flows outside the fragment.
- Using a metal scraper, run across the disc to remove excess dye. If it is not completely removed, clean the scraper and perform the manipulation again to ensure that the disc remains clean.
- Using a rolling motion of the stamp, print the design from the disk.
- Transfer the pattern to the nail plate. When choosing a rubber stamp, you need to do this by rolling from left to right, when using a silicone tool - in one step, pressing firmly on the device.
- If there is excess gel on the nail, remove it with a cotton swab. You can use a brush to correct uneven edges of the pattern.
- Place your hands in the lamp for 1-1.5 minutes until completely dry.
- Apply topcoat and dry it in a lamp.
Keep in mind that when stamping, you always need to do everything quickly to prevent the varnish base from running off and deteriorating the clarity of the boundaries of the work.
If you plan to create a multi-component composition, you need to add elements one by one. You should not try to create a complete design in one application; it is better to dry it periodically to prevent the pigment from smearing.
When working with a lamp, you should not choose the highest power, since drying a small fragment is the minimum zone that will not have time to leak during its polymerization.
Advice from experienced cosmetologists
Those who are just starting to master the technique of stamping a design on the nail plate will find it interesting to familiarize themselves with some advice from experienced cosmetologists:
- Despite the fact that you can find a variety of stamps on sale, not only in shape, but also in material, it is recommended to choose gel stamps. Practice shows that they are the most convenient to use in practice.
- If stamping paint is not used for a long period of time, it begins to fade. In order to solve this problem, in most cases it is enough to shake the composition thoroughly before using it. This action will improve the consistency of a special varnish or paint, making the product much more uniform, simply by lifting the coloring pigment from the bottom of the bottle.
- In order for the design to be applied as evenly and clearly as possible, it is strongly recommended to use silicone stamps, which are made from a transparent material, rather than rubber stamps. This type of device, among other things, has a tube-shaped handle, which simplifies the process of using the tool.
- In the absence of special paint for stamping, some semblance of it can be made from the most ordinary varnish. In order for it to match the thickness of the specialized one, it is recommended to leave the bottle open for a while. As a rule, 30-60 minutes are enough for the density to increase.
- If there is an urgent need to transfer the design to the surface of the nails as quickly as possible, it is recommended to think through and select the application area in advance. This will make it possible to avoid forced downtime and will not allow the varnish to dry before the moment when it is transferred to the nails.
- After applying the decoration to each nail, both the stamp itself and the plate should be cleaned with nail polish remover. It is allowed to contain acetone. But oil-based formulations should be avoided. This is due to the fact that after wiping, an invisible film will remain in the engraving, due to which the quality of the transferred design will significantly deteriorate.
- If the room is too hot, low humidity or drafty, the varnish on the metal disc will dry much faster. In this regard, it is recommended to carry out the procedure in a cool room with tightly closed windows.
- If the stencil becomes clogged, you should never try to pick out the remaining varnish using needles. The engraving will be damaged and the disc will become unusable. It is much more effective to soak the disc in nail polish remover containing acetone for just a few minutes and wipe it with a napkin.
- Before stamping, you should not apply cream or other oily substances to your hands - the designs will not be printed properly.
Beautiful stamping does not always work out the first time
If you put all the above tips into practice and fully follow the stamping technology, the drawing will turn out exactly as it should be: bright, clear and beautiful, and your nails will look amazing.
Why does the top roll down during stamping?
There is nothing complicated in stamping, but still some seemingly insignificant nuances can make the process painful and ineffective. I will now tell you how to avoid failures and turn stamping into pleasure not only from the result, but also from the process.
1. Stamping is afraid of grease, so IMPORTANT: the composition of the nail polish remover (hereinafter referred to as NDL) that you use to wipe the stamp and disks/plates should not contain oil, otherwise the varnish will simply roll off on the greasy film. The presence of acetone does not matter - if acetone-free HDSL quickly removes varnish, then it is also quite suitable. You can use ZhDSL with glycerin - it leaves a whitish coating on the plates, but does not interfere with stamping. It is also IMPORTANT to thoroughly wash your hands with soap before the “procedure” so that there is no greasy residue on your nails, for example from cream, otherwise the design simply will not stick or will be transferred in pieces.
3. It happens that the engraving on a disk/plate is good, but the lines are so thin that the varnish dries too quickly, and it is NOT possible to make a CLEAR PRINT of the design. To avoid this, I advise you to wipe the HDSL pattern so that droplets remain, then apply thick varnish and scrape it 2-3 times. Thus, ZhDSL will not allow the varnish to dry quickly. As a rule, metallic polishes and thick shimmers are more amenable to stamping than cream polishes.
4. If the design transfers well to the stamp, but DOES NOT PRINT ON THE NAILS at all or only in pieces, then the varnish has already dried. You should do everything a little faster; think in advance how you want to arrange the pattern, so as not to twist the stamp in your hands for extra precious seconds. Or there is a greasy coating on the nails (see point 1).
Stamping on gel polish
Surely many people are interested in why it is more appropriate to use gel polish as a base when modeling a nail design using stamping. Everything here is extremely simple. Gel coating is great for stamping (in other words, stamping patterns), because when using such a base you don’t have to worry about an endless number of failed attempts to create designs, because a picture from a special disk can be applied to the nail plate as many times as necessary to obtain the required result.
It is thanks to the permanent coating that you will be able to gain the necessary experience to create an unusually beautiful manicure using a stamping kit. Permanent varnish, unlike ordinary decorative varnish, has a number of advantages, because a failed pattern can be removed with a cotton pad moistened with purified acetone, while the base coating remains in its original form. And over time, having mastered the technique of this design well, you will easily be able to create an original manicure using any varnish.
In addition, when using gel polish, you can, without damaging the base coat, change the design of the drawings every day, selecting those that are most relevant to your current image. You can safely experiment with all sorts of color variations, applying patterns individually or in compositions and changing their location on the nails as your imagination tells you.
An interesting solution would be to apply a design not on every nail, but, for example, alternating nails with patterns and those simply painted with a single-color varnish. You can also use various accessories and glitter to give your manicure sophistication and originality, as in the video.
Step-by-step stamping procedure
- Prepare the nail plate as you would for a regular manicure with gel polish: treat the cuticle, remove the gloss from the nail with a buff, and apply a degreaser.
- Cover the nail plate with the base product and dry in a UV lamp for about 2 minutes. If the base has a sticky layer, remove it with a special product.
- Choose a stencil with the pattern you like.
- Apply beige gel polish in two layers. Dry each layer separately in a UV dump.
- Degrease the nail, disc and stamp with a cleaner.
- Treat the skin around your nails with Skin Defender.
- Apply black varnish to the stencil and remove any excess with a scraper.
- Transfer the design with a stamp onto your nail. Place the stamp on the nail without pressing. When the pad comes into contact with the plate along its entire length, we embed it into the pad. There is no need to roll the stamp left or right.
- Using a hatchet, separate the parts of the varnish from the rollers around the nail and remove the Skin Defender. The lines near the cuticle need to be painted on with paint so that when the plate grows back, the pattern looks clear and neat.
- Dry the paint. Then we cover the drawing with a top coat, which also polymerizes in the lamp. Remove the sticky layer.
Manicure procedure using stamping technique
Treat your cuticles with a protective coating
The design is transferred to the nail with a stamp
If you still do not understand the process of nail design using the gel polish stamping technique, then this video tutorial will be useful to you: