Do you think that manicure with bows is only acceptable for girls? Not at all! Take a close look at the photos of the lovely designs and see: bows on nails are an excellent decor for a woman of any age! In addition, by choosing the right colors and shapes, you can create a design to suit any mood!
Bows are a purely feminine attribute, and most often they appeal to romantic and tender natures. The same style should be followed in clothing. This manicure is suitable for dresses of any cut, skirts, blouses and blouses. But for sportswear, you should choose a different design.
Features of manicure with bows
Youth version of manicure with bows
Manicure with bows is a universal design because it suits the fair sex of different ages.
For girls, it will emphasize their carefreeness and their young, not yet serious age; it will add lightness and playfulness to the image of older girls.
And discreet bows on already established women will allow you to dilute boring and boring images, acting as an attractive highlight.
Of course, such a manicure would be ideal for every day:
- For the office dress code, you can also choose this design, but then it’s better to pay attention to laconic shapes and classic colors.
- If you create an exquisite design, a manicure can fit even into a sophisticated evening look - you just need to play with noble shades and ornate lines.
Casual manicure with bows
Nail design with bows: features and colors
Bows always add a touch of spontaneity to an image and help emphasize femininity and romance. Therefore, such a drawing still remains relevant, regardless of the time of year. But still, to make it look attractive, but not too simple, you need to follow some rules.
First of all, we are talking about the choice of colors. In 2022, you can choose any shade that you like and goes well with most looks.
However, we recommend paying attention to the combination of shades. For example, if you prefer a manicure in pastel colors, then you should not complement it with red bows
After all, the shades should combine well with each other. Only if you follow this rule will your manicure look really beautiful.
Unlike other options, decor in the form of a bow is suitable for nails of any shape and length. The main thing is to draw it at the appropriate size. By the way, if you plan to do the drawing yourself, then in the process you will only need a thin brush or dots. Even simple nail polish of a suitable color can be used as paints. But do not forget that different methods of applying a pattern give completely different results.
For example, the fastest way to create a bow on your nails is to use stickers. Literally in a matter of seconds they allow you to transform even the simplest monochromatic coating. A slightly more complex method is slider design. This will require a little practice, since you need to know exactly how to transfer the design onto your nails as evenly as possible. Beginners often have difficulties with this very moment.
And of course, don’t forget that a beautiful bow can be lined with rhinestones, beads, micro-beads or bouillons. This design is perfect for an evening out and will definitely not go unnoticed. The main thing is that the manicure is done with high quality.
Pros and cons of manicure with bows
Of course, like any design, in the case of creating bows on nails, there are pros and cons.
Benefits of bows on nails
- Bows look very cute and allow you to “lighten” the image, make it more fresh and fun;
- despite all the playfulness, a manicure with bows can look like a fairly classic design, since the design itself belongs to the basic and familiar decorative elements;
- A bow can be easily and quickly made using a variety of techniques and does not require the use of a limited number of materials or colors.
Disadvantages of manicure with bows
- In some cases, bows on nails may look too frivolous, which can harm the image;
- For a manicure to look really attractive, if you want to do it yourself, you will have to practice a lot to get a perfectly even figure.
"Cartoon" design
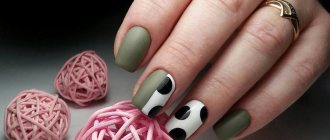
The nail design with bows in a “cartoon” style looks original. One of its most popular variations is the Minnie Mouse style.
- Draw a bow in this style on one nail. In this case, place it at the top. Make the ears black. Then draw a red bow with white polka dots.
- On the remaining nails, make a red background, and draw white polka dots.
- Cover with top coat.
You have a beautiful feminine design that adds a playful and perky touch to your look.
Suitable nail shape
Bows on short oval nails
A bow is one of those elements that looks appropriate on short, simple-shaped nails .
This design is delicate , simple and light , so threatening long triangular nails will look ridiculous as a base for it, and simply long nail plates will still destroy the feeling of lightness and childish simplicity inherent in the decor.
The ideal option for a design would be nails of natural length, square or oval, appropriately combined with the design.
Perhaps the only case when long extended nails are the best option is when creating voluminous bows, which require a large base.
The best coating for painting bows
In principle, there is no significant difference in what nail coating to use: on any varnish you can draw or create a bow that complements the design.
But it is important to consider that in most cases regular varnish is more liquid and spreads faster, so it is better to use other options.
Ideal would be gel polish or shellac , which are a strong base for manicure, in addition, such a coating is more convenient to apply: it is thicker.
A separate advantage is the durability of such a manicure: both the bows and the base varnish will remain in their original form for many days or even weeks, especially if a special fixing base was used when creating the manicure.
How to choose the right color combinations
Color scheme of manicure with bows
Bright or dark bows look best on basic, fairly restrained colors.
The combination of two bright shades in a design with bows is not the best choice.
Such a manicure will look colorful and clumsy, which is unlikely to emphasize the sophistication of its owner’s style and will introduce disharmony into the overall image.
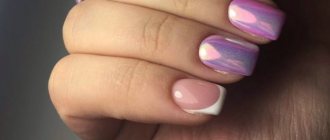
Noble blue matte manicure with bows
Beige, cream, white, pink and other light colors can be used as base colors .
But the bow itself can be made either in bright contrasting colors (red, for example), or simply dark (like black).
A design with light bows can be especially relevant if you need to hide the complexity of a manicure as part of a work dress code or create a design for an elegant celebration, such as a prom or wedding.
Ways to create bows
You can decorate your nails in a variety of ways.
- The simplest of them, capable of providing an individual drawing, is painting with the same varnish using a brush . You just need to choose the desired shade and draw graceful lines on all or several nails.
- It’s even easier to draw bows using special markers . The main thing is that the substance in such markers combines well with the base varnish.
- You can also use dots , which draws dots of different diameters. From these dots you can fold a bow, creating its outline, or you can simply complement the finished drawing with cheerful polka dots.
- Two of the simplest, but not too unique, options are to use stickers or stamps and stencils .
The first method only requires an even positioning of the finished picture and its subsequent fixation using transparent varnish or a special coating. And in the second method, the finished design just needs to be printed on the nail (stamping) or redrawn through a stencil, and then secured. - You can also combine rhinestones and bouillons . The former, like the dots of varnish, can become the basis of a bow, forming into a single figure, and bouillons (curly rhinestones and decorations) can already be created in the shape of a bow. The main thing is to fasten them correctly, according to the instructions.
- The most complex options for nail design are 3D decorations and acrylic sculpting , where three-dimensional figures are created manually and attached to the nails. Such a design, of course, is best handled by experienced professionals in beauty salons.
Bows using nail polish
Bows on nails using a felt-tip pen
Blue jacket with bows drawn with dots
Bows on nails using stamping
Red manicure with rhinestone bows
Delicate manicure with 3D bows
How to draw a bow on your nails yourself
If you are new to nail art, then you need to start with the simplest nail design with bows. To begin, choose two contrasting colors to suit your taste: for the jacket and the bow, then perform a standard manicure: cover the nail with a clear or nude base varnish, highlight the jacket with the chosen dark color, and let the nail coating dry. Now you can consider how to draw a bow on your nails in the simplest way:
- dip a dots (this is a special thin stick with a metal ball at the end for drawing circles) into white paint and place a circle in the very center of the Frenchie’s smile line;
- in different directions from this circle, draw two triangles with white paint, paint over them (this will be the bow itself);
- from the center of the wide side of the triangles, take one white stripe to the sides (these will be ribbons);
- take a very thin brush and use black paint to outline the middle (circle), the edges of the bow and the outline of the outgoing ribbons, put a couple of black strokes in the center of the triangles (the effect of bow folds);
- When the design is dry, cover your nails with top coat.
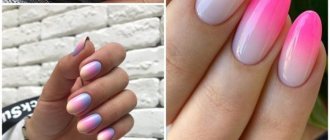
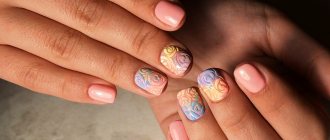
A manicure with multi-colored bows (and the photo demonstrates this perfectly) on a plain pastel base background looks no less impressive. But it is better to apply such a design not to all nails, but to one or two on each hand.
Before painting bows on your nails, prepare your nails (give them the desired shape, length, remove cuticles), cover them with your chosen base polish in two layers, wait until dry, and then:
- in the center of the nail (in place of the middle of the central bow), place a dot;
- from it in different directions, almost to the side borders of the nail, draw two triangles (you don’t need to achieve complete symmetry, then the bows will be more flirty);
- very thinly outline the contours of the triangles in a contrasting color, and make several stripes in the center (for the effect of folds);
- Having finished with the central bow, proceed to the rest (draw the second closer to the base of the nail, and the third - to the edge);
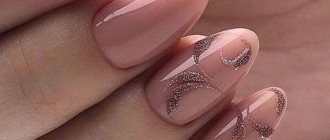
- the center can be highlighted with a stone, and the edges of the nail or the base (lunulu) with a thin strip of glitter;
- Finally, cover the nail with top coat.
Nails with bows made of dots look very expressive and fun. To apply them you will need dots. On the prepared and dried base, apply a dotted pattern in the form of a figure eight, and from the intersection point, lower down two ribbons - the tails of the bow (make them of different lengths). Glamor lovers can highlight the centers of bows with rhinestones. Finally, don't forget to coat your nails with topcoat.
You can see in the photo how bows look on nails made using a stencil. This is the simplest, fastest, but very effective option that you can do yourself, without even having the slightest nail art skills. Cover the nail plate with a glamorous shiny base, when it dries, apply a stencil and cover with black or chocolate polish, then with top coat.
Manicure with bows at home step by step
Manicure with bows is performed in a few simple steps, which practically do not change even when using different materials for decoration.
- a base is created on the nails , which can be either just a layer of the selected varnish, or a base and a layer of gel polish and shellac, or almost a full-fledged manicure, for example, a French manicure, which will become the basis for creating a design.
It is better to choose in advance those nails that will have bows on them, as well as those that will remain “clean” or will be complemented with another design or pattern. - The second step is application himself bow.
You can either paint it in any of the chosen ways, or fix the selected decoration on varnish.If the manicure is performed with regular varnish, the decorations must be attached to the nail that has not yet dried; with gel polish, the nail, ready for design, must be properly dried.
In both cases, you can draw only on completely dry nails.
- After creating the bows, the remaining nails are complemented with the chosen design, be it polka dots, dots , other designs or other creative elements .
- The last step is to fix the manicure.
The design is simply covered with a transparent varnish, and when using durable coatings, with a special fixative, after which the manicure is dried and degreased.
The video tutorial will show you how to easily and originally make a manicure with bows with your own hands.
Manicure options created with needles
Everyone knows that imagination has no limits, so there are countless options for how to draw on nails with a needle. However, before you start implementing your own ideas, you should learn how to beautifully paint your nails and how to draw the simplest patterns on your nails with a needle. The given examples and diagrams are arranged in order from simple to more complex options, so that with their help anyone who is not familiar with this technology can learn to draw at home.
Skins
Designs that imitate the skins of wild animals - leopard or zebra - look very simple and original on nails. These patterns are very easy to draw. In addition, if a mistake is made, the mistake will not be obvious.
Chess board
To create this manicure at home, you need to carefully apply horizontal and vertical lines to the painted base of the nail plate, imitating the effect of painting a board. If there are unevenness on the surface, adjustments are made with a needle.
Floral motifs
This version of manicure using needles is a little more complicated than the previous ones. Here you can already try yourself as a designer and decide whether to use one or more colors, whether to paint with sparkles or decorate your manicure with rhinestones.
We carry out the procedure according to the following scheme:
- Apply a few drops of varnish to the prepared base, from which we draw petals on the nails with a needle, then let the coating dry;
- On top of the first layer of the design, smaller details are applied with varnish of a different color or tone.
It must be remembered that we draw the veins and core on the nails with the smallest needles.
Feathers
Once you have mastered floral design, you can try drawing feathers on your nails. Apply 3 drops of varnish of various shades or colors diagonally to the base layer. Then we draw a single line on the nails with a thin needle, at the top of which we create a blot with strokes.
Lights
To make sure you can’t take your eyes off your manicure, draw flames on your nails! There is nothing easier than making this drawing using needles at home. We paint the upper part of the nail plate with varnish of one color, and the lower part with another. Then, at the junction of the flowers, we draw tongues of flame with a needle.
Blots
A simple and daring manicure is created with varnishes of three or four colors. You need to apply multi-colored droplets to the base coating and then use a toothpick to shape them into blots.
Dots and strokes
A complex pattern does not always mean the best. If you use your imagination, you can create a very beautiful and original drawing from dots and stripes. For example, you can draw flags, hieroglyphs and cobwebs.
Stars
This option is complicated in that it is performed without waiting for the base coat to dry. Apply varnish of a different color onto the semi-dried base, so that the droplets are very small. Then, using the thinnest needle, we create miniature stars from the drops.
Having learned how to draw and create the listed patterns, you can try to apply more complex motifs, including your own design.
Manicure ideas
- Bows go perfectly with a French or moonlit manicure - both with classic and colored nails.
It is enough just to add a couple of elements in a color similar to the one with which the tips of the nails stand out, for example on the nails of the ring fingers, and the classic French manicure will sparkle with new colors. - The combination of bows will add a very childlike playfulness. with colored peas on the nails.
These designs can be alternated on the fingers or even combined on the same nail, using either the same color or different bright shades.The main thing is that the base for such a manicure is light enough.
- Exquisite white bows can be an ideal option for a wedding manicure , which can complement a classic white jacket or, for example, rhinestones .
- For a truly festive and solemn option, you can even choose voluminous figures on long nails, which will look unusual and expensive.
Original moon manicure with bows
Delicate manicure with bows and polka dots
Wedding manicure with bows
Volumetric bows on long nails
Nail design “Bows”: photo ideas
We provide you with a list of the most original designs with bows, “spotted” by nail service professionals.
French with a bow
A small bow on the border of the base and the smile line makes the design much more interesting. Universal French brevity can take on a completely different character! Colored, non-standard chevron, millennium, and classic French manicure with a bow are equally charming. Tiny elements can decorate all nails, but a large bow is best depicted on one or two fingers of each hand.
Rhinestone bow on nails
Arrange the shimmering stones as in the photo. Glue one large pebble - the core of the bow - in the middle. Close to it are two smaller rhinestones. The next row is three elements. To create a large bow, you can make another row of four pebbles. Place the rhinestones on the other side in the same way.
Polka dot manicure with bow
A simple pea print is incredibly loved by home manicurists. Even though it's so easy to replicate on your nails, it's so cute! And in combination with a bow, it is doubly charming. See the options in the photo!
Multi-colored manicure with bows
Draw multi-colored bows on a plain base. Or place exactly the same elements, painting all the fingers with different colors. But feel the fine line between variety and bad taste.
Combined manicure with a bow
Basically, a cute bow can be added to any design. The next manicure combines polka dots, paths of shiny details, a fashionable single-color marsala-colored coating and a golden bow. It turned out not boring and harmonious!
— Manicure with print and bow
A refreshing white manicure is complemented by a fun fruity print and a matching bow. In order not to overload the design, the drawings are made only on the ring and middle fingers. How much comfort and spontaneity there is in it! Let us remind you that geometric prints and patterns are also relevant in 2017.
Design with cats and bows
Do you like to play pranks? Do you want to remember your childhood? Do you want to give your daughter an interesting nail design for her birthday? Then combine bows with funny cat faces. For example, cutie Hello Kitty goes so harmoniously with pink bows!
Manicure with Mickey Mouse and bows
Cartoon characters always add to the mood. Bows suit Cheerful Minnie! Bright red bows with white polka dots are easily recognizable and incredibly loved. If you can’t draw the beautiful Minnie, then draw the silhouettes of a mouse on a plate - a head and two ears!
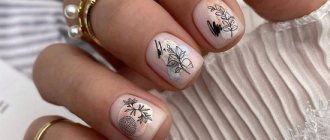
Nude manicure with bows
Design in natural colors will always be relevant. It focuses on the natural beauty and health of nails. And laconic bows will add zest to the design. It’s simply impossible to come up with a more feminine option!
If you do your own manicure, then study “20 lifehacks for a home manicure.” Also an interesting site is https://darasims.com/.
New Year's manicure with bows
The Christmas holidays are associated with trees and Santa Claus, and also with gifts. Beautifully packaged and tied with a bow. In the New Year's design, the bows are modest, “tied” with narrow ribbons, but with sparkles! For the background, choose red (Christmas color) or green (Christmas tree color). However, other shades will look great too! See other original New Year's manicure ideas on the website!
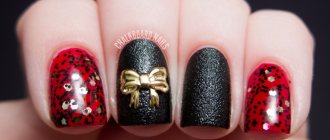
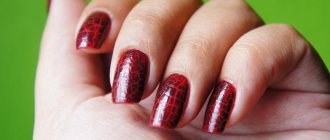
Leopard print with bow
A bold and slightly daring leopard print can also be decorated with a bow. Then it acquires a special softness. We advise you to change your usual natural range of shades to pink and black.
Romantic lace with bow
A delicate, sophisticated openwork manicure (also called “tights”) will become playful and flirtatious if you add a few small bows to it. One large voluminous bow in the same color is also suitable. If you don’t have time to draw magnificent lace, then use stamping.
Wedding manicure with a bow
The bride's nails should match the image, emphasizing her youth, purity, purity and beauty. Bows will be an excellent alternative to the usual jacket. You just need to choose the shade of varnish to match the color of the bride’s dress or bouquet.