Fashionable two-color manicure with coating and design in 2022 will make your nails attract attention. To do this, stock up on varnish in two shades - similar colors or from a monochrome range. If you choose bright colors of gel polish, you can create a gradient or different colored manicure that will look bold.
Color experiments in monochromatic manicure without design
The ideal design for long or short nails begins with the choice of shades and their effective combination. From absolute classics and natural color combinations to bright, unexpected manicure ideas that use the color wheel. For professionals, it serves as a guide in creating harmonious combinations of shades. For example, for a two-color/three-color manicure without design.
Two-tone French
The colored French jacket has won the hearts of fashionistas. The nail design is quite laconic, but it also allows for a wide variety of color variations. Here it is appropriate to design “smiles” in two colors. They are combined with each other using different techniques. For example, on the right hand there is a white jacket, on the left there are black tips. Or the smile line is divided in half, decorated in two colors. Another option is to opt for the ombre style, “different hands” or different colored tips and base. Examples in the photo.
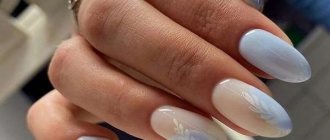
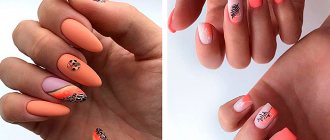
Variants of multi-colored manicure with patterns and designs
Designing a manicure in different colors with patterns and designs is limited only by your imagination. You can create designs that differ from each other on different hands, or you can highlight only one nail on each hand with a pattern.
An option suitable for women of all ages and appropriate for different occasions is light base colors and small, dark patterns.
The patterns are made using stamping or artistic techniques, or ready-made pictures are pasted on. This manicure creates a gentle, feminine look. This option is appropriate for the beach season and sunny summer days; these are designs in the form of bright fruits, green foliage, and palm trees.
An example of a summer multi-colored manicure: on a white base, apply a pattern in the form of small watermelon slices, randomly located. To do this you will need brushes, yellow and red varnish. To decorate smaller details you need white and black. First, draw the red flesh, then the green crust. Whites determine the boundary between them.
Dots are made with black varnish to imitate watermelon seeds. This drawing creates a joyful, cheerful and juicy image. Suitable for girls under 35 years old. An elegant and at the same time fatal image will be created by dark and golden shades. For example, a purple base and a thin golden lace pattern are suitable for an evening in a restaurant or a disco.
The pattern can be made with brushes or stamping. No less attractive is the combination of black and copper, blue and silver, red and gold. These options are suitable for everyday wear by ladies over 35. Bright designs on light-colored nails add lightness, originality, and creative notes to the image.
Suitable for everyday manicure at any time of the year . The designs can be hand-drawn or transferred using stickers. They look impressive on young girls aged 15 to 30 years.
Two-color moon manicure
Try a moon manicure in two different shades instead of a French manicure. And don’t forget to highlight the holes with colored or precious metal sparkles.
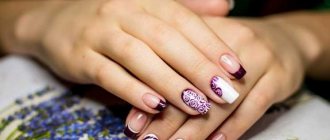
Manicure – multi-colored French
Everyone knows that the classic French technique involves a combination of two colors - a white top of the nail, as well as a colorless, beige or pink base for the entire plate. However, recently a new trend has become relevant - colored French manicure, which uses two shades of varnish. The technique of applying varnish is the same as with a classic French coat. The only distinguishing feature is that instead of classic colors, brighter, more contrasting ones are selected. In this case, the end of the nail plate in some cases is covered with a more prominent varnish - textured, shiny, acidic.
Two-color manicure with design
For example, a beige shade of varnish is considered neutral and the most popular color. Thanks to this, it can be combined with any color without any problems. Apply the selected color shade to your ring finger. If you cover one nail with mint color, then the rest with beige. And you do this design on the other hand. So, by experimenting with shades, additional decor and patterns, you can come up with new ideas for two-color manicure every time.
Technique for performing marble manicure at home
There are several ways to design a nail plate. The marble effect will vary slightly depending on which varnish application technique you choose. Each of them is very simple. With a little practice, you will learn how to do a marble manicure at home very quickly in any of three ways: using cling film, a brush or water. Try different techniques to see which works best for you.
This marble technique is one of the simplest. To create the design you will need two polishes in contrasting shades, several toothpicks, a convenient container for water and a very rich hand cream. Step-by-step instruction:
- Prepare your nails. Give them the desired shape using a nail file. Apply base coat.
- Lubricate your fingers with cream without touching the nail plates. This must be done so that excess varnish is easily removed from the skin.
- Fill a bowl with warm water. Add one drop of each nail polish and use a toothpick to form a pattern, making random patterns.
- Gently dip your finger into the water, nail side down, onto the varnish film so that the design remains on it. Gently remove excess using a cotton swab.
- Adding drops of polish as needed, coat all fingers.
- Apply top coat to your nails and let dry completely.
There is a second way to perform marble manicure on water, in which the pattern will be more realistic. An additional advantage is that the process takes less time. Step-by-step instruction:
- Prepare your nails. Apply a base coat and varnish of the main color in two layers. Let dry thoroughly.
- Treat your fingers with rich cream.
- Drop a varnish of one contrasting color into the water. Allow the material to spread out a little. Spray some hairspray on top.
- Dip your nail into the container so that the film with streaks is transferred to it.
- Remove excess and apply clear sealer.
- Repeat the procedure for all other nails.
This method of doing manicure is not as simple as the previous one, but you can easily master it if you practice. To make a marble pattern, prepare a piece of plastic bag or cling film approximately 5x5 cm in size. Take two nail polishes in contrasting shades. It is advisable that they be thick, because with liquid ones the marble effect on the nails may not work. Step-by-step instruction:
- Prepare your nail plates. Apply a base coat to them. Dry well.
- Apply a second polish. While it is still wet, crumple a piece of polyethylene in your hand and touch it to each nail in turn. Do not hold the film, immediately remove it from the surface. Some of the material will be removed, leaving streaks and streaks.
- Once you have the desired pattern, wait until the coating is completely dry and apply a glossy sealer.
To perform a marble manicure you will need acrylic paints. You can use contrasting varnishes, but the effect will not be as realistic. Step-by-step instruction:
- Prepare your nail plates. Give them shape, apply base coat and background varnish. You don't have to wait for it to dry.
- Prepare a very thin brush and acrylic paints in contrasting colors with the main one. To start, take one shade. Gradually you will be able to work with several colors at once.
- Dip your brush into the paint of your choice and use it to draw broken, curved lines on the plate. They should be different in thickness and diverge in directions, simulating cracks. The more asymmetry, the better.
- Apply topcoat and dry.
There is a way to perform a manicure for people limited in time. Some manufacturers offer varnishes in which several shades are mixed at once or colored inclusions are added. The coating imitates the effect of marble. The advantages are that this varnish is easy and quick to apply. This does not require special practice or time investment, as is the case with performing a manicure with water, a brush or film. The downside is that the price of marble varnishes can be quite high.
Two-tone nails with glitter
Also popular in this direction are manicure ideas with shiny decorative elements. Where they rely not only on the combination of two shades, individual nails are decorated with sparkles, gold foil, mirror rub, and rhinestones. A shining decor is chosen that allows you to use the color scheme of the manicure being created to tie the whole design together.
You can also combine just a colored coating and gold/silver glitter, creating a two-tone nail design.
How to paint nails with color transition master class
If you decide to experiment boldly with manicure at home, you need to check out the master classes on painting nails with a gradient effect. There are two styles of applying varnish - painting with a brush or using a sponge. Everyone chooses for themselves what is best. Having mastered this technique, masters offer not only two-color options, but also three-color ombre manicure. Colors are selected from the same palette according to the principles described above.
Sponge
For a gradient manicure you will need:
- several colors of varnish from the same manufacturer or the same density;
- sponge, cut into a couple of pieces;
- transparent fixative;
- manicure remover;
- cotton buds;
- palette (regular glass or a flat surface that does not absorb liquid);
- fat cream.
Application steps:
- Lubricate your fingers in areas close to the nails with rich cream. Then it will be easier to remove manicure mistakes.
- Having chosen the main color of the polish, apply it to all nails. This is provided that there is the same gradient manicure everywhere.
- Take a mixing palette, mix 2 or 3 shades so that the length of this stretched drop is approximately the length of your nail. Using a toothpick or needle, mix the varnishes at the point where they touch.
- Take a sponge that is not much wider than your nail. Dip it in varnish.
- Make an imprint on your nail. The light color should be closer to the cuticle, the dark color should be at the ends. This manicure technique visually stretches your fingers. If you do the opposite, you will get the opposite effect.
- Wait until it dries and repeat the procedure.
- Use a stick of nail polish remover to remove excess from your fingers.
- Apply gloss sealer. Manicure is ready!
- A little secret: if you use an applicator instead of a sponge, there will be almost no polish marks on your fingers.
Brush
This method is suitable for those who have already mastered the gradient manicure technique. Its advantage is that an ombre effect of 3 or more colors is possible. On a sponge, such a gradient will not look so clear. The only downside to a manicure with a brush is the investment of time and patience. If you want a gradient of five colors, then you need to manually extend each junction. The presence of gel polishes and an ultraviolet lamp greatly simplifies the task.
You will need everything the same as for a manicure with a sponge, only instead of it - a brush. If you have gel polishes, start applying the base, and then color variations:
- Choosing a light shade, paint half of all nails from the cuticle to the middle of the nail.
- Using another dark color, go from the ends to the joining point.
- Take a brush, needle or toothpick and make vertical strokes at the point of contact. It is important to carry them out before they dry out.
- Repeat the procedure again. You will certainly get a soft transition from one color to another.
Manicure two colors with “different hands” design
Here, instead of decorating your nails with different colors, make a design in the “different hands” style. Surely many of you have noticed that this manicure is at the height of fashion. Be inspired by the design in the selection of photos.
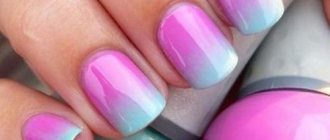
Gradient two-color manicure
A gradient on nails can look bright and catchy, sophisticated and calm. It all depends on the shades you choose. In 2022, the gradient was at the peak of popularity, where the milky color turns into bright shades with a speckled coating. And also a blue-violet gradient - these are the most fashionable shades of the year, not only for manicure, but also for clothing.
Two-tone French manicure
If you are already bored with the standard French manicure and you want to make your fingers bright, but at the same time you don’t want to part with your “smile,” then try making 2-color French nail art. To create it, you will need 2 gel polishes, stencils for drawing the smile line (if you can’t do it carefully yourself) and a top coat.
If you have already decided to do a two-color French manicure, then feel free to use bright shades that create an interesting contrast, for example:
- Red and yellow are a win-win two-color option for the summer season. Such a colorful design doesn’t even need to be diluted with anything. Choose red as the base color and draw the smile line with yellow paint.
- Pale pink with turquoise is a modest two-tone option. The delicate pink color is used for camouflage and makes the fingers attractive and aesthetically pleasing. And the turquoise stripes at the tips add life to the look. This two-tone manicure will go well with a summer dress or a light blouse.
- Purple and black - this combination is more suitable for the colder months. Black lacquer paint on the tips adds elegance to the look.
- Brown and blue are a good two-tone manicure for the office. Brown nails themselves look boring and uninteresting. And the blue “smile” dilutes the image and gives it some zest.
You can also do a standard two-color French manicure, emphasizing the smile line with a black stripe and drawing a bow on the side. Or make a sharp transition between two shades using an adhesive strip.
Also, many decide on a non-standard two-color jacket: when the smile line changes shape slightly, angles and additional elements appear. At the same time, the image turns out to be unusual and stylish. And all this is achieved only using two enamels.
Two-color ombre manicure
Nails designed in ombre style attract with their tenderness and smooth transition of one color from dark to light. And vice versa. For a spring manicure, take a closer look at ombre in pink, mint, blue, and lilac tones. And in the summer it is fashionable to do ombre in acid tones. A good option for ombre nails for the fall-winter 2022 season in beige and rich tones.
Features of gradient manicure
Nail art with an ombre effect is easy to do yourself. Its feature is versatility, because several colors will suit a larger number of clothes, and not just one set. Depending on the season, choose appropriate tones and shades, then the result will not look boring and thematically appropriate. It’s difficult to make a mistake when choosing a palette, but it’s better to study the ideal combinations that will suit your taste.
Before a manicure, you should get your fingers in order. You will need an orange stick, nail scissors, wire cutters, and a nail file. In Europe, the technique of gentle nail art is more often used, when the cuticle is only pushed back, without cutting. If you like this method, then at this stage you will limit yourself to an orange stick. Use clippers to cut your nails into the desired shape, and use a nail file to sharpen sharp corners so as not to touch or break the plate. Having completed the processing procedure, proceed to choosing colors.
With a monochrome manicure combination, coloring occurs with two varnishes with a change in tone. Example: from blue to cyan (white is gradually added to the first color, changing the shade) or from bright crimson to delicate pink (using the same method). This manicure emphasizes a gentle, romantic image or a catchy eccentric one. If related combinations are chosen, the gradient is made with varnishes that are located nearby in the color palette. Examples of combinations: bright yellow and orange, deep blue and sky blue, dark purple and scarlet, fiery orange and red.
The most daring manicure combination is a contrasting gradient. Examples of combinations: sunny yellow and lilac, deep blue and orange, purple and emerald green, blue and pink. Combinations come in warm, cold, bright hot shades. Experiment by combining light and dark colors, pastel and rich palettes. A two-tone manicure in contrasting colors will suit any mood, style or event, you just have to express your desire correctly.
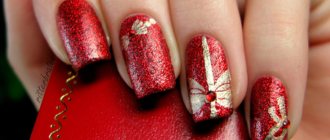
Another festive manicure combination is varnish and glitter with sparkles. It’s up to you to decide whether combination rules apply to them or not. Here you rather need to rely on the festive outfit you will be wearing and your makeup. A dark, evening dress with red lipstick inspires bright scarlet polish and purple or blue sparkles. If you are a bride and have a wedding ceremony ahead, then white and silver glitter are the perfect combination for a manicure.
Fashionable two-color pastel manicure
Here, two pastel shades are selected for manicure, fortunately there is now a wide selection of colors. Their combination can be done using the gradient, ombre, “different hands” style, or multi-colored manicure. In any case, the use of gel polish in light and pale shades on the nails looks gentle and elegant, and adds originality to the manicure. By the way, an excellent option for older women - pastel colors in manicure make hands visually younger.
Ways to create a gradient on nails: classics and new items for 2022
The fashionable gradient on nails 2022 provides a unique opportunity to play with color and create unique pictures on the nails. The classic technique involves performing a horizontal gradient. You can also combine this design with additional decorative elements, patterns, abstract or floral designs. A vertical ombre manicure looks very interesting, for which it is recommended to choose contrasting shades of varnish.
This is the easiest way to get a trendy manicure using a simple foam sponge. To achieve a gradient effect, it is enough to apply a base shade of varnish to the nail, and a second shade to the sponge, which will be imprinted on the free edge.
The technique for performing a gradient with a sponge is as follows::
- a base coat is applied to the previously prepared nail plate;
- shades of varnishes are selected, which should be harmoniously combined with each other;
- base varnish is applied and dried;
- the sponge must be damp, otherwise it will absorb the polish and it will print poorly on the nail;
- several colors of varnish are applied in strips to the sponge;
- the sponge is applied to the nail and pressed lightly;
- A top coat is applied to consolidate the result.
A special flat brush called a “comb” will help you create a nail design with a gradient. Thanks to its use, you can create both horizontal and vertical ombre. A gradient with a brush has the main advantage; to master the technique, it is enough to study the step-by-step principle of operation.
So, how to make a gradient on your nails with a comb brush at home:
- Apply two colors of varnish to the nail plate with a flat brush;
- Using a comb brush, carefully brush along the border of the varnish, shading it;
- you can move the brush to the sides, creating a more blurred background;
- At the end, a colorless varnish is applied to consolidate the result.
Seeing a photo of a beautiful gradient on nails using the Baby boomer technique, no girl will remain indifferent. This is one of the varieties of French manicure, which simultaneously combines a classic design and a horizontal gradient with gel polish. This manicure is elegant and sophisticated, ideal for any look.
To create a gentle gradient with gel polish on long or short nails, you should follow these tips::
- A gel polish base is applied to the nails and dried;
- The surface is coated with white gel polish and dried;
- apply beige gel polish with a fan brush and dry;
- Smooth mixing of colors is obtained;
- topcoat is applied and dried.
Aeropuffing is a device for quickly applying a gradient, both classic and stencil, which can be done using an airbrush. The new trend for 2022 is a weightless multi-layer gradient consisting of small patterns. These could be autumn leaves, winter snowflakes, or anything at all. Aeropuffing is very convenient to use, although you will have to stock up on replacement sponges.
An airpuffing gradient can be done as follows::
- the first layers are base and colored gel polish;
- selected shades of gel polish or special gel paint, which is often sold in a set with a pouf, are applied to a metal or plastic palette;
- the pouf is dipped in gel polish or gel paint, printed on the palette a couple of times to remove excess paint, and only then applied to the nail;
- the resulting gradient is dried in a lamp;
- You can apply a top coat (glossy or matte) on top
The photo shows an example of a gradient using a pouf.
Photo step by step
Airbrush is a simple artistic painting, for which a special device is used. It is used to spray paint over the nail plate, thereby creating a blurry image.
The airbrush gradient is performed according to the following scheme:
- airbrush is applied to the nail in one color;
- after the first layer has dried, apply the second using a varnish of a different shade;
- a gradient on long nails can be done with 3-4 colors of varnish;
- The design is fixed with colorless varnish.
Gradient glitter on nails or stretching glitter with a brush is one of the varieties of ombre manicure. In this case, the base is glitter, which is distributed over the nail plate from top to bottom or bottom to top, creating a smooth transition.
A gradient manicure with glitter on gel polish is performed as follows::
- the nail plate is prepared, gel polish is applied in several layers, and dried;
- for design you can use loose glitter or gel polish with glitter;
- glitter is applied as close to the cuticle as possible;
- take a flat brush, place it parallel to the nail and gently shade the glitter;
- topcoat is applied and dried.
The French gradient looks interesting, stylish and sophisticated on nails, ideally complementing any look. This technique is suitable for beginners who are just mastering the ombre design technique.
To create it you must follow these steps::
- The nail plate is prepared;
- the glossy coating is removed, the nail is degreased;
- light gel polish is applied to the lower part of the nail and stretched towards the center with a brush to obtain a smooth transition;
- the layer is dried;
- take a beige gel and apply it to the rest of the nail, gently stretch it to the edge and dry it;
- topcoat is applied and dried.
The vertical geometric gradient was considered one of the most popular designs last year. It was sprinkled with glitter, powder, mixed with a pattern, etc. Now the love for this design has subsided slightly, but for some reason it seems that it will return to us, because the theme of the geometric gradient has not been fully explored.
How to make a gradient using this technique is described below.:
- the most popular shades for creating a gradient in a geometric style are charcoal black, different shades of gray and blue, purple, blue or pink;
- To apply the design you will need two brushes with fine bristles: long and short;
- Initially, the nail plate is covered with a light shade of varnish;
- then colored gel polish is applied to the palette and the drawing of the gradient begins with the main shade;
- then, as the gradient is applied, white is mixed into the main color on the palette. This way the color is stretched. Those. in fact, a geometric gradient can be created with just two gel polishes – white and colored;
- at the end the design is fixed with a transparent top.
Loading …
Fashion trends 2022 did not ignore such universal nail decor as rubbing. Metallized pigments do not lose their relevance and are used to create almost every fifth manicure. Rubbing is indispensable for creating a home gradient, because it allows you to create something “beautiful” without any special skills or talents. Gradient rubbing is very simple. All you have to do is coat your nails with your favorite gel polish and choose a suitable shade of rub. On dark shades, mirror pigment looks more advantageous; for light shades, it is better to use pearl rubs. You can also choose other fashionable colors of varnish - for example, the black and red design option looks interesting.
The next lesson will help you create a beautiful gradient by rubbing yourself:
- nails and cuticles are prepared;
- apply the base and black base (on black nails the mirror effect will look bright and unusual);
- Before applying any rubbing, it is better to degrease your nails;
- the rub is applied using an applicator or finger and literally rubbed into the surface of the nail;
- Remains of pigment are removed with a brush and the finish is applied.
The gradient design and velor effect are simply beautifully combined. This manicure design looks bright and unusual, and its implementation does not require special skills or knowledge. The ideal option would be to highlight one or two fingers with sand, and leave only the ombre coating on the rest.
Sand gradient technique:
- nails are prepared, cuticles are removed;
- a classic ombre manicure is performed;
- sand is applied to the wet layer of gel polish and distributed evenly with a brush;
- you can use sand of one color or make a smooth transition of several shades;
- remove excess sand with a brush;
- on nails where there is no sand, apply a finishing coat and dry.
Drawings occupy a special place in nail design. Ombre in the form of patterns looks very impressive and becomes the main accent in the image. In combination with a gradient stretch, it is recommended to use pastel and light shades, so that the design will not be lost against the general background and will remain bright and expressive. The transition between colors can be used as a base or become a decoration for just a few fingers. The most relevant are geometric and floral designs.
This design option is very simple to implement. Using special stencils, you can create a variety of patterns on your nails. To make the manicure look interesting and stylish, it is better to apply the design on one nail. The technique is very simple - a classic ombre is done, but a stencil is glued to one nail, which is filled with varnish of a contrasting color. Once the varnish has dried, the sticker is carefully removed and the design is fixed with colorless varnish.
The modern fashion industry offers girls a huge selection of a wide variety of nail polish shades. Calm nude and pastel shades (milk, coffee, pink, mint, blue, sand, yellow) and their combinations do not lose their relevance. Bright colors of varnishes, play on contrast and the most unusual combinations look interesting and stylish - for example, rich green tones, black, blue and different shades of red. To meet the latest fashion trends, don’t be afraid to experiment and feel free to combine a wide variety of shades, getting an unusual and bright manicure that will definitely not go unnoticed.
Pastel
Bright
Dark
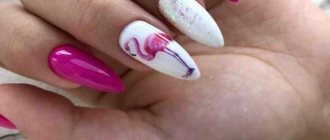
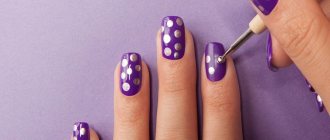
Manicure in two bright colors
Be prepared for this to be a more difficult option. Because there are a variety of bright compositions from incompatible shades and selected according to all the rules of the color wheel. The finished contrasting two-color design, especially on long nails, can be decorated with a pattern or decor if desired. The manicure can be done in neon colors, for example, in green and yellow tones - which is fashionable.
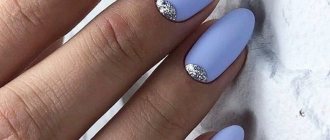
Matte multi-colored manicure
The matte finish gives your manicure a neat look. It is a worthy alternative to glossy. Most often it is done in two ways - matte top or gel polish. For example, combine sand and green, artistic watercolor splashes and a matte top in one design.
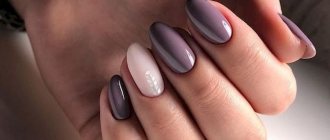
Manicure two colors with a classic color combination
When they want a laconic, discreet design with soft color accents, they turn to the classic color scheme.
- The traditional basis for a classic manicure is red, beige, brown, blue, gray, black, white. And also their combinations.
- Classic color combinations in manicure can be considered a combination of light pastel shades: delicate beige, light yellow, pale pink, blue, mint.
- Let's say a manicure in calm, rich shades of red, green and blue.
- An interesting solution for performing a two-color classic manicure is a combination of shades of different lightness. For example, graphite and light gray, white and milky, brown and beige shades.
- If desired, the manicure can be supplemented with neat designs and decor.
Photo of two-tone manicure 2022 with a beautiful combination of different colors
- We recommend on the topic: Spring nail design: new items, manicure photos.
- Blue manicure: trendy photo-new designs in the photo.