One of the latest trends in nail fashion has been gradient manicure. Smooth transitions from one color to another using gel polishes allow you to create fascinating combinations of different colors.
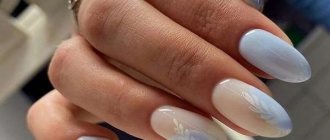
Gradient manicure with gel polish in pink and blue tones
Gradient manicure can serve as the basis for more complex compositions and patterns on the nails. How to make a color transition with gel polish? You can understand the intricacies of this technology yourself. Photos will help you choose colors.
Features of manicure with transitional shades
Gradient design has features compared to other techniques:
- to complete the job you need from 2 to 5 shades of varnish;
- the direction of application of the material can be any;
- the technique assumes a smooth border between colors so that the transition is not visible;
- gradient is a universal manicure option, suitable for both everyday and festive looks;
- the transition can be between related or contrasting colors;
- the finished manicure assumes a glossy or matte look;
- Both regular and gel polish are suitable for making a gradient print.
Nails with a color transition (step-by-step photos will be presented below) can be created in different ways. In master classes there are options for horizontal, vertical or diagonal transition. Another way is when each nail is painted the same color, the gradient is made from the thumb to the little finger.
The ombre technique has a number of advantages:
- modernity;
- speed and ease of manicure;
- versatility, diversity of ideas.
Types of gradient manicure
The gradient can be very different. Here are its main types.
- Regular two-tone transition. You just choose any colors, and the master does a “stretch”. And you know what's cool? The order is not important, both the beginning of the nail and its tip can be dark - it all depends on your wishes!
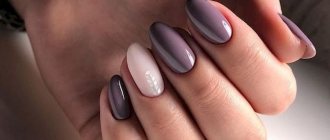
- Transition between three or four shades. But there is a nuance: multicolor looks best on long nails. It is very difficult to do it on short ones.
The gradient can be not only vertical! Horizontal options are less popular now, but we are for variety. Try it, maybe this option is the manicure of your dreams?
By the way, you can decorate not only all your nails with the ombre effect, but one or two, and it also looks stylish.
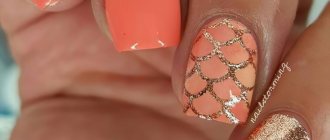
The gradient can be a background for an accent: sparkles, glitter, various rubs for shine and shine and sprinkles (for more complex textures), drawings, stamps and logos. You can also add highlights to the gradient! Yes, yes, a skilled master can draw them.
A manicure as a whole can also be gradient: nails are painted in different tones in the same color scheme, and each finger looks special.
Manicure techniques: ombre and gradient
The color transition can be performed using ombre or gradient techniques. One word is of Latin origin, the other is Greek. Many do not share these concepts, identifying them. Both options are used to characterize the type of manicure, suggesting a transition between colors, but they differ from each other. Ombre is a horizontal color transition, also called a washout.
Photo of nails with a gradient color transition
The gradient is considered a more daring solution; it is the vertical or diagonal direction of the transition of colors. There is no difference in the way the work is performed. If we are demanding in terms of concepts, then ombre is characterized as a manicure in which the boundaries between colors are not visible, the transition is very soft. The gradient even allows for a clearly defined, sharp edge without being feathered.
Table of compatible colors in manicure
In the photo of nails with a transition of related colors, a smooth play is visible. It is not difficult to reproduce such a print in practice. When coming up with a work process, it may not be clear how they fit together. To help the master there is a special table describing the characteristics of each shade.
It is easier to understand which colors combine with each other using a circular pattern, where the colors border each other in segments. In accordance with it, colors located next to each other, strictly opposite, or like the vertices of an isosceles triangle are in harmony.
Palette of shades for different looks
Summer is a time for bright colors. At this time, a manicure with a color transition can be contrasting, where opposite shades are combined. A bright image is suitable for relaxation, weekends, work (if it is not related to business activities).
These colors include aquamarine, mint, purple, lilac. In autumn, the shades shift to brown and gray to match the quality and appearance of coats, woolen sweaters and scarves.
If you need to paint your nails for a celebration, then a good combination would be to use a pastel tone with glitter. The shiny part will attract attention, but will not look provocative or inappropriate.
A business woman needs to choose a discreet nail color option with a transition from milky to peach, lilac or brick shade. Cool colors and warm, muted tones are suitable for this look.
The color of the varnish should be selected taking into account the color of the skin and hair. If you do not take this information into account, you can accidentally give your face a yellow, sickly tint, highlight pallor and circles under the eyes.
Beige and pink colors can give this effect to those with dark skin. For them, it is better to choose a cream or orange-copper option. Cool pink colors and pearl pink tones will look harmonious with pale skin.
Beautiful gradient ombre manicure - the best combination of shades for a gradient manicure
The whole essence of a gradient ombre manicure lies in the combination of shades and a smooth transition from one varnish color to another.
Although recently fashionable ombre manicure 2021-2022 can also be found with a sharp gradient on the nails, for example, several shades of the same color are applied to the nail in stripes without a smooth transition.
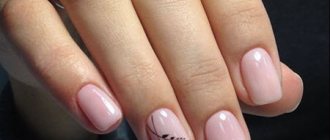
Fashionable ombre manicure looks more flattering on long nails. This allows you to create a gradient manicure 2021-2022 using more than two shades. A beautiful gradient ombre manicure for short nails is best done with light and pastel shades of varnish.
Since it’s summer time now, an original summer manicure with an ombre effect should be bright, cheerful and at the same time universal and suitable for all summer looks.
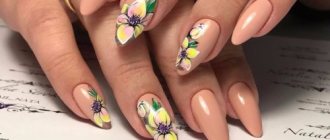
A gradient ombre manicure will undoubtedly become a highlight and a bright addition to any summer look. For summer, suitable colors for a gradient ombre manicure will be shades of red, pink, orange, mint, and lilac.
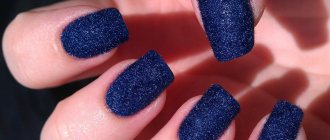
Autumn-winter spectacular gradient manicure is predominantly cool shades of green, blue, wine, purple and black.
Modern ombre manicure allows you to combine both shades of the same color palette and contrasting colors.
Tools for painting nails with color transition
Since manicure attracts attention, it is necessary that the nail plate is well-groomed.
To perform ombre you will need several tools:
- orange stick, cuticle nippers;
- foam rubber with fine porosity;
- foil;
- brush;
- desired colors of varnish or gel polish;
- polishing buff;
- toothpick or needle;
- surface degreasing liquid;
- clinser to remove the sticky layer.
The main tool for work is a sponge and a brush. It is thanks to these things that such a flawless gradient can be achieved. The foam rubber needs to be cut into small cubes with an area slightly larger than a nail.
Household items that are suitable for this purpose include a dish sponge and a makeup sponge. Some masters say that the desired smooth transition may not be possible with the first material due to too large pores.
How to use a sponge to achieve a gradient effect?
To achieve the effect of the drawing, you need to practice a little.
The working technique is as follows:
- The desired colors are applied to the plastic surface in layers.
- Blur the boundary between tones using a brush or needle.
- The master takes a piece of foam rubber and places it on the plastic with the palette.
- The material is pressed onto the nail, pressing for a few seconds.
When the job turns out perfectly, you can save time and start depicting the sequence of colors directly on the sponge. Another way is when part of the sponge comes off so that there are uneven edges.
The master applies the main color to the nail, after which the edge of the foam is dipped in a contrasting shade. When the base coat has dried, the sponge is pressed to the place where the other color should be. At the border of different parts, you need to apply the material to the surface several times with sharp movements.
Degrade with acrylic powder
A simple method suitable for beginners. The fine, free-flowing texture gives a transition effect with a minimum number of strokes.
- We paint our nails with white varnish and dry them in a lamp.
- We cover the nails with top, leaving a dispersion layer.
- Place one shade of powder on a fan brush and sprinkle it onto half of the nail with small movements. We start from the zone of the most intense color location and move towards the transition zone as the amount of powder on the brush decreases. The higher the brush is above the working surface of the nail, the wider, thinner and blurrier the layer is, so closer to the shade mixing area we raise the brush higher.
- Shake off excess powder periodically to ensure even coverage.
- We do the same with the second shade of powder.
- Dry it in a lamp.
- Brush off any remaining powder with a brush.
- Use a soft buff to remove rough bumps to achieve a uniform coating.
- We process the cuticle.
How to make a color transition with a brush?
The second way to work with a gradient is to use a brush. There is a special tool for working with gradients, but a regular one for design is also suitable.
To perform ombre, use foil on which colors are mixed. Apply the varnish to the panel with a brush, and use a toothpick to mix the contacting areas.
Complicating the task, the master begins to create directly on his finger. To do this, you will need a round brush, which will need to stretch each color in the chosen direction. When the next shade is applied next to the previous shade, the border is shaded using a thin, clean tool, each time removing excess varnish. This method allows you to avoid staining the skin around the nail with varnish.
Beautiful examples
On the global network there are many of the most interesting options for implementing a gradient. Let's talk about some of them. For example, ombre in the form of diagonal stripes. You will need to stock up on tape and select several shades of blue gel polish. Initially, the nails are processed and covered with a base, which is dried in a lamp.
We take the lightest shade and paint the plate with it. The coating dries well. Now we glue the tape diagonally at the cuticle. The third part of the nail should be covered in a similar way. Apply a darker shade to the free area. Dry everything well. Cover the nail with tape again, now two-thirds of the way. The darkest color is applied to the remainder of the plate. The composition is dried, the tape can be removed. This is how you get stylish striped nail art.
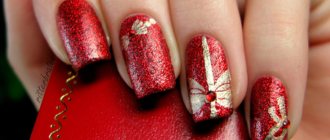
There is another fashion trend. The base coat is applied. Cover the entire nail plate with pink gel polish and dry everything well. The remaining surface should be coated with a gloss. After this, glitter is applied from the free edge to the middle of the plate. The result is an ombre effect.
The chaotic gradient looks fashionable and stylish. In this embodiment, the shade boundaries can be located anywhere. The main rule is to make smooth transitions. In this version, you can use several tones. Bright dots are placed on the nail plate, and then shaded using a brush or sponge. Nail art looks spectacular in colorful tones. It is suitable for those women who are looking for self-expression.
An excellent option is the French gradient. It will look optimal on medium-length nails. Pink, blue and other light tones are often used to perform it. The smile area can be highlighted in white. This jacket is ideal for everyday wear, business meetings, and get-togethers with friends. The technique is simple. You just need to cover your nails with a base layer and dry them well in a lamp. The middle area of the nail plate is covered with lighter tones and lightly shaded using a sponge. White color is applied to the tip of the nail. Everything is eventually covered with topcoat and dried thoroughly.
An air gradient can be obtained using a special device - an airbrush. As a rule, you can only create a horizontal ombre with it. By spraying the desired shade, the colors will smoothly change each other. Once the design is complete, everything is covered with a top coat and secured in the lamp.
In this article we looked at how to create a stylish manicure using the gradient technique. Now you know the secrets of successful nail art with color transitions. Imagine and come up with your own creative design variations, don’t be afraid to experiment. When performing a manicure at home, you should be careful and precise. Start with simple elements. As you gain experience, you will be able to master complex variations. Create your own bright look and highlight it with stylish nails.
To learn how to make a French jacket with a Baby Boomer gradient, see the following video.
Instructions with photos for creating a gradient on nails with regular polish
It is better to start doing nails with a color transition (a photo of one of the options is presented below), working with regular varnish. There is a high chance that you will not get the desired effect the first time. Using regular varnish, you can redo the work as much as you like. With gel this will not be possible, and the manicure will be ruined.
Here is one option for working with a contrasting color using foam rubber. During preparation, it is necessary to remove or push back the cuticle. The second step is to apply a greasy cream, a special Vaseline-based product or PVA glue around the plate, which then allows you to quickly remove excess material.
- A base coat and white varnish are applied to the nail and dried.
- Both colors are applied to a piece of foam rubber in layers.
- The porous material is applied to the nail with short movements, achieving the desired effect.
- Remove excess varnish.
- Cover with a finishing coating, a protective agent.
Recommendations from experts
Painstaking work on creating a beautiful nail can be ruined due to little things. By applying our tips, you can avoid trouble.
- When you work on the transition of tones with a sponge, unevenness and bubbles appear in the gel polish. To prevent this from happening, use a thick sponge or fine-grained sponge. Before applying color to the nail, blot the sponge on paper or foil. Any air bubbles inside will come out. If they do form, spray them with alcohol.
- The fingers around the nail inevitably get dirty with varnish when using the sponge. You can use paper tape and remove it after applying the nail polish. It is more convenient to use another method - spread the skin around the cuticle with a rich hand cream. Excess varnish can be easily wiped off with a cotton pad along with the cream. If you often do ombre, look in stores for a special product to remove unwanted color from your fingers.
Contrasting colors create difficulties. They don’t connect well, it doesn’t look very aesthetically pleasing
To obtain a bright image, you must use white varnish rather than colorless as a base.
Painstaking work on creating a beautiful nail can be ruined due to little things
- Contrasting colors create difficulties. They don't connect well and it doesn't look very aesthetically pleasing. A topcoat can help the problem. It smoothes out the transitions of bright colors.
The gradient runs vertically and horizontally
The vertical image visually lengthens the nail
The color border is placed along the central axis of the nail
- To obtain a bright image, you need to use white varnish rather than colorless as a base.
- Ombre with glitter is done over a plain base coat. Starting from the end of the nail, thick golden sparkles are sprinkled on it, which towards the middle turn into silver and become less frequent.
When you work on the transition of tones with a sponge, unevenness and bubbles appear in the gel polish
If they do form, spray them with alcohol.
The fingers around the nail inevitably get dirty with varnish when using the sponge.
The gradient is performed vertically and horizontally. The difference is in the position of the sponge. The vertical image visually lengthens the nail. The color border is placed along the central axis of the nail. Horizontal ombre involves an axis parallel to the top edge of the plate.
Gel polish manicure with color transition
The peculiarities of working with gel polish are that each layer is dried separately under a lamp. With this material it is easier to polish the surface to a perfect condition.
Nails with a color transition (photos of the stages of working with gel polish do not differ from the previous version) are easy to do. To prepare the plate, you need to push back or trim the cuticle and sand the nail. This is necessary for better adhesion of the gel polish to the surface.
The work takes place in several stages:
- The plate is covered with a layer of base varnish and dried under a lamp.
- Various paints are applied to the foil in strips, and the edges are blurred using a needle or toothpick.
- Press the palette onto a piece of sponge moistened with water.
- The foam rubber is applied to the nail several times with sharp movements.
- If the color intensity is achieved, the applied material is dried under a UV lamp.
- To make the coating more dense, apply several layers of gel, each time directing the nail under the lamp.
For each plate you need to take a new sponge, since the area is different and the colors are laid unevenly. If the pattern on the nail is uneven, then first you need to apply the foam rubber with varnish to the foil, and then try it on your finger.
Nail preparation
How firmly the varnish coating will adhere depends on the quality of nail preparation. Therefore, it is necessary to strictly follow all pre-treatment steps before applying the main coating.
Gradient manicure with gel polish
After basic manicure care, we move on to preparing nails for applying gel polish:
- Using a buff (a special file), we polish the nails to form a layer that will reliably hold the polish.
- Wipe the surface of the nail with a napkin.
- Degrease the nail plate with alcohol or a special degreaser.
- We cover the nails with a primer (base, base), thus preparing the surface for reliable adhesion to the gel polish. The applied layer must be fixed under the lamp for 30 seconds.
Gradient in light colors
French manicure in ombre style
The French manicure technique involves applying white or other varnish along the smile line in a thin strip.
French ombre came into fashion this season, 2018-2019.
There are several options for implementation:
- over the completed manicure, a strip of contrasting color is applied in a thin line along the edge of the nail;
- the plate is painted in 2 colors, from the base to the edge it turns white, the border is blurred.
Thanks to this technique, it is possible to create a delicate ombre version. As a rule, soft pastel colors of varnish are used in the work.
Ombre with rhinestones
The gradient looks interesting, so it does not need additional decorative elements. The combination of stretch marks with rhinestones may look inappropriate because it attracts undue attention. If a woman wants to add some sparkle to her look, she can use medium sized rhinestones on 1 nail.
Since one of the design directions is to apply a different pattern to each finger, the color transition boundary can be indicated using decorative stones. Rhinestones are used to create a pattern, a geometric image. Full laying of one nail is allowed.
Ideas for two-color, three-color, multi-colored manicure
In the 2018-2019 season, the vertical gradient faded into the background, giving way to a horizontal design. The smoother the transition can be conveyed to the master, the more fashionable the manicure will be. But if a woman wants to replicate the idea of a diagonal color transition, then she should experiment and try different gradient directions.
Here are some ideas for using different colors:
- The idea is to use 2 varnishes: colored and white. The thumb is painted with a clean, bright color, the next - by mixing it on the palette with a few drops of a light shade. The remaining nails are painted with flowers, constantly diluting the previous mixture with white. For example, the thumb will have an orange polish, and the little finger will have a light peach polish.
- A similar principle of diluting the main color can be used when working with a gradient on each plate.
- Another option for a vertical transition is to apply several colors to each nail, not forgetting about a smooth transition. In this way you can apply 10 colors on 5 nails. It may look, for example, like this: apply burgundy and red onto a large one using a sponge so that one of them occupies 2/3 of the area. Next, place scarlet and pink, orange and lemon, delicate light green, mint, blue and lilac colors in an arbitrary ratio.
- The trends of the season allow for bold decisions when a horizontal gradient is used on each nail using shades from different ranges: sea wave and mint, and next to brick and pink or lilac-orange.
- A transition of 3 colors can be used on one nail, combining the main shades on the rest: the index finger is painted yellow, the middle finger is painted pink, the little finger is colored lilac. Then on the ring nail there is a gradient from the combination of this palette.
- The use of a related range of 4 tones on a medium-length plate looks beautiful. For example, the use of yellow, orange, scarlet and muted red. If you shade the colors, ensuring a smooth transition, then the nails have a beautiful play of color.
- The diagonal color transition does not have to be the same on all plates. The gradient can be combined with rhinestones on the border of shades, plain nails, and change the direction of the varnishes.
Manicure can say a lot about a woman, which is why so much attention is paid to this topic. Drawing nails with a color transition is not difficult, especially since there are many photos on the Internet with step-by-step actions. For an impeccable result, you need a little practice, but having mastered the basics, a woman opens up space for an unlimited number of image options for every day.
Author: Valentina Dyleyko
Article design: Mila Friedan
Types of Gradient Nail Art Techniques
As we figured out, a gradient manicure is a transition from shade to shade - but depending on how exactly to apply this approach, a considerable number of variations of ombre manicure can be demonstrated.
Horizontal and vertical transitions, as well as diagonally, make gradient manicure very diverse. A “transition” can also be used not only on one nail, but also from finger to finger with multi-colored nails on the entire hand.
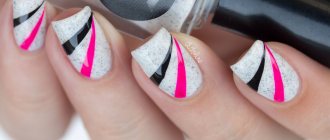
Linear gradient ombre is trendy, which allows you to create a geometric style on your nails with stripes, diamonds, and diagonal ombre lines, which look very impressive.
The mega-fashionable gradient manicure 2020-2021 with sparkles will be impressive, in which it is not a color “transition” that is used, but more or less pigmentation of the sparkles.
Ombre sand strips will help you create an unusually attractive ombre manicure 2020-2021, which will attract the enthusiastic and surprised glances of everyone without exception.
If desired, you can also perform abstract ombre “transitions”. But the hit of the season was ombre in the form of a colored “island” with a gradient on the bare nail, which exceeded all the expectations of nail artists and fashionistas all over the world.
We offer you the top new ombre manicure 2020-2021, which we will look at in more detail right now with a photo demonstration of an example of the ombre nail technique 2020-2021.