When it’s winter outside, and the Christmas holidays are visible ahead, thoughts increasingly arise in our heads about how we will decorate our home. And girls, among other things, are looking for ways to transfer elements of the holidays to themselves. And those who want to have a manicure for all seasons will like our article even more!
More than once we have heard fashionistas say that they don’t want glitter, colors, yes, but not glitter. Varnishes are steamed to give them a matte finish, or even become matte. The use of manicure sand has become a new breath in nail art.
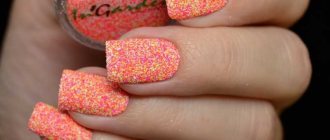
Manicure sand is a special powder of various colors. Sand varnish is distinguished by the size of the grains. For example, a very fine grind can give your nails the appearance of velor, while a coarse grind can give your fingers a shade of granulated sugar.
Varnish with additives is a little thicker than usual, but differs only in the structure of the coating. It is convenient to apply, it does not tend to creep onto the cuticle during coating, and besides, one layer of varnish is almost always enough, in rare cases - two if you want to give your nails a more voluminous look.
Features of manicure
Advantages of the granulated sugar effect design:
- the ability to perform it at home;
- resistance to aggressive household chemicals;
- variety of ideas.
Interesting solutions for manicure:
- velvet surface;
- marmalade records;
- subtle color transition - gradient;
- combination with familiar types of design.
Sugar varnish
Many companies produce special varnishes that, after drying, create a rough coating that looks like sugar or the first snow. A wide color palette of varnishes allows you to decorate any New Year or summer design. Sugar manicure using special varnishes can be seen in the photo.
It’s spring outside, and episodes of the upcoming summer holiday are replaying in my head for the hundredth time. The warm sea, the hot sun and the burning sand under your feet are moments that remain only in your memory or in a photo saved on your phone. To ensure that the summer mood never leaves you, despite the weather outside, try doing this. Using sand nail polish, you can easily create beautiful nail art that will remind you of your upcoming vacation. Our photo gallery will help you choose a suitable design that will not leave anyone indifferent.
Texture manicure is a relief coating with small grains reminiscent of sand. Depending on the manufacturer, the varnish may lie on the nails with a smoother or, on the contrary, a bumpy layer. A manicure with a very voluminous coating is often referred to as a sugar manicure. If the sand varnish is liquid enough and the grains are very small, the result is a velvety design that looks like velor. The final result largely depends on the ability to carefully apply the coating. The nail polish itself is very unusual and has an amazing structure.
Tips from the experts
To properly do a sugar manicure with gel polish, you need to:
- Buy a textured coating from a specialty store.
- Before applying, shake the packaging so that the particles are distributed evenly. Ignoring this point will ruin the appearance of the plate.
- Texture varnish must be applied in several layers. You cannot take a lot of material at once - this will distort the result, making the surface rough and sloppy.
- At the end it is necessary to apply a fixative.
Careful removal of gel polish will have a positive effect on the condition of your hands. Withdrawal rules:
- A small amount of special liquid is applied to cotton pads.
- Apply them to the nail plates and secure with pieces of foil.
- After 5-10 minutes, the wrapper is removed, and the remaining soft varnish is removed with cotton wool.
How is the sugar coating removed?
The melange powder applied to the gel polish is removed like a regular gel polish coating. But it is better not to remove sugar varnish or regular varnish with a melange rub by simply wiping it off the nail, because grains of sand can scratch the nail plate.
Editor's choice: Beautiful nails 2022: photos of new trends
To more carefully remove sugar polish from nails, remember how to remove gel polish. Soak pieces of cotton pads in nail polish remover and apply to your nails, wrapping them in foil. Keep the solvent for about 5 minutes, the varnish will soften well, and you can wipe it off with a light movement without causing injury to the nail plate.
Sugar manicure design is loved not only by fashionistas for its beauty and originality, but also by craftsmen for its ease of implementation. And many nail artists collect a portfolio of their own work, and it is this design that always looks great and is very clearly visible in the photo, without creating bright shimmers.
Application methods
There are several ways to make a manicure with granulated sugar at home. However, the end result will always be different.
Design with acrylic powder
The method is suitable for gel polish lovers. The procedure is simple and does not take much time.
You will need:
- ultraviolet lamp;
- gel polish (color chosen at will);
- acrylic Powder;
- base and fixative;
- tassels.
The design is created in several stages:
- Upon completion of the hygienic manicure, apply a base coat, and then apply gel polish in 2 layers. Dry in a lamp between procedures.
- The last layer does not dry immediately. First, sprinkle the nail plate with acrylic powder.
- After drying, the final result is corrected with a brush, carefully removing excess grains.
- Apply a fixing layer.
Using this method of creating a sugar manicure, you can achieve a velvet effect. To do this, the patterns are first drawn with gel polish, and then the contours are sprinkled with powder, and all excess is removed with a brush.
Melange
Melange is small sugar grains that create the effect of voluminous glitter on the nails.
To carry out the procedure at home you will need:
- gel polish;
- melange;
- brushes;
- base and fixer.
After preparing to apply the decorative coating, you can begin creating the design:
- Apply base to the nail plate. Dry.
- You can cover your nails with colored gel polish in several layers to create a specific design. Dry.
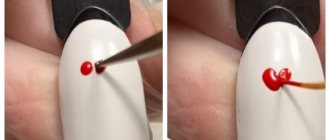
- The last, not yet dried, layer must be immediately covered with melange. Apply with a tapping motion of the brush.
- Remove excess and secure the result with topcoat.
Features of sand nail polish
If you look at photos of sand nail art on the Internet, you will notice that many designs are very different from each other. These differences are due to the different structure of the coating, but in general they are all similar to each other. Sand varnish is usually somewhat thicker than usual. This is due to the presence of a certain filler in the vial. Silicone grains can be the same or vary in size. Some manufacturers enrich sand varnish with fine glitter. The presence of glitter gives the manicure a shining effect.
High-quality sugar varnish is applied without streaks and lies evenly on the nails. It does not flow onto the cuticle and into the sinuses of the side rollers. Due to the high density of the coating, for high-quality nail art, as a rule, one layer is enough . Only in rare cases will it be necessary to apply an additional layer to create a more voluminous relief.
How resistant is the varnish to various damages and chips? All girls note different times for wearing manicure: from one to five days. This factor depends on the characteristics of the nail plate and the quality of the varnish itself. Many people have the question of removing the texture coating. Clean the surface of the nails with a regular nail polish remover.
When purchasing the shade you like, pay attention to some nuances.
- Date of manufacture. The fresher the sugar varnish, the longer it will last you.
- The texture of the composition. Excessively liquid varnish will leak and form streaks on your nails. Too thick a coating can cause wrinkles and bumps to appear. If necessary, purchase an additional special varnish thinner.
- Amount of texture filler. Too few grains of sand will make your nail art sloppy and deprive you of the desired result; too many will give it an untidy, bumpy look.
So that you can visualize a bottle of sugar nail polish, we bring to your attention the “sand” collections from global manufacturers, shown in the photo.
The best polishes for sugar manicure
To perform a sugar manicure, you need to purchase only high-quality products so as not to damage the nail and admire the result for a long time.
Jerden "Color Sugar"
The most popular remedy for obtaining the effect of granulated sugar.
Its features:
- many shades;
- drying the coating will take 3-5 minutes;
- the ability to decorate a chip;
- durability.
When using this varnish, the coating lasts for more than a month.
Dance Legend "Sahara Crystal"
A professional series of varnishes, which is distinguished by a good choice of colors and durability.
Among the features is that it is necessary to treat the nail plate with a protective layer before applying a decorative coating.
Golden Rose "Holiday"
A budget-friendly product that can be used to frequently change the color of your sugar manicure.
The palette is varied, and the quality of the material is not inferior to expensive analogues. The product has a more liquid structure, which is why it is necessary to apply the varnish in several layers.
Velvet sand on nails: a delightful sugar manicure
Category: Nail Design
Manicure using velvet sand is considered a current innovation in the beauty industry. Externally, velvet sand is similar to medium-ground powder of a translucent appearance. The color of sand can easily change - it all depends on the base shade of the varnish. Flock (sand) does not lose its texture when interacting with liquid, like, for example, glitter. It is possible to create a stylish manicure using this material for artificial as well as natural nails.
Velvet sand on nails at home
A beautiful manicure with an original texture can be created at home. What you need is varnish or a gel analogue, base and top coat and powdered glitter. The process of decorating nails is as follows: Apply a base and color coat to the nails, apply a top coat and immediately sprinkle the nails with powder using a spatula. Alternatively, you can even dip your nails in a container of glitter for a richer finish. Shake off excess.
More durable sugar manicure when using gel polishes and gel. The creation technology is the same as in the case of simple varnishes, you just need a UV lamp and instead of sprinkling your nails, you can mix the glitter with gel, apply it to your nails and polymerize it in a UV lamp.
Basic equipment for professional velvet manicure
Velvet manicure can be done using a professional set. It consists of flock, visually similar to fibers of various lengths. Most often, a set contains 7 units of sand. The flocider device helps to glue small grains of sand (under the influence of an electric field) to the nail plate, resulting in the effect of a beautiful and unusual coating on the nail.
A special brush with a long and fairly voluminous bristle ensures convenient work with flock. It is also ideal for cleaning the stand or hopper, which often gets dirty during manicures. It is possible to carefully apply the material to the nail using a metal stand.
Stages of the procedure
- Velvet sand is poured into the device’s hopper;
- Gel or varnish is applied to the previously prepared nail plate;
- place your finger under the metal stand, after which the flocader turns on;
- the nail is dried under a UV lamp;
- The manicure will last long enough if, at the end of the procedure, you do not wet your hands for several hours so that the material has time to harden.
The benefits of sugar manicure
The fair half increasingly prefers this innovative service because:
- such a manicure looks stylish on the nails, attracting the attention of others;
- with the help of flock it is possible to completely cover the nail plate or create a bright design on the nails;
- the procedure takes no more than half an hour and can be easily performed at home;
- flock is very durable and is able to stay firmly on the nails during regular washing of dishes and other household procedures;
- Having had a manicure done by a specialist, you can easily count on the durability of such a procedure (it stays on the nails for up to 20 days);
Cons of velvet sand on nails
The main disadvantages of manicure include:
- high cost, since this service is considered an innovation in the field of beauty;
- If you do a manicure at home, it will not last on your nails for more than a few days.
See further photo gallery of manicure with velvet sand
Tags: manicure, sugar manicure
mynogti.ru
Interesting ideas
Sugar effect varnishes allow you to show your creativity and create absolutely any design.
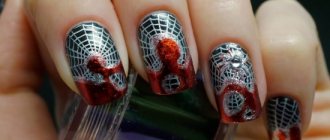
Black manicure
Manicure is suitable for strong and bright girls who prefer to emphasize their individuality.
To create it, it is better to use gel polish. Application stages:
- Coat the plate with the main product and dry it in a lamp.
- Apply two layers of black varnish and dry.
- Draw a skull on several nails and cover with silver acrylic powder.
- Dry your nails and consolidate the result.
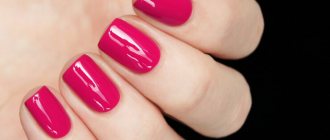
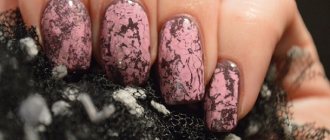
Red design
A simple velvety manicure that will impress others.
Technique:
- Apply and dry the base.
- Apply two layers of red polish to your nails and dry.
- Mix burgundy and golden melange in a separate container.
- Apply another layer of varnish and cover it with melange. Beat in the grains of sand after drying.
- Remove excess.
Marmalade design
A bright and rich manicure with multi-colored sand is suitable for meetings with friends, themed holidays, and ordinary everyday life.
Technique:
- Mix several different colors of melange in a prepared container. It is better to choose bright shades.
- Apply several layers of gel polish, and cover the last one with melange.
- Carefully process the ends and remove excess.
With the help of powdered sugar effect design, every girl can feel confident and stunning, impressing others with her creativity.
Sugar manicure: photo and nail design
Sugar manicure confidently takes a leading position in nail art and is becoming a favorite of modern fashionistas. Ideal for creating solid colors, gradients or three-dimensional designs. With this material, a sea of ideas and opportunities to express yourself opens up.
From the very beginning, “sugar effect” manicures were done using ordinary sugar particles. But this material turned out to be not universal, because the sugar grains are too large, and besides, the manicure does not last long due to the fact that the sugar melts quickly - it dissolves the first time you wash your hands.
However, manufacturers of materials for nail services were not long in coming; they offered the masters a special powder called melange, which allows them to create the effect of sugar on nails. It is suitable for both gel coating and regular varnish.
The special composition of the powder resembles colored dust. It is applied to wet gel paint or colored polish, creating an incredible marmalade manicure. Small grains of sand lie smoothly and quickly on the nail plate and suit any look.
Velvet sand (melange powder) can be found in any specialty store or ordered online. The grains of sand have a beautiful shimmer, so the sugar manicure turns out amazing and easy to do.
Benefits of sugar manicure
Girls and women around the world increasingly prefer this type of manicure because:
- in this design, nails look stylish and attract the attention of others;
- Using this technique, you can cover all your nails, or you can only cover individual parts of them, which will make the design even more original;
- the procedure does not take long and can be easily performed at home;
- the material used in the work is quite durable: it will stick to the nails when doing household chores and frequent contact with water;
- If you don’t do a sugar manicure yourself, but go to a professional, it can last about three weeks.
Cons of sugar manicure
Fortunately, there are fewer disadvantages of sugar nail art:
- If you turn to a beauty salon for help, the new product is expensive.
- A manicure with sand requires scrupulousness; negligence leads to the material falling off within a few days.
- To maximize the period of wearing decorative elements, you need to wear rubber gloves on your hands when doing household chores.
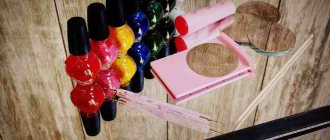
Required materials and tools
To create a sugar manicure you need to prepare:
- a buffer with medium abrasiveness, a file for natural nails, a bond and a dehydrator;
- base, top, colored varnishes, powdered sugar for nail design, gel paint and a thin brush (if you plan to make a design on your nails).
Sugar candies
Nowadays, many products have appeared on the nail design market, thanks to which you can achieve the effect of sugar on your nails. You can choose any colors: plain, neon or melange.
You can create a sweet surface using acrylic powder with small glitter.
- Each nail needs to be covered with a base, two layers of colored varnish and polymerized in a lamp.
- Apply a thin layer of top.
- Immediately, gently sprinkle acrylic dust using a pusher over the entire surface of the nail.
- Dry in a lamp and remove all excess with a brush.
To prevent excess powder from spilling, it is recommended to hold the nail over the jar and sprinkle glitter on top.
Sugar manicure with gel polish
This design looks better on extended nails or gel polish. It is in these cases that you can create not just a marmalade coating, but also make various designs and patterns that imitate a sugar coating.
Step-by-step instructions for performing the sugar effect on nails:
- The first thing you need to do is perform a standard manicure procedure, give your nails a shape, use a buff to remove the gloss, degrease your nails and apply bonding agent to them.
- Next, the nail plate needs to be covered with a base and sent to the lamp. After this, you need to apply gel polish of the main color to your nails in two layers, polymerizing each of them in a lamp.
- Melange powder is applied to the residual stickiness of the varnish using a pusher or brush. It is best to do this procedure over a jar of material, this way you will save decorative rubbing.
- After this, you need to pour a little finish onto the foil (this is done so that the powder does not get into the bottle along with the brush) and cover your nails with it using a brush from the old bottle. The nails are put into a lamp and dried longer than usual.
- To make a sugar manicure with gel polish look more natural and believable, after drying the nails are covered with a second layer of top coat. Without drying it, the nail plate is re-sprinkled with melange and sent to dry. Finally, remove the residue using a fan brush and rub in any protruding particles using a stiff brush.
Sand effect varnish
A pleasant novelty in the world of manicure is sand nail polish. Sugar-effect varnishes contain small particles (often silicone grains of different sizes). They are the ones who create the effect of a rough surface on the nail plate. In addition, small sparkles are often included in the composition, thanks to which the manicure is obtained with a gentle shimmer.
Using this varnish is as easy as using varnish for a regular glossy manicure. Additionally, you will need a base for the varnish - the first thing to do is apply it to the nails. After this, shake the bottle of sugar polish so that the grains of sand are evenly distributed throughout the jar, and only then apply the polish to the nail plate.
To make your manicure look richer and more textured, apply sand polish in two layers. And in order to slightly smooth out the rough surface and further secure the manicure, the nails can be coated with a fixative varnish.
Sugar manicure allows you to create a unique structure on your nails, and the design looks bold and attractive. In this case, decorative sand can not be applied to the entire surface of the nail. The patterns covered with sand look stunning.
Sugar manicure at home
There are several techniques for applying manicure, it is better to familiarize yourself with each and then choose the most suitable option. The first way is as follows:
- Do a regular trimmed manicure, be sure to steam your hands in a warm herbal bath, push back and trim the cuticles, use a nail file to give them a better shape, and dry each nail plate well with a towel.
- Apply a protective base to your nails.
- Now scoop up a small amount of colored dye and make a couple of strokes on each nail. Most often, calm pastel colors are chosen - sand, beige, milky, soft plum, soft pink. Sometimes, on the contrary, strongly contrasting shades are selected.
- While the composition has not yet dried, quickly but carefully sprinkle granulated sugar on the nail and wait until it sticks completely. According to nail art masters, 10-15 minutes is enough for this.
- Next, use a hard miniature brush designed for working with nails to sweep away any loose grains of sand; if you need to make a pattern, form it.
- To make a sugar manicure last longer, it is advisable to seal the result with shellac, but this technique will not work if you want a 100% velvet feeling.
How to remove sand varnish?
Removing sand varnish is not an easy task. To avoid damaging the nail plate with prolonged friction, manufacturers suggest generously moistening a cotton pad with nail polish remover and pressing it firmly against the nail for a minute or two.
After this procedure, the sand nail polish should be soaked and removed from the surface without any problems.
Creating an original sugar nail design
If you are bored with the traditional technology of creating velvet nail art, then use one of the tips from beauty specialists:
- The grains can be attached not to the entire nail plate, but to capture only part of it, for example, highlight the hole of the nail bed with velvet or apply it to the tip. Don’t be afraid to decorate with rhinestones - French and moon manicures require additional elegant framing.
- Saving material can lead to a result that you are clearly not happy with. When working with velvet sand, you need to understand - either sprinkle it generously, or not use it at all. Don't be afraid to get your fingers dirty - the particles can be easily rubbed off and fall off.
- Uneven lines, ornate patterns, monograms drawn using several colorful shades at once look very stylish and expensive.
one-lady.com
How to make gel polish design with sand - instructions
VIDEO INSTRUCTION
To create a design with a velvet coating, you must follow this algorithm:
- Prepare the nail plate: remove the cuticle, give the nails the desired shape, remove the lipid layer with a buffer, apply a primer.
- Apply base coat and dry it.
- Apply gel polish in two layers, dry each layer under a UV lamp.
- We fix the color with a finishing layer, dry it and remove the stickiness.
- Let's start drawing. In our example, the pattern is curls - this is the simplest pattern for initial drawing. For elegance of execution, it is better to use a thin brush. Drop the desired color of gel polish onto the foil and paint with a semi-dry brush (as in the photo).
- After finishing the sketch, pour acrylic powder onto the wet, undried pattern. It is very convenient to work as a pusher, picking up sand as if in a spoon. Sprinkle it, sparing no material, so that the grains completely cover the pattern. It is better to do this over a jar so that you can immediately shake off the excess into it. Now you can dry the marigolds for three to four minutes. When the pattern has set, brush off the excess sand. Manicure with velvet sand is ready.
Little tricks:
- It is very convenient to make a drawing with gel paint, since it does not flow and remains voluminous.
- The design may “slide” along with the powder due to poor drying - longer drying under a lamp will help to avoid this. This is especially true for colored acrylic powder and powder in dark colors. You can also wait a little for the powder to absorb, and only then put your hands under the lamp.
- In the case of gel polishes, drying for 2 minutes in an LED lamp and 4 minutes in a fluorescent lamp is sufficient; if gel paint is used, then 1-1.5 minutes in an LED lamp and 6 minutes in a fluorescent lamp.
- Check the condition of the lamps in the fluorescent lamp - the old ones dry poorly and therefore require replacement.
- To make the design less dirty, use a base for regular varnish. It is liquid, lays down in a thin layer, and dries quickly. Apply it in a thin layer to the pattern with a semi-dry brush, trampling it in a little. It will flow between the grains and dry as an invisible film. Under such “protection” the roses will not lose their velvety texture, but will not get dirty.
Some useful tips for those who decide to design with a velvety surface:
- You can give a classic French jacket a twist by decorating the tip of the nail with white sand and silver rhinestones,
- do not skimp on the material, pour it in large quantities,
- It is better to place the main emphasis in manicure on the velvet coating, and not on varnish,
- Dry the velvet sand thoroughly under a UV lamp,
- combine different shades, apply patterns - experiment.
VIDEO DESCRIPTION
Manicure options with velvet sand
There are a lot of ideas for implementing a manicure with a velvet pattern.
Let's consider popular options for creating original patterns using this material.
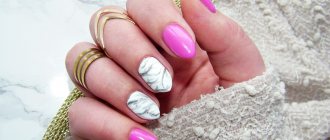
- Red varnish and sand. This manicure option will turn any shy girl into a fatal beauty. Red gel polish will always be in fashion, and if you decorate one or more nails with velvet sand, the manicure will turn out to be unusual and bright.
- Black varnish and sand. For some, black may seem too aggressive, but in combination with golden or silver velvet sand it will look elegant and stylish.
- Colored varnish and sand. If you like bright colors or want to attract attention to yourself, try combining colored gel polishes and sand. The scope for experimentation is incredibly huge, so you can safely experiment.
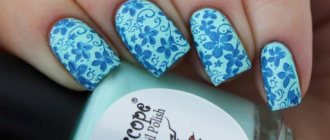
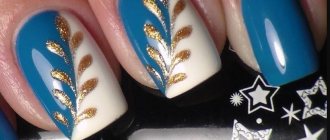
- Winter patterns - braids. Manicures with this pattern are most often done in the winter season. In order to emphasize the beauty of the pattern, it is sprinkled with velvet grains.
- Wedding manicure. Brides often ask artists to create designs on their nails in the form of flowers and abstract patterns using white varnish. By sprinkling the designs with sand, you can easily emphasize individual patterns and place emphasis on the ring finger.
Contrary to popular belief, this manicure is very comfortable to wear and will last as long as gel polish.
You can remove it with a special liquid for removing gel polishes; a specialist in the salon will cope with this task in 10-15 minutes.
Sand manicure is a type of nail art, which is usually created using a special powder called velvet sand. Externally, the powder resembles nail glitter, but has a smoother and more pleasant texture. This innovation appeared relatively recently, but has already managed to win the love of fashionistas. You can perform a manicure called “velvet sand” on both natural and extended nails.
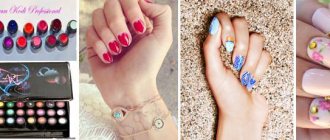
Stylish sand nail art ideas
After the long-awaited purchase, you can move on to the creative part and bring your ideas to life. A colorful collection of photos will inspire you to new experiments and unleash your imagination. Try to start with a solid color, because sandy nail designs look perfect with light and delicate shades of white, pink and peach. Sugar nail art also looks very impressive in black. If you want to choose bright, variegated tones like blue, green or red, you should keep in mind that such contrast is not always beneficial for a textured manicure. To make the sand nail design look new, you can apply a top coat, and the nail art will look very mysterious and alluring. The photo shows several variations of the original manicure.
Sugar nail design is not limited to just a monotonous finish. To create patterns, you can use sand varnishes of various shades. Try, for example, painting each finger in a different tone or focusing attention on two nails by making. You can very successfully combine a sand coating of the same shade with or without glitter. In addition, sugar polish can complement the patterns and pictures of regular nail designs. Look at the photo and choose the right nail art for yourself.
Ease of use makes sand nail polishes accessible to girls with different skill levels. Thanks to its original and attractive appearance, sugar manicure is becoming increasingly popular, and manufacturers are expanding their product range every year. In the final video, beauty blogger VashaNedasha will show you 2 luxurious shades of sandy Sahara Crystal nail polishes from. Experiment and always remain beautiful!
Every girl should have well-groomed nails, so designers create original prints, designs and images to decorate nails all the time. But who would have thought that a sugar manicure would appear. A nail treated with this technology becomes velvety - to the touch and visually reminiscent of velor fabric.
Of course, nail art masters do not cut out pieces of their velvet, much less attach it to the nail. Everything is much simpler - there is special velvet sand.
We suggest making a velvet design with your own hands, at home, but first you need to understand who will suit this method of decorating their nails, and who would prefer something else.
Sugar sand manicure using acrylic powder
If it was not possible to find specialized melange powder or there is no way to purchase it, then you can find a replacement. An excellent alternative would be colored or transparent acrylic powder with the addition of various pigments, which is used for nail extensions.
This replacement is almost equivalent. Melange is a little larger, but acrylic powder is finer, and you can sprinkle it on even the thinnest lines. This material holds on nails as firmly as melange. When performing such a manicure, you can use gel paint or gel polish to draw patterns.