The skull is a popular element that modern designers, stylists and beauty experts use very widely. The nail industry has not ignored this trendy image, so it can often be seen in the works of the best nail art masters.
Our article will tell you how to do a manicure with a skull. Let's look at a few ideas made using different techniques.
Real trend
Gone are the days when only informal teenagers rebelling against stereotypes could decorate clothes, hair, accessories and their own nails. Today you can see skulls in the everyday collections of fashionable youth brands (for example, Zara and Pull-and-Bear).
You may be interested in: How to level a nail plate with a base: technique, description, tips and photos
This element has even conquered the world of high fashion. For example, Alexander McQueen, a true art hooligan and a big fan of the gothic style, decorates clutches and belts, gorgeous shoes and ankle boots, and even evening dresses with sparkling grinning skulls. However, he is not the first who decided to take an idea that once seemed gloomy and unpleasant in a new direction: Vivienne Westwood, whom he adored, did this at the end of the last century. There are a huge number of similar examples.
You might be interested in: Manicure and pedicure courses: training with a certificate. The best manicure and pedicure training school
The sugar skull, which Mexico gave to world culture, deserves special mention. The celebration of the Day of the Dead in many Latin American countries is a real carnival, colorful and joyful, with luxurious costumes and sweets. Sugar skulls decorated with flowers and sparkles are a constant attribute of the festival.
It's no surprise that nail aestheticians have also fallen in love with this trendy idea. When the skull first began to come into fashion, everything had to be done manually, but today manufacturers of nail art materials offer many ready-made solutions that can make the work much easier.
Skull in manicure art
Let's start with the styles in which this element will look appropriate. First of all, of course, it is worth mentioning rock, glam rock and grunge - styles that are characterized by the use of black, metallic elements and rhinestones. Today these trends are very relevant; this nail design is chosen not only by the girlfriends of musicians and bikers, but also by the most ordinary girls.
The image of a sugar skull is characteristic of ethnic style and all sorts of variations on the boho theme. Such designs are characterized by the use of a bright palette of colors; often the design is complemented with rhinestones or bright kamifubuki.
A manicure with skulls and rhinestones looks organic on both short and long nails. But if you opt for extreme lengths and aggressive shapes, the question of appropriateness arises. The age-old shape, arched almonds and stiletto nails decorated with skulls are not the best idea for the office or theater. But at a rock concert or a party in a nightclub, you will probably hear a lot of compliments.
As for the color scheme, the choice is unlimited. Skulls look interesting not only against a jet-black background, but also in the company of bright yellow, dark blue, purple and even soft pink. The main thing is that all design elements and shades are harmoniously combined with each other.
Spiders and web
Another characteristic element of the holiday will be spiders and cobwebs. You can draw them yourself using a regular gel pen or black acrylic paints. The cobweb can appear on one or all nails. This design will look spectacular on a moon or French manicure.
Preliminary stage of work
It is advisable to decide on a design before starting work. But whatever it is, you need to start working with preparing your nails.
Degrease the nail plates, carefully move the cuticle with an orange stick or a sharp cutter. Remove the pterygium, cut and sand the cuticle. Give the nails the same length, if necessary, extend the broken corners. Make sure the shape is the same. Polish your nails with a buff or soft file. Apply primer and let it air dry. Cover your nails with a base, trying to form a smooth surface, and dry in a lamp.
Using sliders and stickers
This is a great solution for those who are not confident in themselves as an artist. Just choose a ready-made design.
Cover your nails with colored gel polish and dry in a lamp. Cut out the picture, leaving as little background as possible, and place it on a cotton pad moistened with water for a few seconds. When the backing gets wet, the slider will easily detach from it. Pry the picture with tweezers and place it on the nail. Level and press, smooth the surface. To do this, you can use an orange stick or a silicone brush. Remove any water droplets with a lint-free cloth and cover the skull slider with a thin layer of base. After baking, evaluate the result: are there any folds sticking out or any bulges? You can remove small errors using a buff.
All that remains is to cover the design with a top coat – glossy or matte, as you prefer.
Foil for manicure
When deciding on the idea of a manicure with a skull, you should definitely pay attention to decorative foil with a pattern. There are many options on sale that are suitable for our purposes.
This material is a thin film with a coating. You can print the decorative layer using a special glue for foil or the stickiness of the top, but it is important to do this immediately after polymerization, before the top has cooled.
First apply a varnish that matches the color. Then - a layer of top. Taking your hand out of the lamp, press a piece of foil to your nail, carefully align it, and press it with your finger. Tear off the backing with a sharp movement. The design will remain on the nail. To make it last longer, apply another layer of topcoat.
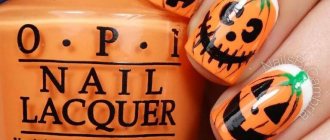
Halloween manicure for short nails
For short nails, any Halloween manicure with a small pattern or a face, as well as an abstraction, is suitable.
Drawing
This is a complex technique that requires drawing skills, a thin linear brush, a round or flat brush, and black and white gel paints.
It is better to draw a skull on a contrasting background, for example, on black. First, the so-called underpainting is done - the outline of the skull. Draw the base and paint. White paint is used for this.
To get a three-dimensional image, you will need several shades. It is better to cover the skull with a light gray translucent color. To do this, mix a small drop of black and white paint and dilute with a base (or top). You will get a material similar to watercolor varnish. Cover the skull figurine with it.
Use black paint to draw the eye sockets and mouth cavity. Use white to add highlights, clarify the outline of the teeth a little. Select the cheek bones.
Add shadows with black paint: under the cheekbones, in the nose, under the brow ridges.
You can decorate a black manicure with a skull with gold leaf, opals or rhinestones. Using black velvet sand can highlight some nails.
Step-by-step Halloween manicure with photos
Step 1
We process the nails and apply a matte base.
Step 2
Paint the second, third and fifth nails with black polish.
Step 3
Apply yellow, lilac and silver glitter varnish to the sponge.
Step 4
Using a gradient technique, cover the remaining nails with a sponge.
We'll get it like this:
Step 5
We paint black nails at the base of the nails with varnish with lilac sparkles.
Step 6
Using a brush, paint the outlines of ghosts on the middle nails with white and black varnish.
Step 7
Draw a white smile on a black background, and a black smile on a white background. Using a special tool we make the eyes of the monsters. We should get two cute faces.
Step 8
Using a thin brush, paint a cobweb and a spider on the thumb using black varnish.
Step 9
The final stage will be applying decorative stars and covering the nails with a fixative.
You should have a simple Halloween manicure that will go with many outfits.
The ideas for Halloween manicure are inexhaustible, it all depends on your imagination and costume.
Skull made of rhinestones
If you want to do a rhinestone skull manicure, choose the smallest crystals you can get your hands on. Clear, silver or petrol ones will work, but all black ones might be a great idea. By and large, you can make a skull from rhinestones of any color.
The smaller the stones, the clearer and more detailed the image you can get.
First, coat the nail with varnish - contrasting or matching the rhinestones. After polymerization, lightly walk over the surface with a buff, then it will be easier to draw. Make a sketch - a sketch of the skull. You can use a liner or a simple pencil.
Paint the outline of the skull with a thick rubber base or clear construction gel. You can also use a liquid base combined with acrylic powder (transparent).
Using tweezers or a wax pencil, lay out the rhinestones starting from the middle of the pattern. If necessary, add small broths to match the tone. Dry the nail in the lamp for 1.5-2 minutes so that the stones set well.
Moisten a thin linear brush with topcoat without a sticky layer and carefully walk between the stones. Try not to get the top on the rhinestones themselves, otherwise they will lose their shine. Polymerize.
Popular varnishes for rocker manicure 2022 photos
You can't do without black polish if you decide to get a rock style manicure. Classic black color is an attribute of rock culture. Black nails, of course, will match the given image, but it is recommended to complement the manicure in every possible way. For example, silver or gold sparkles, rivets, chains, and small metal balls are perfect additions.
Drawings on the nails are also allowed, just keep in mind that white or red will be best combined with black polish. You can also take varnishes in metallic colors. Modern masters with experience do rock manicures with spikes - it looks very unusual, well corresponding to this culture. If you don’t like the crude symbolism of this style, but still want to do a rock manicure, then a black French manicure is a good option for you.
Stamping
This technique produces images with high detail and very fine, crisp lines. All you need is a suitable plate with skulls, a scraper (spatula) and a stamp.
If this is your first time using stamping, practice on tips before doing a manicure with a skull. It is advisable to choose a transparent stamp so that the image of the skull can be placed evenly.
Before starting the design, cover your nails with colored varnish, dry it and remove the sticky layer. Place a drop of contrasting varnish onto the plate and rub thoroughly with a spatula. Position the stamp and press down, then transfer the image onto your nail. Cover with top coat.
Volumetric decor
The next photo shows a manicure with a skull, for which ready-made decorative elements were used. They can be made of plastic, glass, metal. To fix such an element on the nail, use a special glue for rhinestones or a transparent sculpting gel. A regular base may not hold a relatively heavy element.
It is worth noting that nails with such a voluminous design may not be very comfortable to wear. But if you are used to designs with cone rhinestones or candy balls, there will be no problem.
Source
Halloween manicure master class
For a DIY Halloween manicure we will need:
• black, white, lilac, yellow or orange nail polish;
• varnishes with lilac and steel sparkles;
• special nail art tool for drawing circles on nails;
• nail base;
• sponge for applying varnish;
• nail fixer with glitter effect;
• a very thin brush for painting on nails;
• silver stars for nail decoration;
• nail polish remover solution or a special product in a pencil to remove excess nail polish.