When going to a party, corporate event or wanting to diversify their manicure, women prefer designs with rhinestones. Imitation of precious stones looks stylish and expensive, especially if done carefully and tastefully. The correct placement of rhinestones on the nails will make the manicure elegant, and errors in the configuration of decorative elements can ruin even the most beautiful design. How to work with stones that imitate precious ones, what are the features of their use on various surfaces - this and much more in the article below.
Types of rhinestones for nails
Rhinestones for nails are a decorative element that imitates precious stones. The cosmetics industry today offers nail art masters and their clients many types of products made from different materials, different configurations, colors, and textures.
Based on the material from which the pebbles are made, they are classified as follows:
- plastic. Inexpensive, easy to use. Disadvantages: unpresentable appearance, fragility to wear;
- glass. They shimmer better than those described above, but cost a little more;
- zirconium. Decor made from cubic zirconium (not to be confused with natural stone - zircon). Expensive, they look as impressive as possible due to their reflective properties: many facets of the stone allow the manicure to shine;
- faceted artificial crystal. The most famous jewelry made using this technique are Swarovski Kristal Pixie crystals. Crystal chips will decorate a monochromatic, colorless design and will become an effective addition to the gradient;
- natural rock crystal. The most expensive material, used for inlaying marigolds in elite salons, decorates the manicures of show business stars and high-ranking persons.
Comment! Choosing the most expensive product is not always clearly beneficial.
In the case of artificial and natural crystal chips, no one will distinguish a natural creation on the nails from a well-cut synthetic analogue.
Nail pebbles are heterogeneous in shape, which affects the ease of working with decorative elements and the practicality of wearing. The decor is available in the following configurations:
- round form. Classic broths are a component of Kristal Pixie crystal chips from Swarovski;
- flat-round. Visually they resemble half of a small ball: the convex side shines with small edges, the flat side allows you to firmly attach the pebble to the nail plate;
- fully faceted. Small elements, tightly seated by the master on the adhesive material.
In addition to the types described above, there are marigold stones that have the outline of a rhombus, square, circle, polygon, etc. in a planar projection. Many craftsmen consider cone-shaped stones that repeat the shape of a peak with a pointed tip to be the most effective.
Comment! A beautiful arrangement of rhinestones on nails is determined by the artistic abilities and taste of the artist, the shape, size, and material used to make the decor.
Sizes of rhinestones for nails
Lines of stones from different manufacturers offer decor of various sizes.
Swarovski crystals have the widest possible range of decoration diameters: from 0.8 mm to 9 mm, but the latter are usually used not by nail studio artists, but by textile decorators.
The average size of rhinestones for gel polish, which are most popular among visitors to nail studios, is about 3 mm. The arrangement of small decorative particles is easy to vary; large ones are usually placed in the center of the plate.
Attention! Large decor visually makes the nail smaller and draws attention to the shortcomings in the structure of the plate. Small pebbles are suitable for those with marigolds of any length.
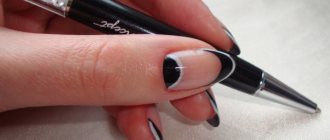
Black and white manicure with a pattern
In addition to the fashionable abstract pattern and zebra print, there are traditional patterns. For example, restrained floral patterns, floral patterns, drawings similar to black and white illustrations, paintings in a graphic style.
How to glue rhinestones on nails
Laying out rhinestones on nails requires that the artist has the materials to secure them. Depending on what the specialist is working with: natural or strengthened, extended nails, the means by which the nail expert attaches the pebbles vary:
- Manicure glue - pebbles are placed on this product when working with natural nails and regular varnish. Two-component adhesive takes longer to dry, but if the decorative element is placed incorrectly, it can be moved. One-component (“superglue”) dries instantly, making it impossible to correct the design if the pebble is placed incorrectly on the nail.
- Base and top coat. The properties of the base and top ensure adhesion of the products to the nail surface and decorative coating. It is advisable and convenient to use compositions for the purpose of gluing decor: you can change the arrangement of elements on the nail plate as much as you like. Rubber-based products are considered preferable for nail inlay: they are quite viscous and can hold large stones.
- Gel. It is used to secure large elements because it has a viscous texture. If rhinestones are laid out on the entire nail, no gel is used: the stones “sink” in a large amount of a high-molecular composition.
Black and white manicure ideas
Unusual jacket options, black and white graphics, as well as the most fashionable print of this season - a design in the style of a black and white photo or animal print. With the addition of shine, in ombre techniques, marble, matte/glossy, in “different handles” manicure and in combination with “bare” plates - in all varieties it will look unusual and attract attention. Matte is especially suitable for short plates, and on long nails you can afford a complex design.
What is the best glue for rhinestones on nails?
The choice of adhesive depends on the type of stones. Nail art masters recommend attaching large pebbles with one-component superglue: it will quickly adhere to the surfaces, allowing you to avoid moving the decorative element. In this case, the exact location of the rhinestone is thought out in advance, since it will not be possible to adjust the design.
By gluing many small pebbles, forming a pattern, drawing, or inscription from them, they use a two-component adhesive, which allows you to change the location of the decor.
Comment! If the decorative stones are translucent, then the glue for rhinestones on nails must be transparent, without color.
Black and white matte manicure
The matte surface favors not only geometry, although it undoubtedly does. It is in black and white that a glossy design on a matte nail looks elegant, and intense shine – especially silver. Simple drawings and graffiti, silver and golden foil will not let brave girls get bored.
How to take rhinestones for nails
Coating nails with gel polish with rhinestones and inlaying natural nails requires the presence of a manicure tool capable of carefully picking up one or more crystals:
- thin tweezers;
- orange stick;
- toothpick;
- moderately sharpened wax pencil;
- thin brush.
Comment! When performing an inlay manicure, wooden utensils and a brush must be wetted - dipped in water for a few seconds.
Beautiful black and white manicure
Here we need to use the dramatic possibilities of this contrast: golden/silver smiles, lunar space, geometric patterns. For example, a framed smile looks elegant and sophisticated in combination with a black and white zebra print.
How to beautifully put rhinestones on your nails
Creating rhinestone designs on your nails requires concentration and skill. Nail art masters recommend that beginners first hone their skills on training tips or any substrate.
Using a thin brush dipped in an adhesive (glue, gel, top, base), draw the outline of the desired design. After this, pebbles are “placed” on the marked lines and points.
Simple designs are laid out on nails with rhinestones - geometry, abstraction, chaotic arrangement, for example, with Swarovski crystals or more elaborate patterns and complex lines.
Black and white manicure for different nail lengths
Short
An interesting black and white jacket, where a smile is created due to glossy varnish along the edge. Or a lunar manicure, where the lunar space in the form of a triangle is highlighted in black - this will visually lengthen the nail. You can make a complex dot pattern along the hole. Marble manicure is also suitable for short nails. Like the “different handles” design, complemented by cute designs, with alternating black and white backgrounds and designs. Experiment with spider gel, spots, strokes, dots.
Long
This is where a complex animal print or floral design with transitions will fit well. Allow yourself an extravagant jacket on very long plates - wide, different on different hands, complemented by rhinestones and glitter. A gradient, a combination of several techniques and techniques on different fingers will look elegant. For example, marble, rhinestones, glitter, silver or gold lines, negative space, geometry.
How to glue rhinestones on nails
Inlay requires the master to have the following tools and means:
- adhesive (gel, top, base, glue);
- stone picking tools;
- rhinestones of the desired size and shape.
How to glue rhinestones onto gel polish
To attach decorative elements to nails coated with gel polish, you must:
- Apply sequentially, drying each layer in a lamp: base, colored gel polish (do not remove the sticky layer).
- Using a brush dipped in the base coat, mark on the nail plate the places where the rhinestones will be attached.
- Using the selected tool, place the pebbles at the desired points, slightly pressing them into the surface. Dry in a lamp.
- Using a thin brush, pick up a small amount of the base product and circle the perimeter of each pebble. Dry.
- Cover with top coat those areas of the plate that have no stones on them and place them in the lamp. After drying, remove the sticky layer.
How to glue rhinestones onto regular varnish
The decor is attached to regular varnish using glue in the following order:
- A colorless base is applied to the nail.
- After drying, the plate is coated with decorative varnish.
- On the dried surface, use a thin brush to mark with glue the places where the decor will be.
- Using a wax pencil or wooden stick, the stones are placed on the nail surface.
- To secure, apply a base layer.
How to attach rhinestones to a matte top
A matte top requires a more careful application of the adhesive, since the glue, base, top, and gel will be visible on a non-shiny coating, even if transparent.
In this case, the manicure is done according to the classic scheme: base-gel polish-matte top, after which an adhesive is applied to the dried nail, followed by pebbles.
Fastening technique
An original and spectacular manicure with rhinestones invariably emphasizes your individuality and, of course, cannot help but attract the attention of others. True, it is not particularly comfortable to wear: pebbles cling to hair and various surfaces. But there’s nothing you can do about it, you have to choose - either beauty or convenience!
For beginners, it often happens that rhinestones, after sticking, lose their shine or simply come off. To avoid these troubles, you need to attach the crystals to your nails correctly, following a few simple rules.
General recommendations
How to glue rhinestones so that they don’t fly off - you need to follow all the details of fixation. First, you should do a classic manicure, prepare the nail plate and coat your nails with varnish. Then you can move on to the creative process... To securely attach rhinestones, craftsmen use two different methods:
- with special glue;
- straight to gel polish.
Before moving on to a detailed consideration of each of them, let's focus on general recommendations. So, in order to glue rhinestones, you need to do the following:
- mark the place where the rhinestone is attached, leaving a drop on the nail with glue or colorless varnish;
- hook the pebble and place it on the droplet - you can use tweezers, a magnetic or wet pointed stick, a needle or a toothpick as a tool.
- press lightly and let it stick;
- Cover its base (but not the surface!) with a sealing layer of topcoat.
On glue
There are two ways to attach decorative elements to the nail plate using glue.
The first is to apply it pointwise and then fix the rhinestones. The second is to lubricate each pebble with an adhesive. You can also combine them. It’s up to you to decide which is best; it all depends on personal preference.
Attention! There is no need to experiment by trying to glue rhinestones with regular “Moment” type glue. Nothing good will come of this - most likely, the outer shell of the crystal will dissolve and it will lose its shine. Special glue is quite inexpensive and can be bought at any specialty store.
Professionals recommend thinking through the future design in advance and preparing all the necessary tools and materials. There is no need to list them here - you will need the same thing as for a regular design using gel polish plus rhinestones and a topcoat without a sticky layer.
So, we have everything ready, now we can get started. It is important to follow the entire process step by step:
- Wash your hands thoroughly, then dry and disinfect them (for example, with alcohol).
- Carry out the necessary hygiene procedures: push back the cuticle and clean the nail plates with a buff, carefully removing the glossy layer.
- Remove dust with a brush and wipe your nails with a napkin (lint-free!)
- Degrease your nails with a dehydrator or other product you usually use.
- Apply the base in a thin layer over the entire surface of the nails (including the ends), then dry in a UV lamp for 2 minutes.
- Now you can proceed directly to the chosen design: If this is a manicure with gel polish, apply it in two or three thin layers (the thinner the better), not forgetting the ends of the nails. Dry each layer slowly (at least 3 minutes) in a UV lamp.
- Nails where there are no rhinestones can be immediately wiped with a degreaser, applied topcoat, dried and removed the sticky layer - we have them already ready.
- Now let's move on directly to gluing the rhinestones. You need to act carefully and quickly enough - the glue hardens in a matter of seconds and there will be no opportunity to correct anything later.
- Gently press the rhinestones onto the nail plate. Which method and tool is up to you to choose. I use tweezers to pick up the pebble and use a toothpick to make dots of glue on the nail. But in general, there cannot be exact instructions here - whatever is more convenient for you.
- Wait for the glue to dry. The drying time is indicated by the manufacturer on the bottle; Usually 1 minute is enough.
- Take the topcoat without a sticky layer and use a brush to apply it to the free areas of the nail plate. It is convenient to apply the top around the base of the rhinestones with a toothpick.
- Dry the entire manicure in a UV lamp.
Ready!
Attention! There is no need to cover the surface of the rhinestones themselves with topcoat! The finishing coat will hide their shine and the stones will become dull and cloudy.
As you can see, there is nothing particularly complicated in this procedure. However, when laying out a pattern, you need to be extremely precise, because the glue instantly attaches the decorative elements, preventing the pattern from being adjusted.
For gel polish
This method has one undeniable advantage - you will have time to adjust or correct something.
So, you have already done a manicure with gel polish (if not, see points 1 - 7 in the previous block) and have completely finished working with your fingers, which will not have rhinestones on them. Let's move on to the next stage:
- Apply top coat to the nails where you will be gluing the rhinestones, but do not let it dry.
- Place the pebbles on the top with a magnetic stick or tweezers. In this case, each element must be pressed in a little so that it seems to get stuck in the coating.
- Apply the decor sequentially, starting from the middle of the nail to the edge. The arrangement of elements can be easily adjusted.
- If the rhinestones float away from the desired place, you can add a little acrylic powder to the coating (the easiest way to do this is on a palette) - it will become thicker.
- After finishing with one finger, dry it and move on to the next nail.
- After drying, you need to take a thin brush and fill all the gaps between the rhinestones with the top coat, tracing each decorative element at the base, but without touching its front surface. This way we will securely attach each pebble to the nail plate and their shine will not fade.
- Finally, dry the entire manicure in a UV lamp.
The shining decor is ready!
Important! After gluing the rhinestones, it is better to use a finishing coating without a sticky layer - otherwise, when removing it, you can move the stones or damage their surface.
Video instruction
Of course, the methods for gluing rhinestones described above can be supplemented or modified, for example, using a base instead of a top. I suggest watching the following video, in which the master shows how to glue rhinestones onto gel polish in four different ways:
How to remove rhinestones from gel polish
The first step in removing old manicure with pebbles is removing the decor.
Beginning self-taught artists sometimes refuse rhinestone patterns on their nails due to fear of difficulties when removing the decor. Stones are removed:
- wire cutters, if we are talking about large elements;
- file;
- cutters.
Nippers (tweezers) are not used by workers, but by dull ones that cannot be repaired. The new tool will quickly lose its sharpness due to the aggressive material of the stones. Use tweezers to carefully pry up the decorative element, removing it from the nail surface, after which the layer of gel polish is filed off with a file.
If you don’t have unnecessary pliers, you can pry off decorative elements with a hatchet tool. No effort is needed to avoid injuring the nails.
Using a manicure cutter, at low speed, pry up the pebbles from the side or file them off from above, after which the nail is filed down using a nail file.
More detailed techniques for removing decorative elements from nails are described in the videos below.
Blue manicure - features
In addition to yellow and gray, the most fashionable color will be the classic blue color and its shades not only in manicure, but also in clothing. And since this color has become a trendy trend, many modern girls dream of this manicure color. A blue manicure with or without a design can have a muted, deep and quite bright shade.
Fashionable tones include: sapphire, indigo, sea green, ultramarine and electric blue. These are the most popular manicure shades among modern young girls. But, when they want to emphasize femininity and add fresh notes to the image, they choose light shades of blue.
In addition to color, it is very important to choose the decor for your nail design. The most expressive and attractive ideas for such a manicure are obtained with sparkles, rhinestones, foil, confetti and other nail design materials. Which manicure to choose in order to match fashion trends and refresh your image - about this in our article.
Step-by-step manicure with rhinestones at home
Drawings with rhinestones on nails at home are much easier to do than images drawn with a brush: you don’t need any artistic skills for this.
For a design with inlay you will need:
- black and red varnishes;
- manicure tapes;
- nail glue;
- thin brushes;
- rhinestones;
- fixative
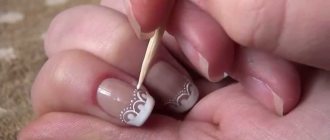
Instructions for creating a nail design with rhinestones are presented step by step below:
- Cover your nails with red varnish and dry.
- Glue the manicure tapes into a triangle so that its base coincides with the base of the nail.
- Use a thin brush to fill the space limited by the ribbons with black varnish. Dry.
- Apply a small amount of glue with a brush (the area of the applied product should not exceed the area of the stone).
- Place the rhinestone on the nail, pressing it slightly with a wooden stick.
- Cover the plate around the rhinestone with a transparent fixative.
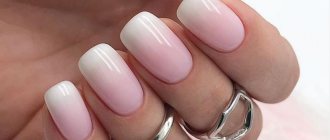
French in blue tones
Classically blue French is a blue-white, blue-beige color scheme or transparent varnish as the main one and blue for drawing the edge of the plate. Such a modest design can be diversified with a small amount of rhinestones along the border of the colors.
A dots-style French jacket looks very elegant and expressive, since blue shades perfectly set off dots of any color - be it a restrained combination of white and lilac or a bright spring palette of green, yellow, blue and pink dots.
One of the most stylish types of French manicure is French manicure, which combines matte and glossy polish of the same shade, such as denim. This design will be appropriate for both evening and business style.
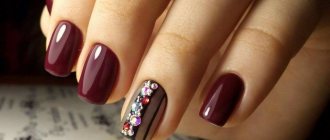
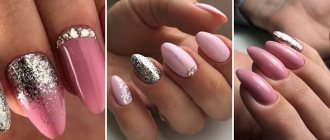
Schemes for laying out rhinestones
The location of the stones on the nails can be anything. If you do not have the necessary dexterity, experience and artistic abilities, you can use one of the standard schemes for laying out decor:
- Location at the base of the nail. This design is decorated with one or more rhinestones, a crescent is highlighted in a lunar manicure, and laid out in a “pyramid” - a triangle.
- Longitudinal lines: one or several (“shirt” - an arrangement of three or four stones at a distance from each other, like shirt buttons).
- Transverse lines: single or several.
- Diagonal.
- Simple geometry - shapes: rhombus, oval, triangle, heart.
- French manicure with rhinestone inlay.
Below are the simplest schemes that even a novice master can master.
Fashion trends for blue and white manicure in 2019
Most of the options proposed by the craftsmen for 2022 are made in a bright, almost neon blue color. It is considered stylish to apply such a monochromatic coating to all fingers of the hand, except two, which are decorated in white. For evening and formal designs, these white nails can be decorated with foil or inlaid with rhinestones and bouillons.
To create a background, camouflage bases are used, which are used not only for color, but also for leveling the nail plate.
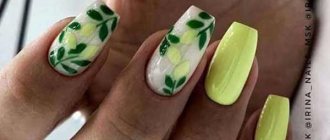
Floral arrangements can be complemented with monograms along one of the sides of the nail. The main requirement for such designs is not to overload them with a large number of elements. The compositions should look very delicate and ghostly, more like a hint of a flower, without precise drawings.
The photos of the designs above show a variety of nail design options in combinations of blue and white. At any time of the year you can choose a winning, original design in these colors.
Don’t forget that this manicure goes well with sportswear, denim, and office style, but is not suitable for those who like brown shades in their wardrobe. Although there are no strict prohibitions on manicure and, if desired, such combinations can be allowed.