How to make three-phase gel polish:?
Gel polish is exactly what you need if you are tired of repainting your nails every 3-4 days. Thanks to the special composition, you will get the perfect manicure, because gel polish combines the advantages of regular varnish and artificial nails. The application procedure will not take much time, but the result will please you from 2 to 4 weeks. This coating does not lose its appearance, does not fade, does not chip, and at the same time strengthens your nails.
Fashion does not stand still, the variety of colors is constantly expanding, and the quality of varnishes is increasing.
Very interesting among the new products are a variety of jelly gels or “cat’s eye” coating.
Brief overview of varnishes
According to their structure, varnishes come in three types:
- single-phase;
- two-phase;
- three-phase.
If you decide to choose a single-phase gel polish, then its application is not considered difficult. All layers, first – base, second – modeling, third – finish, were combined in one bottle of gel polish.
The two-phase structure is a little more complicated. Here, on the prepared nail we apply a base layer of varnish, followed by colored gel polish, which acts as the final layer. For this procedure, you should purchase two separate bottles.
The three-phase system already combines three main and irreplaceable components, and they are all complementary to each other. So, it contains:
- Strengthening base gel.
- Colored coating.
- Protective top - gel.
It is thanks to the “top” that the nails are reliably protected from the aggressive influence of the external environment.
Based on the multi-layer nature and properties of each component, three-phase gel polish is an excellent solution for strengthening and beautiful appearance of your manicure. Gel polish will not chip or lose color saturation, which cannot be said about regular polish. It is worth noting that three-phase gel polishes are absolutely odorless, which makes them safe and non-toxic for our body.
Step-by-step application instructions
If you are tormented by doubts about whether you can independently do the same neat, beautiful manicure as in a salon, then we suggest that you carefully study the detailed instructions. We will tell you how to properly apply single-phase gel polishes and what you will need for this.
- Performing a manicure begins with the usual procedures. Remove the old coating and give your nails the desired length and shape.
- Treat your nails with a manicure buffer with an abrasiveness of 800 grit, carefully removing the top layer.
- Soak a cotton pad in degreaser and wipe your nails thoroughly. If you do not use it, the coating will lie unevenly and will not adhere well.
- Gently push back the cuticles with a pusher. You can use a plastic or metal tool.
- Carefully painting the nail plate and especially its tips, apply the first layer of gel polish. Try not to touch the cuticle and periungual fold.
- Dry the varnish in an LED or UV lamp. In the first case – 1 minute, in the second – about two.
- Before applying the second coat, push back the cuticles again to ensure a flawless manicure.
- Just as carefully, paying attention to the ends, apply a second layer.
- Use the lamp again.
A beautiful and long-lasting permanent manicure is ready, all that remains is to apply a special oil to the cuticle to soothe and soften it. As you can see, applying a single-phase coating is quite simple, which means you can cope with this task perfectly. We invite you to supplement your acquired knowledge with a step-by-step video, where you will find a visual demonstration of the described technique for applying single-phase gel polish.
Performing a manicure with three-phase gel polish
Let's take a closer look at three-phase gel polish and how to apply it to the surface of the nails.
Preparation
Preparation plays an important role in applying a manicure and takes place in several stages:
- The first thing you need to do is get your nails in order, remove the cuticle, make the desired nail shape and file off the top glossy layer.
- The next step is to thoroughly degrease the nails using a special product.
It should be noted that if you have oily hand skin, then repeat this step twice to maximize the adhesion of the layers. The degreasing procedure is carried out so that fungus does not grow under the coating, invisible to the naked eye.
- Next, we apply a more gentle acid-free primer.
You need to refrain from acidic products, as they have a specific, not very pleasant odor and penetrate into the deeper layers of the nail. This layer is designed to ensure strong adhesion of the nail plate to the selected varnish. The primer dries within 20 seconds, without using a UV lamp.
Performing a manicure
The next stage, manicure, takes place in several steps:
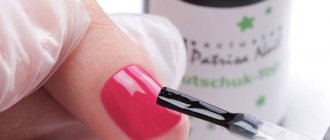
- Applying a gel base layer.
Apply the base thinly and evenly over the entire nail plate, including the free edge of the nail. A thin layer of base, like all subsequent layers, will be most appropriate. Dry in a UV lamp for 2 minutes or in an LED lamp for 30 seconds.
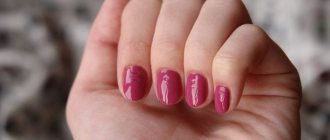
- Now let's move on to the most interesting part - the color coating of our nails.
At this stage, the first color layer should be as thin as possible. A thick coating of colored gel polish can lead to the formation of bubbles or waves when interacting with a UV lamp, which we absolutely do not need. If your layer is not dense enough, apply a second layer of colored gel polish (don’t forget to seal the end of the nail). If you ignore this procedure, soon expect chips and cracks at the ends of your nails. Dry in a UV lamp for 2 minutes or in an LED lamp for 30 seconds.
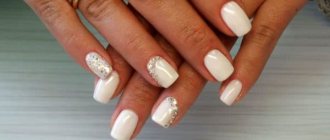
- Further, at your request, you can apply decor, be it artistic painting, sparkling rhinestones or iridescent sparkles.
After decoration, the manicure goes into the next form.
Step-by-step technology for gel nail extensions
Step by step gel nail extension
as follows. Stage
the first, preparatory, consists of disinfecting hands, removing
cuticles in any usual or convenient way. Nail surface
degreased for strong adhesion and then sanded to avoid
peeling. The edge of the nail is filed and given the desired shape. Each layer of gel
must be dried under a special ultraviolet lamp. And this,
in addition to its main purpose, it helps to avoid fungal infections in the future
diseases. There are three-phase and two-phase nail extension systems
gel. Gel extensions are carried out using a two-phase and three-phase system. Each of them consists of a certain number of components, which has its own purpose. For example, in a three-phase system, the first layer is responsible for adhesion of the nail plate to the artificial material. The second layer models the nail, and the third provides strength, creating a smooth, shiny surface. In a two-phase system, one component is used for modeling and adhesion, and the second for strength. There is also a single-phase system in which the gel performs all of the above functions.
Beautiful manicure, well-groomed nails
The step-by-step technology of gel nail extension involves applying two or three layers of gel, each of which is dried in turn under an ultraviolet lamp. Sometimes when drying under a lamp, a burning sensation occurs. Then the procedure is suspended and they wait until all symptoms disappear. The extension process ends with nail design. The entire gel extension process takes up to three to four hours and lasts up to two weeks.
From my experience, I know that a real professional master takes an hour and a half, and if there are complex patterns on the nails, it takes two hours. Correction, which is carried out after ten to fourteen
days after extensions, allows you to “forget” about manicure for a couple of months. Do you want the coating to last long? On the day of extensions, you should not do housework: washing dishes, hand washing, replanting flowers. Because all these things will have to wait until “tomorrow”, when the nails become “reinforced concrete”.
Gel extensions, like all cosmetic procedures, also have unpleasant consequences.
- Firstly, expansion is a rather labor-intensive and lengthy process that requires considerable costs, including financial ones.
- Secondly, nails under the gel do not “breathe” at all, which will subsequently require long-term treatment and recovery with the intake of vitamins and special procedures.
Step-by-step technology for gel nail extensions often causes unpleasant sensations, which depend on the threshold of sensitivity and professionalism of the artist. Despite the smooth and dense coating, gel nails are more fragile than acrylic nails. To avoid injury to the nail, you can cover it with a biosculpting gel, which half consists of natural resins, natural vitamins and proteins. The presence of such materials allows the nail to “breathe”, and after restoration, such nails look healthier and stronger.
154
Completing the composition
Now we have come to the end of our procedure, which also takes place in several steps.
- Finish coating.
The coating is applied in a regular layer with the obligatory sealing of the end of the nail. If you have a manicure with rhinestones, we recommend applying a top coat in two layers - this will provide maximum protection to your convex jewelry. Then thoroughly dry each layer of applied varnish in a lamp. Hard and strong nails are guaranteed.
- Remove the sticky layer from the top coat.
For this procedure, it is best to use a cotton pad soaked in a special liquid to remove stickiness. But if you don’t have one at hand, you can use regular alcohol - the result will not disappoint you.
After all the procedures have been completed, your coating is ready. Three-phase gel polish, with careful handling of manicure, will be worn for several weeks, maintaining its original appearance.
By spending a little more time on a professional manicure with three-phase gel polish, as opposed to single-phase, we get a more lasting effect and better composition quality. Another positive feature of three-phase varnish is that it is easier to remove and does not stain the nail plate.
Application technique
The application of gel polish is carried out step by step in the following way: hygienic cleaning, degreasing, application of base, color layer, final layer. Each layer must be dried.
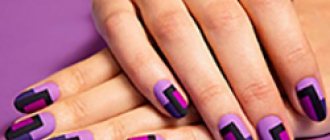
When applying color, it is important to follow a certain technique, which differs from applying simple varnish. There are two options for applying gel polish to the nail. In the first, the brush is placed just below the base (2-3 mm) of the nail and, under light pressure, goes to the base, then to the tip. Next, the side parts are painted from the root, after which it moves along the form to secure the end of the nail.
In the second option, on the contrary, a drop of varnish is placed 2-3 mm from the base, the brush moves upward, then comes off and distributes the varnish over the right and left parts of the nail. The middle is painted over with the remaining varnish. The undoubted advantage of gel polish over simple polish is that it does not dry out and can be leveled for an unlimited amount of time.
Removing varnish
To properly remove three-phase gel polish, we will need:
- 10 - 12 cotton swabs (we recommend using a cotton base, as it has a better effect on the nail), a couple of orange sticks and 10 pieces of foil approximately 10 by 10 cm.
- Gently moisten the sponge in gel polish remover, cover the nail with it and wrap it in foil.
- We wait about 15 minutes.
- We remove the foil and cotton wool (sponge) from the finger that was the first to wrap, remove the gel polish with a stick (the coating should crumble a little from the impact of the stick).
- Remove the remaining manicure elements with a small nail file.
If you are not going to apply a new manicure right away, it is useful to treat your natural nail with cuticle oil. In case of applying a new manicure, the oil completes the manicure procedure and is applied immediately after removing the sticky layer.
Main differences
What does single-phase application system mean? Simply put, this is a three-component product, which includes a base, color and finishing layer. With its help you can do a quick manicure, and such a bottle will take up little space in your cosmetic bag.
A manicure using this gel will last about two weeks. But not all nails accept it, and accordingly, the durability of the coating may be less. A trial application will determine if the product is suitable for your case.
What is three-phase gel polish? This product consists of three different bottles:
- base;
- color;
- fixative
The base coating has the same principle of operation as double-sided tape. At the same time, it strengthens the nail and holds the color well. The fixative performs the function of fixing the color and protecting it. The fixing layer can be matte, glossy or have a scent that remains on the nails after drying.
Three-phase gel is a suitable option for those who like to decorate their nails with stickers.
Photo of nail polish coating
Even more photos at the link: Gel polish photo.
Reviews
To fully understand the effectiveness of such gel polishes, we have prepared real consumer reviews for you. Many companies produce these products, let's find out what the girls will say about the most popular ones.
Reviews of single-phase gel polish “TNL”
Marina, 25 years old
Just recently, a master explained to me what simplified gel polish means. She described all its advantages. Their salon uses TNL products, I wanted to try it. Indeed, the procedure went a little faster than usual, the result was almost the same. Unfortunately, my nail plates are thin in themselves, so in everyday life they began to break quickly with this varnish.
If several layers of gel, color and top strengthen them, make them thicker, denser, then two layers of single-phase do not play a big role in strengthening. The next time I went to the specialist, I chose a proven three-phase manicure. The main advantage is the duration. I didn’t notice any particular difference in the quality of the coating, but the main factor for me was the strength of the nails. Unfortunately, it was not possible to strengthen the nails with this remedy.
Answer: Each woman has her own needs, which she has the right to express to her nail art specialist. Single-phase shellac really has no effect on the thickness of the nail plates.
Anastasia, 29 years old
I have always used regular varnishes, because I always don’t have enough time to go to a hairdresser. I began to notice how my nails began to turn yellow and peel. They explained to me that the reason for this could be ordinary varnish, which contains many chemicals that destroy the nail plates. I purchased a kit for applying gel polish and spent a long time sorting out all the necessary materials.
I decided to try single-phase gel polish, because it was more affordable than the three-phase set. I chose the product and heard a lot of positive reviews about it. I was completely satisfied with the result, only after a week the gel polish began to peel off. The reason is not clear to me: either I made a mistake during application, or the quality of the product should be better.
Answer: Beginners often make minor mistakes, which affect the duration of the integrity of the coating. Perhaps you did not properly degrease the surface of the nail plates, did not seal the color well, or did not dry it with a lamp for a short amount of time. Take all these nuances into account the next time you work, watch the result.
Reviews of single-phase gel polish “Masura”
Yana, 31 years old
I regularly use the services of salons because I love to have beautiful, well-groomed nails. The master often tells me about new products in the world of nail art fashion, so I have tried on myself a large number of colors, decors, and coloring variations. A year ago, their salon purchased single-phase varnishes, and I happily allowed myself to try the new product. I was completely satisfied with the result. The color turned out rich and durable. I didn’t notice much difference between it and the usual shellac, but the cost of the service is much cheaper, and it takes a little less time. Now I cover my nails only this way.
Answer: Salons save money on separate purchases of top and base coverage, so the cost of the service is reduced and becomes available to more clients.
Olga, 32 years old
I do manicures at home, and often clients come who are physically unable to sit through a long procedure, stretching it out over two days. I decided to offer them single-phase coating with Masura varnishes. Everyone who agreed appreciated their benefits: durability of the coating and express work. By the way, during the purchase I was pleasantly surprised by the cost of the funds. In addition, there is no need to remove the sticky layer after them, and this also saves money and time. As a professional with 8 years of experience, I will say that I did not notice any particular difference between three-phase and two-phase coating.
Answer: Many manufacturers take women’s needs into account, so they create innovative new products that save customers’ time and money as much as possible.
Reviews of single-phase gel polish “Yoko”
Victoria, 30 years old
I do shellac manicures all the time. I noticed how my natural nails became very thin. I decided to take a month's break and restore them. After restoration, the master advised me to try Yoko single-phase gel polish. During application, the top layer of the nail plate remains, and for me this was very important, because even after a month my nails looked tired. After three weeks, we removed the coating, the original nails remained the same, even a little stronger, and this is a huge plus. Now I use only these products to minimize harm.
Answer: Many consumers noted that with a simplified coating, the top layer of the nail plate remains, and this has a positive effect on its structure.
Daria, 26 years old
After giving birth, I bought a manicure set for shellac, because there are no grandparents who will look after my granddaughter while I run to salons. I bought a few products to start with so I could figure it out myself. I listened to the reviews and took two colors of single-phase gel polishes – “Yoko” cherry, “Irisk” beige. Of course, the cost of both is very reasonable, and the first one is just pennies, so I decided to try it.
I won’t tell you for a long time, but after comparing the two after several unsuccessful attempts at application, I threw it away. You need to apply at least three layers to get a rich color. Bubbles kept appearing during drying. Its cost, of course, speaks for itself, but at almost the same price you can buy better quality products from other manufacturers.
Answer: Much depends on the party. Perhaps you just didn't get the best option.
Single layer gel polishes. What is single-phase gel polish
On store shelves there is a wide range of products we are considering, which differ not only in color, but also in the number of phases. This is where the question arises, what does single-phase gel polish mean?
By entrusting your manicure to a master in a salon, you can observe how layers of base, gel and top are applied successively to consolidate the result. This nail care technique is called three-phase because three different products are used during its implementation. Single-phase gel polish allows you to abandon the base and top, because its unique formula replaces these components.
Single-phase gel polish gray
Reviews about single-phase gel nail polish say that it has many advantages compared to three-phase. Satisfied customers note such advantages as a thin coating, which makes the manicure natural.
The base in the three-phase nail design technique has a dense structure, so the gel polish thickens the nail plate, which is especially noticeable if the nails are short. With a single-phase product this problem does not arise.
Drying the coating in a lamp
The difference between a manicure made with single-phase and three-phase varnish can be seen in the photo.
- Financial savings - a single-phase varnish costs a little more than that used in a three-phase technique, but its price is significantly lower than the total cost of salon manicure products.
- Space saving - instead of three bottles, only one is needed.
- Drying in an ultraviolet or LED lamp, unlike some conventional gels, which are suitable only for an LED lamp.
- Long lasting coverage up to 4 weeks.
But if there are so many advantages to using a 3-in-1 product, why haven’t all nail salons switched to this technique yet? It turns out that there are several negative aspects that distinguish single-phase gel polish from three-phase gel polish.
Durable coating
Using different products gives the artist a choice not only of color, but also of the composition of the product. Aggressive substances can be replaced with gentle ones at any time. In addition, a single-phase product will not be able to eliminate the unevenness of problem nails, which a thick base can do very well, building the correct architecture of the nail plate, and creating a complex design with stickers becomes impossible.
You need to decide which varnish to use to create a manicure at home, based on your own experience and the condition of your nails, but in any case, you should familiarize yourself with the correct technique for applying the chosen product.