Monograms on nails - photos of manicures and schemes for drawing mesmerizing curves
Beautiful hands are unthinkable without well-groomed nails and manicure. Untidy nails can negate all efforts to create a harmonious and effective image, which is why women have long sought to decorate them. Now there are many different techniques with which you can create a beautiful manicure. Among them, the developments of masters in drawing various patterns stand out.
Beautiful curls, which are often painted on nails, are called monograms among nail artists. Previously, the word “monogram” meant initials written in script. Now the meaning of the concept has expanded and it refers to numerous curls. It is worth mastering the technique of drawing them, as they are becoming increasingly popular.
How to draw monograms on nails?
There are 3 main ways to draw them: for the lazy and for fans of calligraphy. You can choose the right one depending on your desire, free time and artistic abilities.
- Hand painted. This method is a priority and is extremely highly valued, since it allows you to create unique small masterpieces on your nails, without being limited in any way. In addition, handmade work immediately indicates the highly qualified craftsman.
- Stamping is the application of images using special metal plates with a pattern. There are a wide variety of design options, you just need to find what you like.
- Stickers can be ordinary, adhesive-based. To work with them, just stick them on the surface of the nail and cover with a top coat. There are also thermal varieties that require more care and time. The presented range of options is not inferior to other methods of applying monograms.
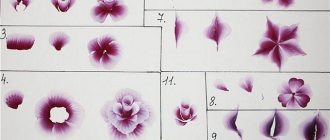
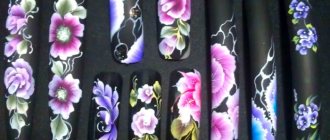
Training cards
For those who want to learn hand-painted monograms, there are special devices that allow you to master this difficult task in a short time. These are special training cards that can be downloaded to your computer and printed.
Then, armed with a brush and paint, you simply need to repeat the patterns on the workpiece. This method allows you to “teach your hand” and in the future it will be easier to create ornate designs on your nails. It will be possible to “peep” possible patterns in them, and based on them, show your own imagination.
Some useful tips
At first, you may think that the monogram design is very difficult to implement, but with practice, you will realize that you were wrong. You will very quickly learn to draw even complex patterns. And now we want to give you some tips that may be useful at the learning stage.
- First, try doing a manicure using regular gel polishes. If you decide that you want to continue creating monograms on your nails, you can purchase special acrylic, gel or watercolor paints to make the design more saturated and voluminous.
- Buy practice cards and give yourself drawing lessons. They can be bought or ordered in specialized stores. They are paper with examples of ornaments and designs printed on it. By repeating them, you will improve your skills and feel more confident. Training cards are the best assistant for those who are just mastering the art of painting nails.
- Stock up on brushes that are convenient for you to work with - purchase them in specialized stores or make them yourself, as demonstrated in the first lesson.
Features of the monogram design
Since a manicure using monograms is not too flashy, although here everything depends on the color combination, this method of decoration has become widespread. Previously, initials in the form of a monogram adorned only expensive items: jewelry, dishes, scarves, etc. Now this concept is much broader, largely thanks to the art of nail art. Nowadays the monogram in manicure is performed in several styles.
In this case, a classic jacket is made, on the sides of which beautiful ornate patterns are drawn. Every season is marked by new fashion trends. Once upon a time, such designs decorated very long square-shaped nail plates, but now the efforts of nail artists are focused on decorating short nails in this way.
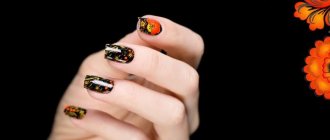
- Monogram in black
Black color is quite popular for drawing. This option often looks very contrasting and catches the eye, but does not lose its popularity.
The simplest option that you can do yourself is to apply a design using stickers. They are very easy to use at home, and the choice of suitable patterns is almost unlimited. To design a manicure, you need to make a base, most often transparent or colored. It is necessary for an even coating, good adhesion and increased service life. The selected pattern is glued onto it and covered with a transparent fixative on top.
This style is called fantasy decoration of nails with monograms. The options are limited only by your own imagination: the design covers only 1 nail or its edge, all the nails on the hand, etc. At the same time, the combined shades and design can be anything. It is believed that the most fashionable and original models are made in this style, and the result is in any case unique.
Manicure with a monogram: ideas for combining with nail trends
The monogram pattern is universal, therefore it can be combined with most familiar and original materials and techniques.
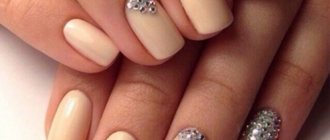
- Rhinestones and sparkles
A manicure is rarely complete without these materials, and even more so a monogram. Stones can be used in different variations: to be the center of the composition, from which all the curls originate, or to decorate the hole. But in this case it is easy to slip into bad taste, so there are reasonable restrictions - you should not use bright colors. Pastel or rich dark shades are more suitable, next to which sparkling stones will look elegant and sophisticated.
Sequins are more practical and are used more often. The process of applying them is extremely simple: the newly applied patterns are sprinkled with glitter on top using a special fan brush. The drawing is dried, after which you need to shake off the excess glitter. This option is very popular among women – the shiny pattern stands out charmingly on the glossy surface. Of course, this manicure is best suited for a festive event. But in winter and New Year's time it became especially widespread and popular.
- Velvet effect sand
Manicure ideas with monograms
This is a design that will never be the same. Whether you use diagrams or take a drawing from your head, there is always room for creativity before you. We invite you to get some inspiration by looking at photos with options for luxurious ornate nail art.
Basic lessons, detailed videos and photos with examples will help you master a new nail design technique. With just a little effort, you can create a manicure that will attract the attention of others. And two excellent videos will help you with this, in which you will find very detailed lessons on drawing monograms.
How to learn to draw monograms
Monograms are a stumbling block for many manicurists. I so want to beautifully draw these even, symmetrical and perfect curls, but my hand doesn’t obey, my brush is not the same and my material is bad... But others can do it so simply and subtly! Sound familiar?
Girls, I’m very glad that you finally decided to look for information on how to learn how to draw monograms. After all, it’s much easier to take a little time and read the advice of those who have faced the same problems than to get into trouble with them yourself, right?
In order not to be unfounded, I will show one of my designs from three years ago with monograms, and how I draw them now:
The difference, in my opinion, is obvious :) As you can see, you can learn everything on your own - I have not completed any courses in this area. The only question is how long it will take you. Personally, I resisted for a long time and did not want to take on their development, but the time has come, and I gave up!
What is the main conclusion I made , and what I want to advise everyone to do: even if they tell you what materials and what brush to use, they tell you about technique and brush pressure, you won’t get results without training! Yes, you will spend more than one evening of your free time on this and ruin a dozen tips - but only perseverance will help you achieve the desired result. To tell you the truth, I am still critical of my monograms and continue training - I want to be even thinner and more symmetrical!
The long preface is over, I hope you got something useful out of it :)
So, where to start learning how to draw monograms? That's right - from basic elements and training cards. My blog has a whole section with practice sheets on various topics: from basic lines and ornaments to monograms, which you can download and print for exercise.
However, this information was published about 4 years ago, so I consider it outdated. Such monograms that you can find there are no longer painted by top manicurists. Technology has changed, and we need to adapt to these changes. Therefore, I made new maps, using which I will show my exercises.
Monogram training cards consist of two parts: basic elements and simple curls in the first, slightly more complicated elements and entire nail compositions in the second.
The exercises are designed in such a way as to learn how to draw an element from different directions: top, bottom, right and left. Usually reverse movements (for example, with the right hand from right to left) turn out a little worse.
Here you will also learn symmetry in drawing: each pattern is mirrored in two versions.
And yes, you can find a lot of interesting training cards online, but you have to pay for them. I send them by email for free, for your reposts of this page on social networks :).
How to use training cards?
- They need to be printed. For this, it is best to use glossy paper - since it is more similar to the surface of a nail, it will not absorb paint, and the brush will glide better.
- If you don’t have glossy paper, you can laminate the sheet, put it in a file or cover it with tape - this way you will also get a reusable training card on which uneven elements can be erased and drawn again!
- The elements of the design on the card are made in such a way as not to exceed the size of the nail plate (this is why you need a ruler), so it will be difficult to repeat the pattern from a computer without printing.
- What to draw with? For training, I would advise using a cheap gel paint that you don't mind. It’s good if it’s black – on white paper, imperfections are best visible. You can also paint with acrylic paints, but they “stretch” a little differently, so it’s better to choose what you’re going to work with on your nails.
- How to dry gel polish on paper? In general, after a while it will air dry on its own, but it’s good if you have a lamp with a removable bottom - then drying will not be any problems. Read about my favorite and lifesaver SUN UV5 from Aliexpress. Well, if you made a reusable card according to my recommendations, then you don’t have to dry it at all, but erase everything and leave it for further training in your free time.
- About brushes . Girls, I can tell you one thing: you can buy at least a dozen thin brushes for monograms, and not one of them will paint the way you want. So I recommend starting with one, and then practice trimming and adjusting until you get what you want. Remember, the brush should not be very thin (three hairs), otherwise it will be difficult to hold a drop.
- How to draw. The first element on the map is the one we will practice drawing. Then it is duplicated translucent, so first we draw along its contours. Does everyone remember the copybooks at school? Everything is done here by analogy.
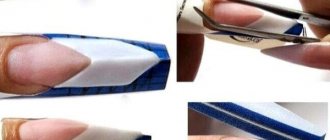
Monogram brush and first design
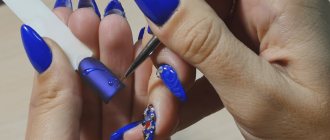
Drawing fancy curls of monograms is not that difficult, but you need the right tool. You can perform this nail art only if you have a thin nail design brush. Such brushes are sold in specialized stores, but if desired, you can make them at home. Let's look at the method of making such a brush and the technique of performing a manicure with monograms.
- Let's start by preparing the brush. Take small scissors and carefully begin to trim the hairs from the brush along the contour, leaving only a thin strand in the middle. Make sure there are no extra hairs sticking out anywhere. The thinner the brush, the more elegant the line you can draw with it. After you have trimmed off all the unnecessary stuff, drop a little topcoat onto your fingertip, lightly rub it in and gently apply it to your brush. This will make her obedient and prevent her from getting frizzy. It is better to take a tool made of synthetic material - it is more elastic and comfortable to use.
- Next you will need white acrylic paint. Dip the very tip of the brush into the paint, trying to capture just a drop.
- Carefully remove this droplet onto the nail with a light touch and then, from the resulting point, begin to draw a line in the direction you need. The drawing is done arbitrarily, as your imagination tells you. But if you don’t have any interesting ideas in your head, then you can look at ready-made diagrams.
With this simple technique, you can create a design of incredible sophistication - sophisticated, elegant and unusual. To make the technique more clear to you, we offer you a very interesting and useful video lesson.
What is a monogram
By opening an explanatory dictionary, you can find an explanation of the word “monogram”; it meant the interlacing of the first letters of the first and last names. Initially, monograms were used by noble people who made seals or embroideries with capital letters. Then monograms began to be widely used in jewelry, as well as in ceramics.
After a while, manicurists decided to transfer the beautiful interweaving lines onto the nails. Taking ideas from nature, looking at the graceful interweaving of grape and strawberry tendrils, stylists began to paint curls on the nails. In manicure, a monogram is considered to be any elegant and beautiful interweaving of thin lines that create an intricate and sophisticated pattern.
Curl styles
To make it easier to understand what the client wants, monograms were divided into styles. Each style implies a certain type of pattern and execution technique.
The following styles are distinguished:
- classical;
- French;
- for brides;
- modern or contemporary.
Style description table
In the table you can read a brief description of each style and look at examples of monogram design.
Monograms are a flight of imagination of the master, there are no specific design criteria, you can come up with any interesting weaves, the main thing is that the lines are clear and neat.
Tips for Beginners
Most girls love beautiful curls that decorate their nails. To create original curls yourself, there are several tips on how to learn how to draw monograms on your nails.
- Before you start drawing on your nails, you should practice on paper. You can draw images of nails and use a thin pen to draw monograms.
- After practicing on paper, you can buy tips and practice working with a brush.
- During calligraphy painting, the hand should be relaxed so that trembling does not appear.
- You should learn to apply equal pressure while drawing each monogram so that the thickness of the line does not change.
- You should not start drawing on all your fingers at once; first, you can make a design on one or two nail plates.
- It is best to start with simple curls, and after mastering the technique, proceed to more complex patterns.
- On a monochromatic surface, monograms look better and are more striking.
- Paints are best suited for drawing; they are easier and more convenient to paint with.
Video “Drawing monograms step by step”
In the video you can watch a step-by-step master class on drawing simple monograms on nails.
Training cards
For beginners, there are special training cards that help master drawing techniques and provide many creative ideas. Training cards can be bought in special stores or printed from a computer.
There are different types of training cards, they are divided by complexity:
- for newbies;
- patterns of medium complexity;
- for professionals.
Initially, it is better to take the simplest cards, on which, as for small children, a drawing is drawn with a solid line, and then there is a dotted line or a noticeable solid line. By tracing the lines with a brush, the hand remembers the movements, and drawing becomes much easier.
Materials for creating curls
Before you start drawing monograms yourself, you need to have the necessary tools and materials at hand.
- base or varnish base;
- top;
- nail polish remover;
- file;
- orange stick;
- cuticle nippers;
- beveled brush, styper, kolinsky or dots;
- needle;
- decorative decorations (optional);
- nutritious cream;
- oil;
- bath;
- degreaser.
The list can be slightly adjusted, the varnish can be replaced with paints, the needle can be replaced with a toothpick, and the cuticle nippers can be replaced with a special emollient. It all depends on what you feel comfortable drawing with and what type of manicure your fingers are used to.
Paints are much easier to use, since they do not spread, and some do not need to be additionally dried in an ultraviolet lamp. However, such a manicure will last less than using gel polish.
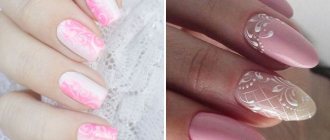
Delicate nail design with curls
We invite you to try another magnificent manicure that will perfectly match your wedding dress and simply fill your image with incredible tenderness. Let's look at its implementation step by step.
- Cover your nails with translucent white or pearl polish. Let it dry completely.
- Now apply a layer of clear coat and, without allowing it to dry completely, apply pearlescent shadows to the tip of the nail with patting movements.
- Cover with one drying layer.
- Next, using the thinnest brush, begin to design - you can draw curls and smooth lines. Everything is done arbitrarily, the main thing is that the curls form a harmonious pattern. If you still feel unsure, then you can use training cards - special sheets of paper with drawings printed on them.
- Be sure to protect your finished manicure with a top coat.
As a result of these simple manipulations, we get a very beautiful nail design that will not go unnoticed. A detailed video with step-by-step instructions will help you better imagine the technique.
Methods of applying monograms
Monograms on nails can be obtained in several ways, each of which has its own advantages and disadvantages.
- Nail stamps are a very easy way to create monograms. You need to apply a drop of varnish to the metal plate, then use a stamp to transfer the design to the nail. Stamping is one of the easiest ways to create identical curls. The disadvantage is the inability to create a modern monogram design, since stamps do not allow imagination to run wild.
- Stencils differ from stickers in that you need to draw the design yourself, filling the outline of the stencil with varnish, paint or shellac. After filling, the stencil is removed and the design is covered with topcoat.
- Self-application is the most labor-intensive, but also the most sophisticated option. Manual application can be done using a needle, pin, dots or special brushes.
- Nail stickers - the easiest option is to buy ready-made stickers with a design and attach them to the nail plate with the adhesive side. Using stickers, you can quickly create a manicure with monograms, but remember that paper blanks quickly deteriorate.
Drawing with a needle or toothpick
Most girls began using needles and toothpicks to create manicures during their school years. Although, they probably didn’t even know that they were drawing monograms on their nails. There are two ways to draw monograms using a toothpick: on a dry base and on a wet base layer. Below is a step-by-step description of creating monograms on nails for beginners.
- get a manicure;
- cover your nails with the selected shade of varnish;
- dry in air or under a UV lamp;
- remove the sticky layer if necessary;
- Having chosen a contrasting shade of varnish, place several dots on the surface of the nail plate;
- using a needle or other sharp object, stretch the droplets, creating a pattern.
- give nails shape;
- cover your nails with a base coat;
- without waiting for it to dry, apply a few drops of another varnish to the base;
- Using a toothpick, mix two shades, drawing curls.
Drawing algorithm for beginners
Before starting the creative process, you should prepare your nails. You need to get rid of the previous coating, remove the cuticle, shape your nails, degrease and polish the nail plate.
- lay out all the necessary materials on the table, everything should be at hand and not get in the way;
- Apply base to the prepared nail;
- cover your nails with a colored or colorless base;
- the curl should be drawn from the edge of the nail;
- when using several colors, you need to dry each element separately;
- After creating the design, the nails should be covered with a protective layer.
Step-by-step instruction
There are a large number of manicures with monograms; they differ in the curves of the lines, the density of the curls and the design. The step-by-step process for performing monogram nail designs is the same for most cases.
- Do a manicure in the usual way, degrease and polish the nail.
- Cover with base and dry in a UV lamp.
- Apply the base color and top coat and let everything dry. You should always remove the sticky layer from the top coat.
- Drop a small amount of varnish or paint onto foil or a special stand.
- Dip a thin brush into the paint until a small drop forms at the tip.
- Transfer the drop to the nail and draw a pattern with smooth, leisurely movements. For volumetric patterns, the lines should be doubled, and the space between them should be left empty.
- To make the monograms symmetrical, the nail can be visually divided into two parts, this makes it easier to draw.
- Upon completion, the pattern is covered with a top coat.
Monogram schemes
Step-by-step drawing of monograms on nails can be seen in the pictures. By placing dots on the main background and moving in the direction of the arrows, you can easily create a beautiful design.
Simple
Simple monograms can be created using stamping, a needle or a brush. To draw a simple monogram you need just a little imagination and patience. You can put a dot of one color, and on top of it a slightly smaller dot of a different color. Next, using the drawing tool from the center, begin to draw a pattern.
Velvet
In order to create velvet monograms, you will need acrylic powder and varnish with a sticky layer. After creating the design, you need to pour powder onto the nail; a wide fan-shaped brush is best for applying powder. After drying, shake off the remaining sand. The finished drawing should not be covered with anything.
Complex
Complex monograms are painted using several tools and different varnishes or paints. Using a thin brush you can draw a mesh, and with a beveled brush you can draw transitions between colors. You should draw complex monograms only after your hand has been trained, otherwise the result may be far from what you imagined.
Gold
Gold on nails looks beautiful and sophisticated, especially if the pattern is made on dark blue, burgundy, mint, red or another bright color. You should choose a contrasting color and paint the nail plate with it, following the step-by-step instructions given above.
Then, using a brush, put a black dot, and from it draw a comma, in this sequence move from the edge to the center of the nail plate. After the pattern is ready, you need to dry your nails under a UV lamp. Then apply gold pigment to the finished drawing and finally cover it with top coat.
The curls can be painted directly with gold paint, but then they will not turn out voluminous.
Rhinestone Swirl Ideas
Shiny stones could always decorate any manicure, and they add special sophistication and style to monograms on nails. To create a delicate design, you can decorate only the middle of the monogram with a pebble or line the hole with small rhinestones. The main thing when working with shiny stones is to choose a non-variegated base to emphasize the shine of the stones.
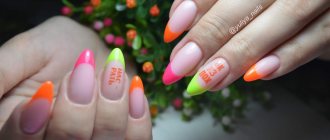
Monograms on nails - nail design, manicure with varnish, gel polish. Photo
Any representative of the fairer sex wants to look beautiful and well-groomed. Particular attention should be paid to a flawless manicure, for the creation of which it is not necessary to visit a beauty salon.
You can make a stunning nail design and learn how to draw original monograms on your nails step by step without leaving your home.
The technique of depicting monograms on nails in the form of thin filigree lines is very interesting. They can be of absolutely any shape and style:
- in the form of curls;
- various bends;
- like petals;
- in all the variety of letters and lines;
- oriental ornaments;
- with Gothic elements;
- lace design;
- exquisite embroidery.
You can perform a wonderful manicure using this technique using different techniques. For example, experienced craftsmen paint curls with a simple brush and ordinary colorful varnish. To avoid smudges, it is necessary to maintain an even application and control the amount of varnish on the brush.
A good option would be to apply a design using shellac, gel polish or acrylic components. They use strips and stencils with monograms, paints of different color palettes.
With plates that have ready-made monograms and having learned how to apply the coating on your nails step by step, it’s easy to create a stunning manicure.
By applying gel polish, you will be able to create a long-lasting manicure that will delight you with a fresh look. This will require more time, but the result will be worth it.
Covering your nails with acrylic paints will surprise you with its variety of shades and delicate work. It is this painting that will create the effect of elegance and chic.
In addition to stencils, they resort to stickers, which greatly simplify the work and have great opportunities for realizing their design ideas. They are glued onto a transparent base or base coat on the nails and secured by applying a final coat of varnish.
The dot technique for drawing monograms involves the use of needles or toothpicks. For greater clarity and expressiveness of the curl design, the ornaments are applied to a varnish base.
Simple and beautiful monograms - red, black, gold
Monograms on nails of a simple type are created step by step with a needle or brush. This will require a little patience. It is advisable to put a dot of one color, and on top put a dot of a smaller diameter and a different shade.
Using a painting tool, decorate from the center to the edges. Beautiful stains are depicted using devices and various paints. They can only be made magnificent by an experienced hand.
Golden curls look sophisticated, preferably against a bright or rich dark background. Having applied a contrasting tone to the nail, begin to put black stripes on it, drawing out commas and the desired stains.
After drying, coat with gold plating and secure. Black monograms look great on a French manicure. Red monograms can be drawn in any way and combine favorably with white, beige shades interspersed with gold.
Monograms with rhinestones
Curls with stones give the design a special style and grace. Professionals recommend a combination of sparkling rhinestones with a uniform background to highlight the shine. You can decorate the center of the monogram with them or place them along the edge of the hole.
Volumetric monograms
When you start making monograms on your nails in a volumetric design, you should follow these steps step by step:
- Give the nail plate the desired shape.
- Glue decorative elements (appliques, figured glitter, various signs or symbols) onto the base base.
- Seal with clear varnish.
A voluminous nail style will require patience to complete and is suitable for any occasion.
Monograms with French
First, the nails are decorated with a French design, then beautiful weaves are drawn on top. A distinctive feature is the curls drawn on the sides of the nail covering, usually on one edge and with the addition of rhinestones.
Monograms with acrylic powder and sand
To create such curls you will need acrylic powder and sticky varnish. After completing the drawing, use a wide brush to pour powder, previously coated with sticky paint, onto the nail plate.
The sand particles will be evenly distributed and quickly harden. All that remains is to dry your nails and carefully brush off the remaining sand. This design attracts with silkiness and tenderness.
Monograms with glitter
The nails must first be painted over with a varnish base. Having chosen among the many different types of glitter those that are needed, they can be applied with a hairpin or a toothpick moistened with water according to the planned pattern. Dry and apply a colorless sealer.
Monograms and curls
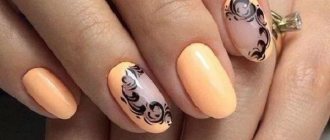
Curls are one of the varieties of monograms; the technique for making them is identical, and they are made in different styles and designs.
Monograms and openwork
The most labor-intensive nail design technique. A very thin lace mesh that is carefully drawn over the entire surface of the nail. To make the task easier, there are stencils.
When working manually with several tones, you should carefully draw the picture. Particular attention should be paid to the harmonious combination of colors and overall gamut. The lines should be clearly visible on the base coating.
Don't miss the most popular article in the section: How to draw monograms on nails step by step for beginners. Instructions with photos.