There is an opinion among fashionistas that in order to create charming beauty on your nails, exorbitant efforts and special skills are required. This is partly true, although this conclusion applies to really complex compositions in nail art. But there are many ways to create a chic manicure without complications, and mica for nail design is an excellent solution for such options. Let's look at what you can do with this decoration below.
nails with mica
Liquid mica
Small particles of the material are more reminiscent of sparkling powder, so liquid mica received another name - wet glitter or liquid foil. A manicure done with gel or acrylic, gel polish or even regular polish can be improved with mica. This material is more docile and easier to use. The surface of the nail will be perfectly smooth and not rough.
Performing a manicure with liquid mica step by step
Cover the plate with a thin layer of gel polish.
Using a flat brush, we pick up mica particles and transfer them to the nails.
We level them with a bone on the surface. Liquid mica adheres fairly evenly and tightly to the sticky layer.
Dry the surface in the lamp for no more than 20 seconds.
We apply the fixative. In most cases, there is no need to re-coat with a topcoat, because the base of the plate becomes smooth after the first application of the top.
Liquid mica of different shades is available for sale, packaged in small containers. If pieces of mica are already mixed into the varnish, then the technology for working with such material is even easier: just coat the colored or transparent base with mica 1-2 times, and the original manicure is ready! You can also facilitate the technology of manicure with mica on natural nails by mixing sparkling particles with gel.
Types of manicure mica
There are two varieties: regular and liquid.
Space manicure design with mica
The usual one is a powder material of dry glitter, dense and hard.
Some of them are too large, so before manicure you need to inspect the material and cut with scissors those plates that are too large.
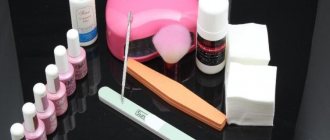
You can decorate any area of the nail. To lay out glitter you need:
- base (varnish);
- drying-fixer;
- stick or brush;
- container with water.
You need to apply the plates onto the newly applied layer of varnish using a stick. Use a brush to cover the entire nail.
Original discreet manicure with mica
Liquid mica (other names: liquid foil, wet glitter) is a varnish with glitter; it lays on the surface more evenly, so you don’t have to use a stick.
Apply the base, followed by one or two coats of wet gloss. Pieces of mica may “break through” the coating, so again a sealer will be needed. This type of material is used to decorate natural nails.
Secrets of the original manicure with mica
If the pieces of loose mica turn out to be too large, they can be easily crushed with sharp nail scissors.
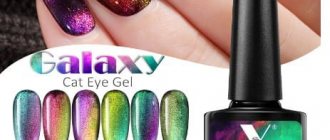
The most universal is chameleon mica, which changes shades depending on the angle of light. The nail design will suit any colored outfit. But a manicure using one specific color of shiny particles will not harmonize so perfectly with your wardrobe. You will have to carefully consider the combination of all components of the image.
Combine mica with other decorative elements, be bold! For example, decorate the composition with drawings, small beads, and dried flowers. The nail design with mica and sparkles looks original, combining sparkling particles of different sizes.
Manicure with golden and silver mica
Despite the fairly wide selection of colors and shades of bright mica, the most popular and universal are gold and silver shades. Mica in such shades is ideal in terms of compatibility with complex nail designs. Noble gold and silver in manicure design go well with women's jewelry and accessories. Gold and silver mica can easily be called classic elements of this design.
Mica and gel polish
You can decorate with mica not only nails coated with regular varnish. The combination of gel polish and shimmering mica will be no less impressive, and this design will last quite a long time. But here you need to use exclusively crumbly, dry mica.
Instructions on how to apply mica to gel polish:
- Treat your nails with a medium-soft buff, brush off the dust with a brush;
- Apply primer to all nail plates;
- Cover your nails with a base layer of gel and dry in a lamp;
- Apply the first layer of colored gel polish, dry in a lamp;
- Apply a second layer of color and use a toothpick, pusher or orange stick to transfer the desired amount of mica onto your nails. Dry in a lamp.
- Apply a final top coat of gel and dry all nails thoroughly. Manicure with mica and gel polish is ready.
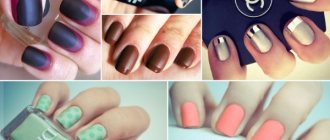
The most successful color solutions in designs with mica are the following combinations: black varnish and blue, lilac or green mica; red varnish and golden, yellow or orange mica; Blue varnish and crimson or red mica. Light mica looks very gentle on a transparent or light varnish of a natural shade.
See photos of the best manicure options with mica:
This design does not require any difficulties and any girl can do it on her own, with a little free time and just a little patience. The effect of a mica manicure significantly exceeds the effort spent on it. After all, such pens look very elegant and feminine. And the sparkling particles will cheer up not only the owner of the marigolds, but also everyone who notices them.
Main characteristics of mica
Artificial mica for manicure design, more like small pieces of foil. But unlike natural material, this decorative element is presented in a wide color palette and is offered in the form of plates or small shavings.
In terms of its structure, this decor also has fundamental differences, as it is offered in liquid and dry form. Moreover, loose dry, can be purchased at any nail art boutique in various bags and jars. Liquid decor differs from a dry, light, flowing consistency, and in appearance it is more reminiscent of ordinary varnish with glitter.
When designing nails with mica, you should remember that this material is quite voluminous, and in some variations it is rough and lumpy. That is why mica is most often used on extended nails, which are then coated with a special fixing agent. It is quite possible to make such a design at home, but so that the roughness does not cause any inconvenience, it is necessary to cover the surface with several layers of a conventional fixative.
How to use dry mica correctly
The dry design mixture can be used in different ways, for example, simply spread over the entire nail or decorate only the French area, distribute unevenly on one side of the nail plate, decorate a moon manicure or make an unusual pattern. However, in order to correctly and beautifully apply mica to the surface you will need: a container of water, dots, a toothpick or an orange stick, a base varnish, dry mica and a fixative. Once all the material is at hand you need to:
- Keep your nails in order by carrying out all hygiene procedures
- Then apply the base varnish
- And after the surface dries, apply a second layer.
- Without waiting for drying, you should start decorating your nails
- The process itself is quite simple, you should use a dot to grab a little mica and transfer it to the nail, distributing it in the required direction. To completely cover the nail with this decor, you should use a brush previously dipped in water.
- The final stage of manicure is drying and top coat.
Master Svetlana talks about how to work with mica correctly in the following video:
How to use liquid mica
Liquid mica is much easier to use than dry mica, because this decor is made on the basis of varnish and in some cases can completely replace a regular manicure product. But to make a nail design, you should:
- Carry out all hygiene procedures
- Degrease and coat nails with base
- Apply several layers of your favorite varnish
- And after complete drying, cover the nails with liquid decor, preferably several times
- Then secure with regular topcoat
The use of liquid mica in nail design not only simplifies the original design procedure as much as possible, but also preserves the manicure much longer than a design made with a dry shiny mixture. In addition, thanks to this decorative element, the manicure is less susceptible to chipping and can withstand everyday stress, compared to a conventional product.
What attracts women to the popular manicure with mica? The answer is clear: brightness, sparkle, volumetric effect. When you first see such a design, it may seem that special materials and complex techniques will be required to complete it. Not at all! You can create the same beautiful manicure at home!
Mica in nature is a mineral with a layered structure. Pieces of mica have a specific pearlescent luster, so they are used not only in industry and construction, but also in art.
Of course, for nail art they use a material that resembles a natural mineral in appearance. Manicure mica is small thin film plates of different shapes. They have bright colors and a beautiful holographic effect. The plates sparkle beautifully in the rays of light, creating the appearance of volume.
Manufacturers noticed the growing interest of manicure lovers in this material and expanded their range. Synthetic mica is now available in different shades and sizes. There is an opportunity to create new three-dimensional designs of unsurpassed beauty!
There are two types of mica for manicure: regular and liquid.
Regular (loose) mica is small plates
, resembling pieces of foil that have a relatively dense, solid structure. There are large pieces in the jars that can be cut with nail scissors. Loose mica is used in aquarium design and when growing. The particles will have to be covered with a thick layer of gel or topcoat so that there are no roughness or bumps on the surface.
Stamping set: the fab five
What tools are used for stamping?
- A flat metal plate with engraved patterns. The disk can accommodate a varying number of images. And the in-depth patterns themselves can have a variety of sizes. There are floral, themed, geometric, openwork and others. The imagination of the masters is limitless! For example, you can apply an original New Year's design using a plate with corresponding designs, as in the photo. The choice depends on the woman's preferences.
- A small stamp with a rubber or silicone base, with the help of which the image is transferred from the disk to the nails.
- A scraper is a thin scraper that removes excess varnish from the surface of a metal plate. The product remains only in the recesses. This helps to create clear, expressive, beautiful stamping designs on your nails.
What tools are needed for stamping?
- Standard base for varnish and fixer.
- Colored varnish for the main background.
- Regular varnish of the selected color for applying drawings.
- Acetone or other HDSL, but without oil content.
During the work process, you also need napkins and lint-free cotton pads.
Subtleties of manicure with dry mica
If a woman is not afraid to be bright, and there is no strict dress code at work, you can cover the entire nail plate with mica. Shiny fragments fixed at the tip of the nail look beautiful, but then the nails must be long, otherwise no one will notice the unusual design.
A step-by-step guide to designing mica nails consists of the following steps:
Fill a container with some warm water, add a couple of drops of orange, soak your hands in the vitamin composition for 10 minutes and push back the cuticle with an orange stick. If the skin is too rough and the base of the nail looks rough, the cuticle will have to be trimmed with sharp nail scissors. Using a file, achieve the same length of your nails and go over the surface with a grinder. Distribute an even layer of the color of one varnish, it is better to use a gel, but then at home you will also need a UV lamp, otherwise the composition will be sticky. After drying in a UV lamp, apply another coat of varnish. Before the varnish has time to dry, go over the plates with mica. An orange stick, dots or toothpick are suitable as a handy tool - the tool is dipped in water, which eliminates electrification, then a small amount of mica is grabbed and brought to the nail
There is no need to rush - it is important to carefully place the mica on a damp surface in the order you like. Distributing the material over the entire nail, you can use a regular brush. Dry your hands in a UV lamp. Apply a protective topcoat.
Technique for creating a manicure with micromica gel polishes
In order to decorate your nails with a bright, precious outfit, you need to perform preliminary basic preparation. It consists of the following steps:
- removing the cuticle (using a remover or fraser, or performing a classic trim manicure with tweezers/nail scissors);
- removing gloss from the surface of natural nails using a polishing buff (or a file with an abrasiveness of 240 grit);
- applying a degreaser and air-drying the nails for 30 seconds, and then applying a primer and bonder to ensure reliable adhesion of the gel polish base to the nail;
- covering the nails with a thin layer of base and polymerizing it in a lamp (in a UV device - 2 minutes, and in an LED lamp - 60 seconds);
- applying the selected shade of gel polish in 1-2 layers. For Glossy Platinum coatings, you will need a separate brush to distribute the decorative layer more thinly and evenly. Whereas the Vegas collection from Grattol can be easily and beautifully applied with a native brush. When creating an image, remember: Grattol Vegas gel polishes are denser and thicker than Irisk Glossy. "Vegas" is more covering and as dense as possible, while "Glossy" will require 1-2 layers for a perfect manicure. To polymerize coatings of this type, you will need UV lamps with a power of at least 36 Watts, or a hybrid (combined LED lamp) with a power of at least 12 Watts. An important point: before applying, thoroughly stir the gel polish, but do it very carefully so as not to accidentally saturate the coating with unnecessary air bubbles.
- Each layer of “liquid mica” must be dried in a UV lamp for 1-2 minutes (for an LED device, the drying time will be 20-30 seconds) and the stickiness removed using a special preparation and a lint-free cloth.
- To complete the manicure, cover your nails with a top coat (glossy or matte) and remove the dispersion layer (if you do not plan to complement the manicure with other decorative elements).
- The finishing touch is to apply nourishing oil to the cuticle and lightly massage the skin adjacent to the nails. All! The precious nail-look is ready and will delight its owner for 3-4 weeks.
What image should you choose to reveal all the beauty of “liquid mica” gel polishes? Practicing manicurists highlight the 5 most spectacular options. Let's get to know them and choose the look that suits you!
Technique for performing therapeutic manicure
The first thing the master does is examine your hands and make a diagnosis. He may also consult with various specialists, such as a dermatologist, to deal with the root cause of this nail condition. Then you will be offered a more effective comprehensive treatment.
Next, the doctor performs the following steps in turn:
- cleaning the nail plate;
- preparing a hand bath (herbal-based formulations with beneficial microelements are usually dissolved in water);
- treatment of the nail plate, nail bed, skin folds;
- wellness massage;
- applying a moisturizer or other treatment to the skin.
Additional stages may also be added if the diagnosis requires it. For example, paraffin therapy.
Hardware medical manicure
As in a standard hardware manicure, the procedure is based on the use of a special device with many attachments and cutters. They differ in the degree of hardness and abrasiveness. They treat fingers, periungual ridges, cuticles, and nail plates. In this case, the nozzle changes each time depending on the condition of the hands.
Hardware manicure is performed only on dry hands. Steaming in a bath should not be done before it, as this increases the risk of cutting yourself. It’s impossible to choose the right cutter without experience in this matter, so it’s better to turn to a professional.
"Broken glass"
A manicure design with a “broken glass” effect can be made with translucent fragments of mica or you can choose a material with holographic shimmers as decoration. In this way, all the nails are decorated or a few fingers are highlighted. Using such elements, you can create a beautiful pattern on your nail plates or arrange pieces of mica in a chaotic manner. In any of the options, increased attention to your hands is guaranteed.
Answers on questions
It all depends on what tools you have. The simplest thing is to cover 1 or several nails with dry glitter. They, like any decor in principle, are applied to dried gel polish and then covered with a top coat. You can experiment with stamping - just buy a plate with a design, a stamp and paint.
Without harm to nails - no way. Experts remove gel polish with a machine, but not everyone has a good router and not everyone knows how to use it correctly. In addition, after removing the gel polish with the device, a base remains on the nails, on which re-coating is done. Therefore, it is better to purchase a special product and do not harm your nails.
There are several options for applying the rub. One of them is for a top coat without a sticky layer. Just scoop a little amount of rub into the applicator and transfer to your nail. Rub over the entire surface until you get an even layer of color. Cover the top with a new layer of finish and dry in a lamp.
Rhinestones are applied under a topcoat, which, after polymerization, holds them back and does not allow them to break off. If this option does not help, use a special fastener for jewelry.
It all depends on the type of stickers - water-based or adhesive backed. Water-based images should be immersed in water for a few seconds, separated from the substrate and carefully transferred to the nail. Secure top with finishing coat. Adhesive-based stickers are simply peeled off from the base and glued to the desired location on the nail plate. The top is also covered with a fixative.
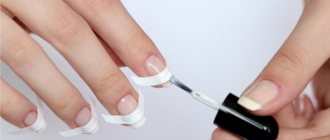
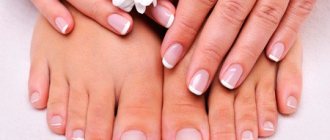
French with mica
While covering the entire nail plate with mica is not difficult, applying this decoration carefully along the French line is a little more difficult. To achieve a flawless design, you will need special stencil stickers for the French jacket. This can be a classic oval “smile”, angular or lunar French.
How to use the stencil, look at the photo:
To make an even mica contour on your nails, follow the instructions below:
- Apply the base color of the polish to your nails, allowing it to dry thoroughly;
- Place the stencils on your nails in the desired position;
- Apply transparent varnish to the free tip, and without allowing it to dry, glue mica to it using an orange stick;
- Wait a little while for the mica polish to dry, then remove all the stencils and seal the manicure with a top clear coat.
This design can be done both on your own nails and on extended nails.
Mica for nail art, what is it?
In the precise meaning, mica is a natural material. It is a layered mineral with a sparkling, translucent, pearlescent structure. This mineral looks very beautiful. Later, manufacturers learned to imitate natural mica, creating artificial thin foil plates, shining and multi-colored, which began to be used as decoration in various areas of the beauty industry. Manicures are made with mica, and it is also used in some types of needlework. But it was in nail art that this material “took root” best.
Mica for nails can be liquid and dry (loose). The latter is sold packaged in various jars or simply bags. Liquid most often takes the form of varnish and is applied to the nails with a brush. You can purchase this incredibly beautiful material for nail design in any nail art department. A huge number of colors, shades and structures will allow you to choose mica to suit every taste and any manicure fantasy.
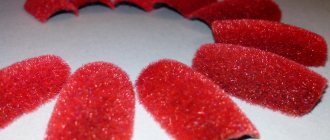
What loose mica looks like, photo:
Liquid mica, photo:
Choosing a nail file, which one is used for what
Files vary depending on the grit. Grits measure the amount of abrasive applied to 1 square centimeter of a file:
The coarsest file is 80 grit. It is used to reduce the length of artificial nails;
From 100 to 150 – to give shape to artificial nails;
From 180 to 240 – for working with natural nails;
From 400 to 2000 – polishers.
It would be a big mistake to use the wrong saw. In stores you can see nail files without a grit mark. You shouldn't buy them. These can be rough files that will only “soak” the nail and it will crumble and flake.
It is wrong to cut the edge of a nail with scissors; there are files or clippers for this. He, like a guillotine, cuts the edge at the right angle.
| Caution: Nails in their structure resemble a honeycomb. If you cut the honeycomb with scissors, the edge will break and a lot of honey will leak out. If you cut with a knife, a few drops will come out. The same goes for nails. If you cut with scissors, the edge of the nail will be broken. This is not visible to the naked eye, but the destruction produced can be observed through a microscope. |
The nail file moves in one direction. Then the edge of the nail does not become frayed. You cannot use a file on wet nails. Nails absorb a lot of water and become flexible. They follow the file and it’s impossible to make a good cut. Moreover, you can break off the edge of the nail. Therefore, use a file only on dry nails.
The polisher also works on dry nails. This is a tool for the final stage of the manicure procedure.
What is liquid and dry mica for nails
If we look at it in detail, mica is an organic multilayer element mined industrially. It has a pearlescent iridescent surface
and is often used in the manufacture of jewelry and interior decoration.
However, using natural material for manicure is quite expensive. Therefore, today you can find foil-based artificial mica
. In appearance, the prototype is in no way inferior to the original. Moreover, various coloring substances can be added to the synthetic material, making it unique.
Mica for nails comes in two types:
Dry mica
Dry (loose) mica is small plates that look like foil or shiny shavings and have a relatively dense structure. The material is packaged in small bags or jars. It can have different colors, so it can be easily matched to any design.
Loose mica is often used for building and aquarium design. You need a thick enough topcoat so that the mica pieces are not visible above the surface of the record. Otherwise, the manicure will become unsightly bumpy and sloppy. Since the particles of dry mica are relatively large, they look better on long nails.
File manicure courses
For masters who have not yet mastered the technique, but want to expand their capabilities and practice their skills, we suggest that you familiarize yourself with the nail file manicure courses.
Mastering the technique will bring masters:
- increasing the level of professionalism;
- the expansion of the customer base;
- saving time.
In addition, the cost of a file manicure procedure is lower than, say, an edged manicure. To work, you only need disposable files or replaceable files for the block.
Luxio
The brand of manicure products provides training in Moscow and St. Petersburg. The program has two types of courses:
- for craftsmen working in cutting equipment;
- for craftsmen working using the hardware method.
Cost – 10,000 rubles.
Duration of training is 1 day. Upon completion of the course, a certificate is issued.
Nail Experts
A two-day course with theoretical and practical parts for Moscow residents. The school provides models as well as tools for practicing techniques.
The cost of training is 17,000 rubles.
At the end of the second day, each participant who has successfully completed the course receives an international certificate.
Nail Sunny
A one-day course from a chain of manicure salons in Moscow. All students are provided with material and tools, as well as models for practicing techniques.
Cost – 7,500 rubles.
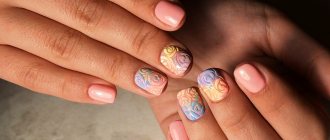
Interesting manicure options with mica
Mica, liquid or dry, looks beautiful and impressive, so design with it looks interesting in itself.
For example, you can make a fashionable “broken glass” design, when even pieces of bluish mica are applied to the nail as if it were a broken mirror.
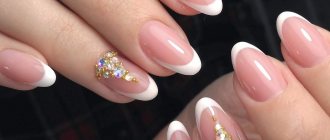
French manicure using mica is also beautiful: a little shine on the tips of the nails looks unusual.
You can line the entire nail with dry mica, and make the rest of your fingers a calm shade.
Thus, creating a spectacular manicure even at home is easy. The main thing is not to be afraid of experiments and to follow the latest developments in this area. A beautiful manicure is more accessible today than ever before.
Mica honeycomb design
A manicure with bright mica honeycombs is extremely beautiful and original. This design can be easily achieved by using shiny mica in a regular shape. For example, hexagonal mica, the same color as the main varnish, is placed in the correct order on the entire surface of the nail plate of one, several or all fingers. It is important to remember that non-plastic, shiny mica is a very rich element in nail decoration, so you need to use this spectacular and fashionable nail design sparingly and tastefully.
Nail decor with casting
If you follow fashion trends, you know that liquid stones are the most popular casting. This idea of decorating a manicure is very complicated, since in addition to special materials, you need the skill to use them, so you need to go to a beauty salon. However, even in this case, there is no 100% certainty that it will be done well there, because not everyone has mastered this technology yet. Of course, fake jewelry is used here, but if the manicure is done by a good master, the difference will be insignificant, and the impression of others will confirm this. No, the stone will not be so massive that it is difficult to even raise your hand. This is only a visual similarity. The special material used to create this manicure is polymer. It is designed to imitate real precious stones.
If you add a little imagination and desire to willpower and patience, then your own masterpieces on your nails will look no worse than those in the salon. And the design of nail plates with mica will complement any image, adding a touch of unusualness to it. Good luck and inspiration!
Security measures
It is very important to follow some safety rules when performing this procedure.
First of all, you should make sure that the tools are sterile, even if we are talking about your personal manicure devices. Care should be taken to ensure that the cutting surfaces are sharp and that the tools themselves are in good working order, as there is a risk of damage to the cuticle and skin in the nail area, which can lead to very disastrous consequences. You should handle scissors and other sharp and cutting manicure devices carefully.
If handled carelessly, you can easily get cut or pricked. Still, it will be better if each family member has his own manicure set for purely individual use. This is not only hygienic, but also one of the possible ways to protect your own health. During the procedure, you need to have hydrogen peroxide and a cotton pad with you so that in case of cuts you can immediately treat the wounds.
Useful tips and tricks
Manicure at home is easy to do if you follow all the step-by-step recommendations, as well as some valuable tips from nail experts.
- Despite the fact that the gel polish dries quickly under a UV lamp, the coating reaction continues for 48 hours. The shellac will take a couple of days to set on the nails and it is advisable to avoid possible micro-traumas and damage in every possible way during this time. It is recommended to avoid prolonged contact with water. After final fastening, you can wash dishes, go to the sauna and do home cleaning.
- If the nails are not dried from moisture after the bath, then shellac may not adhere well to wet plates. Due to moisture, the coating may simply peel off. To avoid this problem you need to use dehydrators or a degreaser. Before applying the primer, this step is considered mandatory.
- In order for the design to look natural for as long as possible, it is worth avoiding the dark shades of shellac. Ideal options are French manicure and nude designs. Such coatings grow almost imperceptibly from the nails.
- If the coating suddenly becomes dull, you can paint your nails over it with a clear, simple varnish, which will enliven the dull design.
- Cracks can be masked with stamping.
- Apply shellac to the nail in a thin layer, pressing the brush to the entire surface.
- There is no need to shake the bottle of gel polish before opening it. During shaking, the product is saturated with air bubbles, which increases the chance of cracking of the manicure on the nails. Instead of shaking the bottle, you can roll it between your palms. It is better to leave the shaken bottle on the table for 1 minute so that the varnish “settles”.
Advantages and disadvantages of design with liquid mica gel polishes
The main condition is that the coating must not only be safe for the health of the nails, but also have an optimal texture thickness and density of decorative particles. Previously, craftsmen “fine-tuned” varnishes and gel polishes by adding glitter, rubbing or tiny mica to them in order to obtain the desired intensity of shine and density (hiding power). With the advent of specialized coatings, the work of a manicurist has become significantly simplified and the boundaries of creative experiments have expanded. At the same time, gel polishes of this type have their own nuances that you need to know about when choosing them for your manicurist. Let's look at the main pros and cons of “sparkling” nails.
The advantages of liquid mica coatings include the following:
- There is no need to very carefully level your nails with special bases for polish and gel polish before applying the iridescent texture. Due to the shine of the smallest particles of mica, the nail becomes like a cut stone, hiding possible aesthetic defects.
- Reducing time to create a design. Depending on the shade you choose, the artist can create a design by applying just one layer of gel polish. The nails will be completely hidden under a layer of decorative coating, and the final image will be lighter in weight. Which is especially important for nails that tend to break under gel polish due to their inherent fragility.
- Ease of working with the material itself. Gel polishes of this type are quite thick in themselves and do not “run away” to the cuticle and side ridges. The density of their texture will allow both the beginning artist and the novice to create images using the popular “under the cuticle” technique. And you won’t need to sophisticatedly correct application flaws, as often happens with more liquid gel polishes.
- Comfortable application and polymerization, wearing the design and removing the coating. By choosing this type of decor for fingers from any of the manufacturers, you can be sure of problem-free polymerization (the coating in the lamp does not burn your nails too much, does not form bubbles and does not flow to the free edge). When applied, “liquid mica” does not require any sophisticated preparation and is distributed over the nail as simply as regular shellac - in a thin layer. A nice bonus is that these gel polishes are perfectly self-leveling and do not streak. There is no need to worry about removing manicure, since “liquid mica” is removed as quickly and easily as regular gel polishes with a “cream” texture (by soaking in foil with preparations for removing gel textures, or with a Fraser).
- The ability to create a luxurious manicure with a minimum of effort on nails of any length and shape. “Mica” gel polishes look wonderful on both short natural ones and extensions (gel or acrylic). When worn, they do not fade or chip, the color component does not fade, and the dense shimmer does not become cloudy even when in contact with household chemicals.
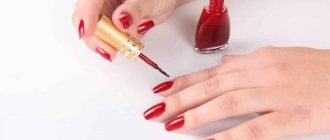
Home manicure ideas
Manicure with dots is performed using a special “dots” tool, similar to a needle with a ball at the end. It is sold at any nail store. To replace the dotsu, take a toothpick or hairpin.
Prepare a base varnish and several contrasting color varnishes for dots, dots. Apply base polish to your nails and let it dry. Using a dot or similar, apply dots on the nail next to each other or in a strict order. It all depends on your imagination.
Water manicure
A bright, bold, unusual water manicure draws attention to your nails. Prepare nail polishes that match in color, a container of water at room temperature, a cuticle protectant or hand cream, cotton pads, nail polish remover, toothpicks
Prepare nail polishes that match in color, a container of water at room temperature, a product to protect the skin around the cuticles or hand cream, cotton pads, nail polish remover, toothpicks.
Apply a special protective agent or hand cream around the cuticles. Add one drop of varnish to a container of water one at a time in the intended order.
Swipe the toothpick several times in different directions over the varnish in the water. No more than 1 minute should pass from the first drop to the finished drawing. Place your nail parallel to the plane of the water in the center of the design.
Allow time to dry, remove excess polish around the cuticle. Repeat the procedure for each nail.
Next: in detail how to do a water manicure.
Lunar manicure at home
He returned from the 30s of the last century. At that time, it was not customary to cover the entire nail with varnish; fashionistas left the hole at the base uncovered. Hence the name - lunar.
Prepare 2 polishes in contrasting colors and stencils (available at a nail store).
Apply polish to the nail color that will be at the base of the nail and allow time to dry. Place the stencils on the nails at the hole and apply the main color of the polish. Give the polish time to dry and carefully remove the stencils from your nails.
Next: how to do a moon manicure yourself.
Matte manicure
The fastest way to get an unusual home manicure.
Prepare a glossy varnish, without glitter or pearl, in a pan of boiling water.
Apply polish to your nails. Without waiting for drying, hold your nails over steam at a height of 15 cm for 10-15 seconds. Manicure is ready.
Magnetic manicure
Another simple and effective manicure at home.
Thanks to the invention of a varnish in 2007, which contains metal particles, magnetic nail polishes appeared on the market. Immediately after applying the varnish, by bringing special magnetic strips to the nail, you can achieve unique patterns - grid, diagonal, stripes, rays, stars. You can buy magnetic stripes together with varnish or in separate sets.
How to use dry mica
Mica nail polish can be used in many different ways. You can use it to lay out the entire nail, the French area, or use it to create a specific pattern on the nail. In order to apply crumbly mica to your nails, you will need the following:
- Base varnish: it can be varnish of any shade or simply transparent;
- Drying-fixer (in extreme cases, mica can be coated with ordinary transparent varnish);
- Orange stick (this can also be a dots or a simple toothpick);
- Small container with water;
- Mica of the selected shade.
How to apply:
- Before starting the design, be sure to do at least a light manicure, align all your nails to the same length so that your hands look well-groomed;
- Apply one coat of base varnish first and let it dry slightly. Then apply the second layer, but without waiting for it to dry, start applying mica to your nails. This is done like this: dip an orange stick (toothpick or dots) in water to remove the electrification, then pick up a little mica on the tip and transfer it to the nail, laying it out in the desired order. If you want to cover the entire nail plate with mica, you can use a brush, also dipping it first in water, then in mica.
- Finish the manicure with a dryer or any other top coat.
Required tools and materials
As previously stated, this type of manicure does not require any special means or tools; a minimum set will be enough. Let's take a closer look at what tools you may need and their purpose.
- Scissors or nail clippers are used to easily trim the excess length of the free edge of the nail plate. Some people use these items to remove cuticles, but this should not be done, as you can easily get injured.
- File for processing the free edge of the nail.
- It is necessary to have special scissors for removing cuticles, as with them the procedure will be safer and painless.
- In some cases, you may need so-called cutters - pliers designed to remove the skin of the nails.
- A container for water in which you can make a bath for your nails and soften the cuticles.
- You will need a couple of dry, clean towels or thick paper napkins.
- To prepare a bath, you need to acquire special salts and oils, or you can use ordinary hand soap.
- Some people use orange sticks or a special spatula. Typically, such tools are double-sided - on one end there is a pusher for pushing back the cuticle, on the other there is a sharp scraper used to remove it.
- If you wish, you can use a cuticle remover, but if you have the other listed tools, this is not at all necessary.
- To treat the surface of the nail, you will need a soft file - a buff, which will help smooth out all the roughness and give the nail plate a glossy shine.
- For decoration, you need to get nail polish, and for a more durable coating, it is better to use shellac.
- At the end of the procedure, you must use cuticle oil or hand cream containing beneficial substances and vitamins.
Therapeutic manicure made from iodine
The beneficial properties of iodine have long been used to give nail plates greater strength and get rid of fungus. If you cannot afford to buy expensive drugs or often visit a medical manicure office, you can do home baths according to the following scheme:
- Pour warm water into a container that can fit both of your hands at the same time. Add 20 drops of iodine. It is better to purchase a bottle with a dispenser, so it will be easier to measure the required amount, and the price is not much higher.
- Dip the fingers affected by mycosis into the water. Keep them there for 20-25 minutes.
- Take your hands out and wipe them. Repeat these simple steps every day until you achieve the desired result.
This method is long and will require considerable endurance and discipline. Treating fungus with a specialist is much faster.