Home / Beauty / Manicure and pedicure
Cosmos manicure seems to be created for girls who want to stand out from the crowd.
It is becoming increasingly difficult to surprise with flowers, ornaments and compositions made of rhinestones, and the theme of space fills the image with magic and alluring appeal, so fresh and extraordinary designs quickly burst into the world of manicure fashion and over the course of several seasons managed to win many fans.
How to do a manicure with a space design: step-by-step instructions
1
First you need to prepare your nails for applying polish. To do this, file them to give the desired shape: the “space” design suits both short nails and long oval or square nails. To make your manicure look neat, remove/push back the cuticles using a special product (it will soften the skin) and an orange stick. At the end, do not forget to sand the surface of the nail with a buff file. For those who do not yet know how to do a basic manicure, we have prepared a special training video.
2
First, apply a base coat to your nails. It will even out the relief of the plate, protect it from pigment penetration into the deep layers of the nail and prolong the durability of the manicure. Apply the base in one or two layers and wait until it dries completely.
© makeup.ru
3
We chose black as the main color (it can be replaced with rich blue or purple). Our idea is to create a whole galaxy on your nails: on a black background the design will look most advantageous.
© makeup.ru
4
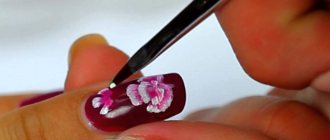
We will draw planets, stars, the milky way, moonlight. To make them bright and contrasting, first schematically outline the contours of the main shapes with white varnish. Use a thin brush for this. Draw lines, triangles, and depict stars using dots scattered randomly across the entire surface of the plate, as in the photo below.
© makeup.ru
5
Take a very thin brush and fill it with yellow varnish, using it to outline several shapes. Fill others with light green or dark yellow, slightly mixing them together.
© makeup.ru
6
Next, apply an orange-red or peach-colored polish to your brush to create an ombre-style transition on some shapes.
© makeup.ru
7
Using a rich pink polish, paint two or three circles, add some contrasting colors to the figures in the immediate surroundings. Don’t worry if the varnish blends a little into other colors: this will make the drawing look even more interesting, more abstract and three-dimensional.
© makeup.ru
8
Use the thinnest brush or dots to pick up a dark blue shade and add small dots.
© makeup.ru
9
Add a few more strokes of color where they are missing. The drawing should be very bright and colorful. Feel free to place colorful dots in different places, creating the effect of a starry sky.
© makeup.ru
10
The final touch is the top coat. Distribute it over the entire surface, achieving a perfectly even effect. If necessary, apply two coats. The top will protect your manicure from chips and cracks and add a glossy shine to it. If you want to play with the design, try using a matte finish instead of the usual one.
© makeup.ru
Manicure is ready!
© makeup.ru
Benefits of Galactic Design
- looks truly fascinating;
- It is very easy to do even at home;
- due to the “multi-layering” design will last much longer than conventional varnishes;
- this design can also be made using gel polishes;
- each time the options may differ, because it depends only on you what kind of pattern you will make;
- this manicure is ideal for every day and for an important event or occasion;
- suitable for any dress, any jeans or T-shirt;
- the owner of such a design will definitely be the most original and eye-catching.
Nail design with space on short nails
“Space” manicure, unlike most nail designs, looks equally attractive on both short and long nails. Here are three examples of exactly how you can depict a scattering of stars on a small nail plate.
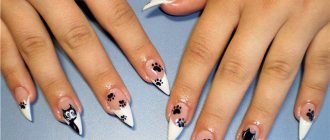
- The easiest way is to simply paint your nails with black or dark blue polish and use an orange stick to put white dots, which will symbolize the stars in the night sky.
© Getty images
- You can paint your nails with a deep blue polish, add some white streaks and stars (you will need a thin manicure brush), and apply a clear coat with shimmer or glitter on top.
© zizivavoom
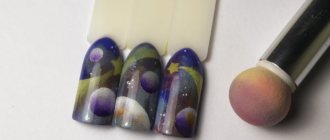
- The third option is more difficult to implement, but the effect is more believable. To replicate the look below, you'll need a clean makeup sponge that you won't mind ruining, and at least five shades of nail polish. Find detailed instructions here.
© Makeup.ru
Some useful tips
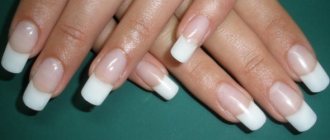
- The first stage of any manicure is straightening the length and shape of the nails and removing the cuticle. If your nails are of different lengths and shapes, no nail art will save you. Before painting your nails, tidy them up.
- The process will take a lot of time, so take time for yourself and don’t be distracted from your creativity.
- It’s almost impossible to ruin a space manicure; your imagination will definitely help you.
This is an ideal option for creative people. Let the flight of your fantasies be unlimited. To create a fashionable and unique manicure, close your eyes for a second, dream, plunge into outer space. Then, ideas will definitely flow to you in a deep stream. You will reward yourself with a good mood, a charge of positive emotions, and your image will become irresistible, unique and newfangled.
Photo gallery: unusual nail art
Video: how to do a manicure in space style yourself
Manicure in space style on long nails
You have already seen that space manicure looks extremely impressive on long nails by studying the photo instructions above. How else can you approach this issue?
- Try painting your nails with black polish and adding lots of small dots of white polish on top. The second option is to find a special coating with glitter that will look like a starry sky on your nails. The main thing in this look is to alternate large and very small “stars” so that it is immediately clear what exactly is depicted on the nails.
© sugibaker
- The night sky on your nails can also be created using the ombre technique. Study our instructions, in which we discuss the issue in detail.
© your.angelok
Gel polish application
The advantages of gel polishes are undeniable. Even after a few weeks, the created cosmic manicure will decorate your nails. Of course, if the application technique was followed and quality products were used. In addition to colored gel polishes, you will need a primer, base, top coat and a UV lamp. You can also use an LED lamp.
Applying gel coating requires some skill. It’s better to practice on artificial tips first, and then experiment with your own nails.
Application is not much different from the previous method. Only first the nails are covered with primer and base. Each layer of varnish is dried in a lamp. You can experiment with a diamond coating - this will make your nails appear voluminous, shimmering with new colors in good lighting.
You can paint planets and stars on your nails with acrylic paints. Or you can use thermovarnish as a base , which will change its color when the temperature changes . It looks very original - a space manicure will definitely acquire an additional zest!
Secrets of a perfect manicure
- The result largely depends on the quality of the tools and means used. So, files should carefully file the plate and not scratch it, and wire cutters and scissors should be well sharpened. Don’t neglect special products: remover will help soften the cuticle skin so that it is easier to remove/remove, and oil will help moisturize it so that it does not grow back so quickly.
© makeup.ru
- Experiment with shades to create interesting color combinations. And take a closer look at decorative coatings for nails - with special effects: matte, magnetic, metallic. By the way, the latter would be very appropriate in a space manicure.
© makeup.ru
- If you are not confident in your abilities, first practice on paper - draw the necessary shapes on a sheet of paper. In this case, use varnishes and brushes that you are going to use in a real manicure. Remember that you can always resort to using special stencils and stickers.
Did you manage to repeat the space image following our instructions? Share your experience in the comments!
How did the fashion for cosmic nail art appear?
The theme of space has been trending for several years now. Distant galaxies and the vast expanses of the universe began to excite the hearts of modern girls when films about travel to the stars and intergalactic battles began to regularly appear in movie theaters. The fashion industry quickly picked up on popular motifs, and designers began to create clothing and accessories decorated with images of mysterious nebulae, bottomless starry skies, fantastic shuttles and astronauts.
The trend has also affected nail salons. The first attempts to depict the mysterious cosmos on nails looked quite simple and not very impressive: glitter and rhinestones were glued onto dark-colored varnishes, and stickers were transferred. Today, there are much more options for creating cosmic nail designs, and modern techniques and tools allow you to create real masterpieces that will take your breath away.
Beautiful examples
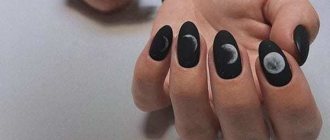
- cosmic “cat's eye” for those who are not ready for radical experiments, but want to wear space on their nails;
- “ink” galaxy with stars and planets, as well as on a magnetic substrate;
- multi-colored “space” created using a sponge;
- galaxy made of white, blue, dark blue.
To learn how to design nails in the “Space” style, watch the following video.
“Space” manicure ideas 2022-2023 – photos
If you still haven’t found an idea for your own ideal space manicure, it doesn’t matter. The following photos will definitely give you inspiration and valuable ideas.
Coating methods
Sponge
Using a sponge, you can create both an “ombre” effect (or, as it’s called, a gradient) and a starry galaxy. For this, both separate pieces of sponge are used, each painted with its own shade of varnish and applied to the nail one by one, and a solid sponge, onto which, in fact, the entire “galaxy” is applied and transferred to the nail. The main requirement for a sponge: it must be dense, not loose and immaculately clean.
It is unacceptable to use a sponge that has previously been used to apply foundation or other cosmetics to the face.
Glitter
With the help of glitter - small and large sparkles - the nails are given shine. Glitter (like its smaller “brother” shimmer) can either be contained in varnish (or topcoat) or packaged separately in jars. Accordingly, it can be applied both with varnish and on top of it. The intensity of application depends solely on your desire: whether there will be a path of stars in your “space” or the entire galaxy will be covered with star dust, it’s up to you to decide.
Photo design
If for some reason you don’t want or don’t know how to paint with gel polishes, but really want to see a “cosmic” design on your nails, there is a solution for you. The easiest way to create galaxy nails is to use sliders, which are now sold in great numbers in all professional cosmetics stores. They can be used on both regular polish and gel polish. There is only one technology: the slider needs to be wet, then carefully separated from the paper backing and transferred to the nail plate. Next, if the nails are covered with gel polish, a top coat is applied to the slider and the hands are dried in a lamp. If the manicure is done using regular varnish, the slider is covered with a drying top and allowed to dry naturally.